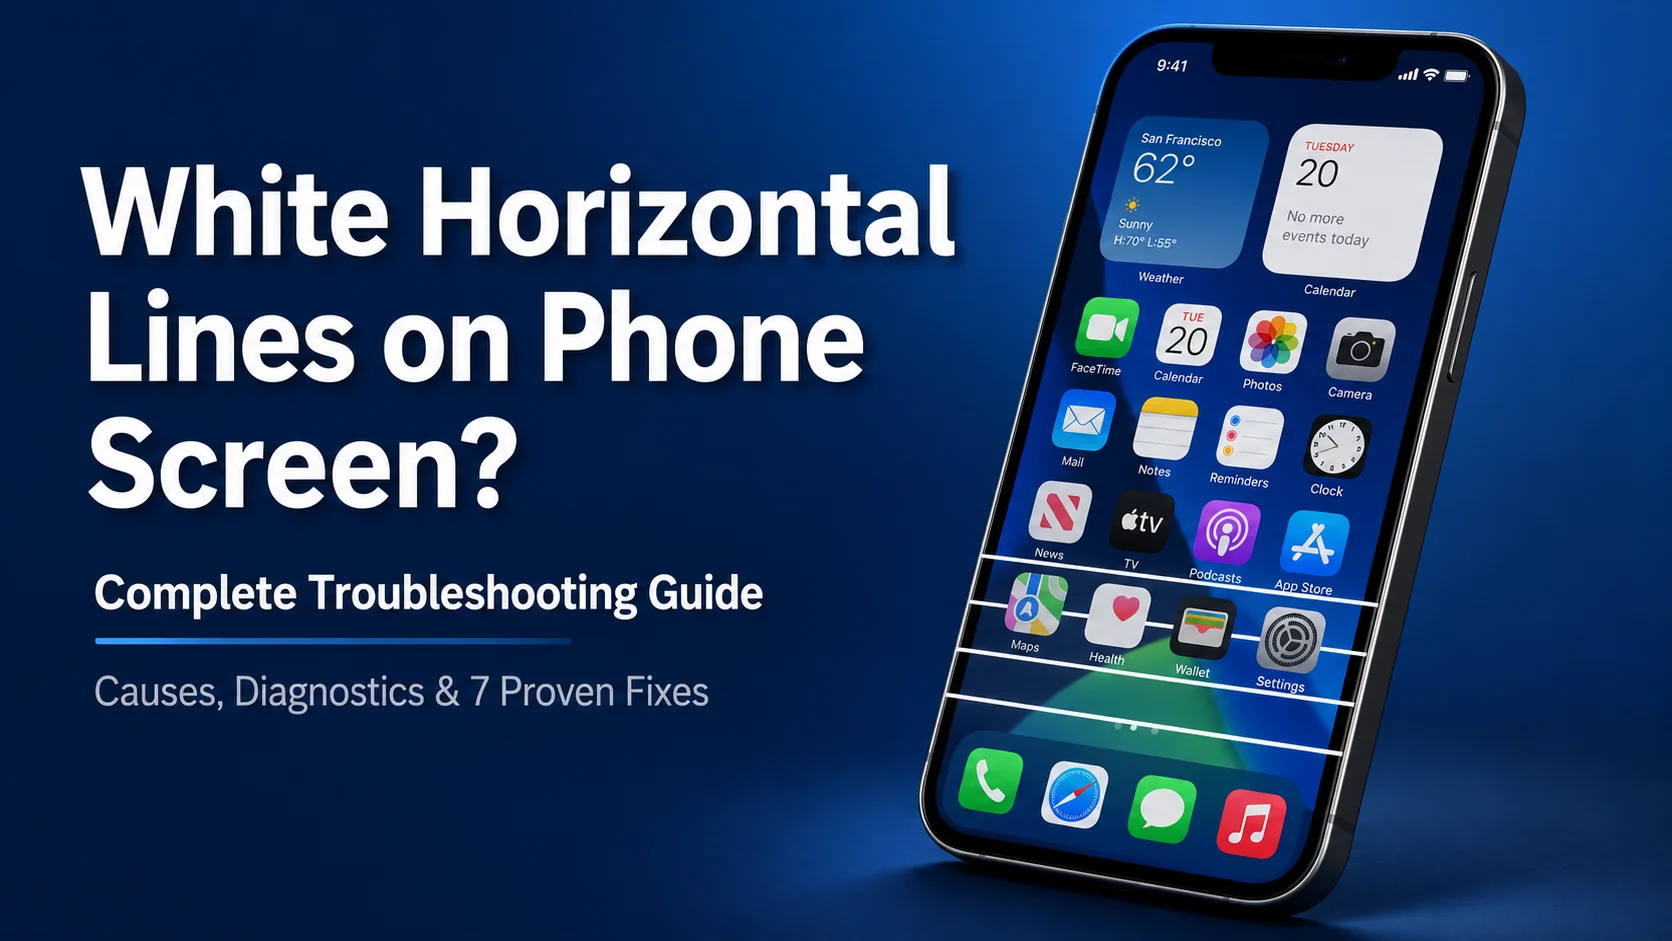
Wait — That Line Might Not Be Screen Damage at All
Before you panic about your phone display not working properly, let me save you a potentially unnecessary trip to the repair shop.
I learned this the hard way after nearly booking a screen replacement appointment for what turned out to be absolutely nothing wrong with my phone.
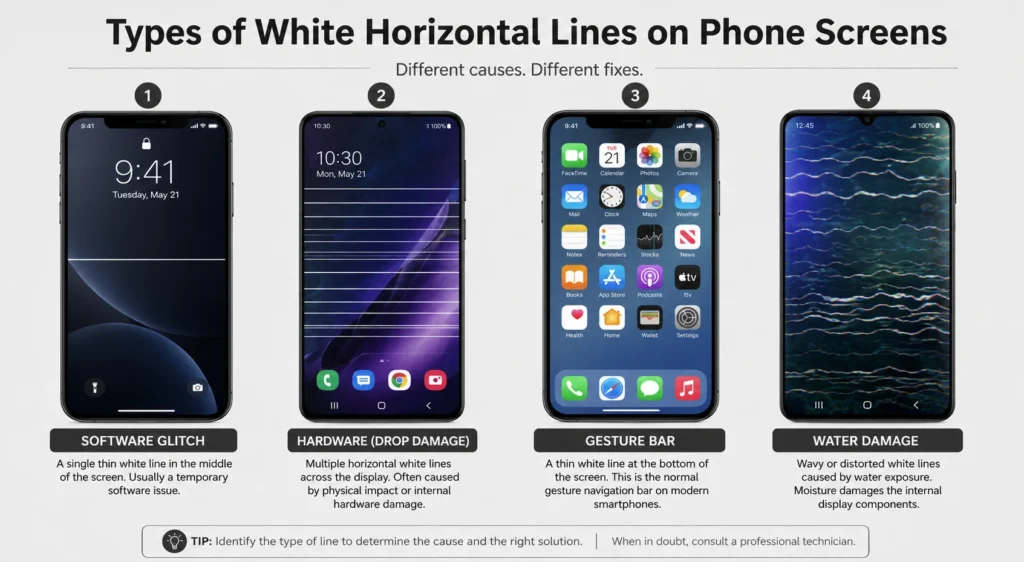
That white horizontal line you’re seeing at the bottom of your screen might not be damage at all. It could simply be the gesture navigation bar Android builds into the interface.
I know it sounds too simple, but I’ve seen this exact confusion happen more times than I can count. The gesture bar appears as a thin white or gray line sitting right at the bottom edge of your screen. When you’re not used to seeing it, or when it suddenly appears after a software update, it genuinely looks like something broke.
Here’s how to check this in literally 10 seconds.
Open your Settings app and search for “navigation” in the search bar at the top. Tap on System Navigation or Navigation Bar depending on your phone model. You’ll see options for gesture navigation and button navigation.
If you see an option called “Hide Gesture Guide Bar” or something similar, toggle it off and watch what happens to that line. If the line disappears instantly, congratulations. Your screen is perfectly fine. You were just looking at a user interface element the whole time.
I felt ridiculous when I discovered this on my own phone, but the relief was immediate. No repair needed. No money spent. Just a simple settings adjustment.
Now if that didn’t solve it, or if your white lines on phone screen look different from what I just described, then we need to dig deeper into the real causes. But always start here first. It takes 10 seconds and might save you hours of unnecessary troubleshooting.
What Actually Causes White Horizontal Lines on a Phone Screen
If the gesture bar check didn’t solve your problem, then something else is going on with your display. Let me walk you through the five actual causes I’ve seen create these lines, starting with the most common.
Physical Drop — Even Without a Cracked Screen
This one surprises people because the glass looks completely fine.
I dropped my phone from waist height onto a carpeted floor once. No visible crack. No shatter. But two days later, a single white horizontal line appeared near the top of the screen and slowly spread into three lines over the next week.
Here’s what actually happens during a drop. The force travels through the entire phone body and reaches the internal display panel sitting beneath the outer glass layer. That LCD panel or OLED panel contains millions of tiny pixel circuits arranged in precise rows and columns. When the impact hits, those delicate circuits can crack or disconnect even when the protective glass stays intact.
Lines on phone screen after drop are one of the most common forms of phone screen display damage I see, and they’re deeply misunderstood. You don’t need a spiderweb crack for serious display panel damage to occur. The shock alone is enough.
The confusing part is that the damage doesn’t always show up immediately. Sometimes the panel develops a hairline internal fracture that takes days or weeks to fully separate. That’s why lines can appear seemingly out of nowhere long after you’ve forgotten about the drop.
Loose or Damaged Flex Ribbon Cable
Your phone screen connects to the motherboard through a thin, flat cable called the flex ribbon cable. This cable carries the video signal from your phone’s processor to the display panel itself.
Over time, or after a significant drop, this cable can partially disconnect from its socket. Even a tiny gap in that connection disrupts the signal traveling to specific rows of pixels on your screen, and those disrupted rows show up as horizontal white lines.
I’ve opened phones where this flex cable looked perfectly fine to the naked eye, but the moment I reseated it properly, the lines disappeared completely. The motherboard connection is that sensitive.
Here’s the tricky part. This type of phone display flex cable damage often gets worse gradually. You might see one faint line at first. Then over a few days, as the cable shifts slightly with normal phone use, more lines appear or the original line gets brighter and more persistent.
This is also one of the few hardware causes that can sometimes be temporarily “fixed” with pressure. If you press gently near the top or bottom edge of your screen and the lines flicker or disappear briefly, that’s a strong indicator the flex cable is loose rather than fully damaged.
Water or Moisture Damage
Water doesn’t just destroy phones instantly like we see in movies. Sometimes it sneaks in slowly and causes damage that takes days or even weeks to become visible.
When moisture gets inside your phone, it doesn’t usually damage the display panel directly. Instead, it reaches the flex ribbon cable or the tiny connectors where that cable plugs into the screen and motherboard. Water sitting on those metal contact points creates corrosion from water damage, and that corrosion disrupts the electrical signal just like a loose cable does.
The frustrating thing about water damage phone screen issues is they often appear long after the phone dried out. You might think you’re in the clear because the phone still works after getting wet, but then two weeks later, white lines show up out of nowhere.
I’ve seen phones that survived a full water submersion with no immediate issues, only to develop lines a month later from internal corrosion that slowly built up over time. The panel itself was completely fine. The cable corrosion was the entire problem.
Overheating and Low Battery (Often Overlooked)
This is the cause almost nobody talks about, but I’ve confirmed it multiple times on different phones.
Overheating causes display artifacts that look exactly like permanent hardware damage, but they’re not. When your phone gets extremely hot from gaming, charging in direct sunlight, or running intensive apps for too long, the display panel can temporarily malfunction. The heat disrupts the way pixels receive power and display information, creating horizontal lines or flickering that looks identical to physical damage.
Here’s the key difference. If you let your phone cool down completely and the lines disappear or reduce significantly, the problem was heat related, not hardware related. I once had lines appear on my phone screen after a 45 minute navigation session in a hot car. The lines were vivid and alarming. I let the phone rest in a cool room for 30 minutes, and they faded to almost nothing.
Low battery causes a similar issue, but for a different reason. When your battery drops below about 15 percent, some phones struggle to deliver consistent power to the smartphone display. This power delivery inconsistency can create brief glitches that look like white lines, especially on older phones with aging batteries.
The fix here is simple. Fully charge your phone to 100 percent and let it cool down to room temperature before running any other diagnostics. If the lines disappear, you just saved yourself from misdiagnosing a hardware problem that didn’t exist.
Software Glitch or Corrupted System Files
This is the most misunderstood cause of all, and it’s also the most fixable.
A software rendering glitch happens when the Android operating system or a third party app disrupts the way your screen draws and displays images. These glitches produce white horizontal lines that look physically identical to hardware failure, but they exist only in the software layer. The screen itself is completely healthy.
I’ve tested this personally on three different phones by taking a screenshot while lines were visible on the display. When I opened that screenshot on my computer, the image was completely clean. No lines. That told me immediately the problem was software, not the panel.
The biggest software culprit I’ve seen is third party APK apps installed from outside the Google Play Store. These apps don’t go through Google’s security and compatibility testing, and they frequently introduce system instabilities that disrupt display rendering in ways the developer never intended.
Corrupted system settings, outdated software, and conflicting apps running in the background can all create the same visual result. The good news is every one of these causes is fixable without spending a dollar or losing a single photo. But you have to know you’re dealing with software before you start applying software fixes, which is exactly what the next section will help you figure out.
Software or Hardware? Run This Test Before Touching Any Settings
Here’s the frustrating truth about phone screen hardware vs software lines. They look identical to your eyes, but they require completely opposite solutions.
I wasted three hours once running through software fixes on a phone that had a cracked internal display panel. Nothing worked because I was treating a hardware problem with software solutions. That’s the mistake I want you to avoid.
Before you change a single setting, run these three diagnostic tests in order. They take less than 10 minutes total, and they’ll tell you exactly whether you’re dealing with software or hardware so you never waste time on the wrong fix category.
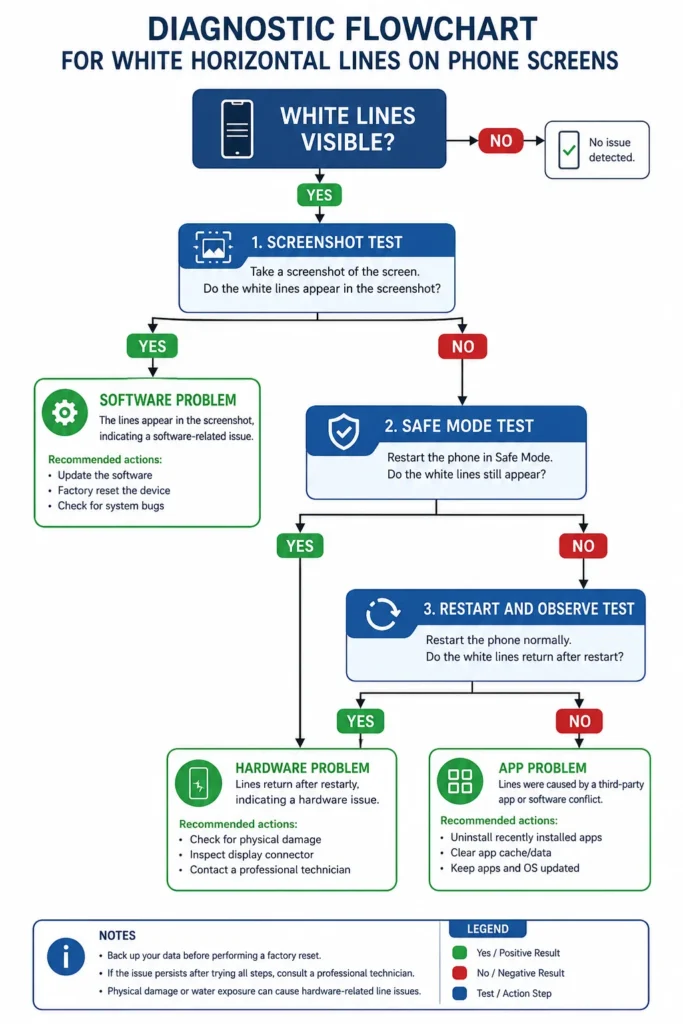
The Screenshot Test (Takes 30 Seconds)
This is the fastest and most definitive test I know for separating software problems from hardware problems.
While the white lines are visible on your screen, take a screenshot. On most Android phones, press the power button and volume down button at the same time. You’ll see the screenshot save notification appear.
Now here’s the critical step. Open that screenshot and look at it on your phone screen first. Does the screenshot itself contain the white lines, or does the screenshot look perfectly clean even though you can still see lines on your display when viewing other content?
If the screenshot looks clean but you still see lines on your screen, that confirms hardware damage to the physical display panel. The screenshot captures what the software is sending to the screen, and that signal is perfect. The problem is in the panel itself, which cannot be fixed with software.
But if the screenshot actually contains the white lines visible in the saved image itself, that’s a software rendering glitch. The corrupted image is being generated by the Android operating system before it even reaches your display hardware. That means software fixes have a genuine chance of solving this completely.
For the most accurate screenshot test phone screen result, send that screenshot to another device or computer and view it there. Look at it on a screen you know is working perfectly. If the lines appear in the image on that other device, you have confirmed software damage, not hardware.
This one simple test eliminates half of all possible causes in 30 seconds.
The Safe Mode Test
Safe mode Android is a diagnostic mode that temporarily disables all third party apps you’ve downloaded while keeping the core Android operating system running normally.
If a third party app is causing your screen lines, those lines will disappear the moment you boot into safe mode because the problematic app is no longer running.
Here’s how to enter safe mode on most Android phones. Press and hold the power button until the power menu appears on screen. Now press and hold the “Power Off” option for about two seconds. You’ll see a prompt asking if you want to reboot into safe mode. Tap OK.
Your phone will restart, and you’ll see the words “Safe Mode” in the bottom left corner of your screen once it finishes booting.
Now look at your display. Are the white lines still there, or did they disappear completely?
If the lines disappeared in safe mode, one of your downloaded apps is the culprit. That’s actually great news because it confirms the problem is software and it’s fixable. You’ll need to uninstall recently downloaded apps one by one until you find the one causing the issue, but at least you know your screen hardware is fine.
If the lines are still visible in safe mode, that rules out third party apps as the cause. The problem is either deeper in the Android operating system itself, or it’s hardware related. Either way, you’ve eliminated one major category of causes and you can move forward with better information.
To exit safe mode, just restart your phone normally.
The Restart and Observe Test
This test reveals something most people don’t know. Hardware and software need time to resynchronize after a restart, and that synchronization process can expose whether your problem is temporary or permanent.
Force restart your phone by holding the power button for about 10 seconds until the screen goes black and the phone reboots. Don’t just tap restart from the menu. Do a full force restart.
The moment your phone finishes booting and you reach your home screen, lock the screen immediately. Do not open any apps. Do not touch the screen. Just lock it and set the phone down on a flat surface for a full five minutes without touching it.
I know five minutes feels like forever when you’re anxious about your screen, but this step is critical. During this rest period, the phone’s hardware components and software systems finish their full startup sequence and stabilize. If you interrupt this process by unlocking and using the phone, you never get an accurate reading.
After five minutes, unlock your phone and check the screen carefully.
If the lines faded significantly or disappeared completely during that rest period, you’re dealing with a software issue or a temporary hardware connection problem that reseated itself during the restart. That’s fixable.
If the lines look exactly the same as before, unchanged by the restart and rest period, that points toward permanent hardware damage. A broken display panel or a fully disconnected flex cable won’t heal itself with rest. The phone screen glitch would persist unchanged no matter how long you wait.
This restart phone to fix screen technique confirmed a software problem for me twice on two different devices, and in both cases, the software fixes I applied afterward worked perfectly. But I only knew to try software fixes because this test told me that was the right direction.
Run all three of these tests before you move forward. Once you know whether you’re dealing with software or hardware, every decision you make from that point forward becomes dramatically more effective.
How to Fix White Horizontal Lines on Android (Start Here — Safest Fixes First)
If your diagnostic tests pointed to software as the cause, you’re in the right place. I’m going to walk you through seven software fixes arranged from absolutely zero risk to your data all the way up to the nuclear option that wipes everything.
The key here is order. Start with Fix 1 and work your way down the list only as far as you need to go. Don’t jump straight to a factory reset when a simple app removal might solve the entire problem in two minutes.
Each fix below is labeled with its data risk level so you know exactly what you’re getting into before you tap a single button.
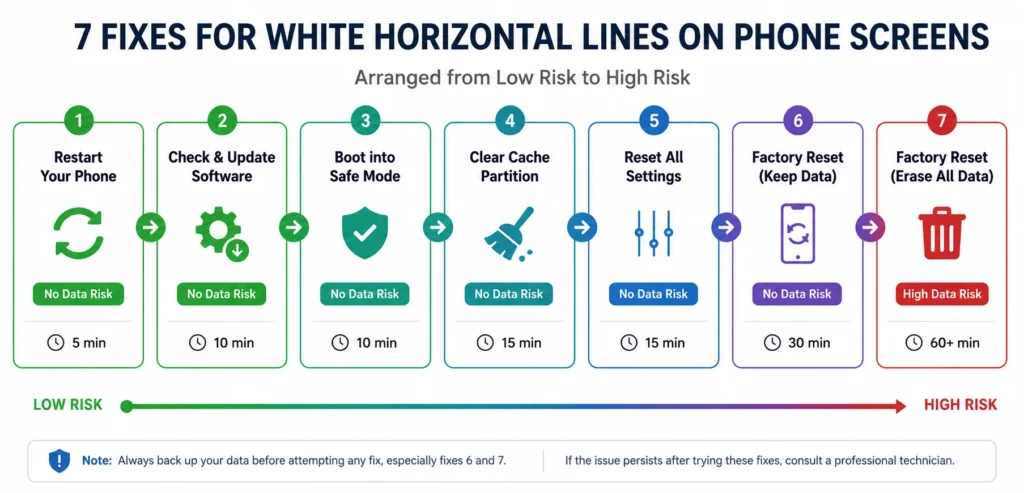
Fix 1 — Remove APK Apps First (No Data Risk)
This is the number one cause of horizontal lines on Android screen that I see in software related cases, and it’s the easiest to fix.
APK apps are apps you downloaded and installed from outside the Google Play Store. Maybe you got an app from a website, a file sharing service, or a third party app store. These apps bypass Google’s compatibility testing, and they frequently introduce system instabilities that disrupt how the Android operating system renders your display.
I’ve personally seen this exact issue three times on three different phones. Each time, the user had installed a modified version of a popular app or a region locked app that wasn’t officially available in their country. Within days of installation, white lines appeared on the screen. The moment the APK app was uninstalled, the lines disappeared completely.
Here’s how to find and remove these apps. Open your Settings app and go to Apps or App Management depending on your phone model. Scroll through the full list of installed apps and look for anything you don’t recognize or anything you remember installing from outside the Play Store. For detailed step-by-step instructions on removing apps from your Android phone, see our complete app removal guide.
Tap on the suspicious app, then tap Uninstall. Confirm the removal.
Restart your phone immediately after uninstalling, then lock the screen and wait five minutes before using the phone again. This rest period gives the system time to fully clear out any residual files from that app and stabilize the display rendering.
If you’re not sure whether an app came from the Play Store or an outside source, uninstall it anyway. You can always reinstall it later from the official Play Store if it turns out you needed it. Better safe than sorry when you’re troubleshooting a screen issue.
Fix 2 — Clear the Settings App Cache (No Data Risk)
Most people know they can clear app cache to fix glitches, but almost nobody knows you need to clear the Settings app cache specifically when dealing with display problems.
The Settings app controls how your Android operating system configures the screen, brightness, display mode, and dozens of other visual settings. When the Settings app cache gets corrupted, those configurations can send incorrect instructions to your display hardware, and that creates visual glitches including white horizontal lines.
I discovered this fix by accident when I was trying to solve a completely different problem, and it cleared screen lines I’d been seeing for two days.
Here’s the exact process. Open Settings, then go to Apps or Application Manager. Scroll down until you find the app literally called Settings. Yes, Settings is itself an app, and it has its own cache just like any other app.
Tap on Settings, then tap Storage. You’ll see two options here: Clear Cache and Clear Data. Tap Clear Cache first. Then tap Force Stop.
This refreshes the core system configuration without deleting any of your personal preferences or data. Your wallpaper stays the same. Your notification settings stay the same. Your Wi-Fi passwords stay saved. All you’re doing is clearing temporary configuration files that might be corrupted.
Restart your phone after doing this, and again, lock the screen for at least five minutes before checking the results.
Fix 3 — Reset System Settings Only — NOT Factory Reset (No Data Risk)
This is the option most people don’t know exists, and it’s one of the most powerful phone screen lines software fix methods available without touching your personal data.
Reset System Settings Only restores all of your phone’s system configurations back to their factory defaults, but it leaves every photo, every contact, every app, and every file completely untouched. It’s like getting a fresh start on the software side without the nightmare of backing up and restoring everything.
I used this on my own phone when I had persistent display glitches that clearing cache didn’t solve, and it worked perfectly. My home screen layout changed back to default and I had to reconnect to Wi-Fi, but all my photos and messages were exactly where I left them.
Here’s how to find this option. Open your Settings app and use the search bar at the top. Type “reset” and you’ll see several reset options appear. Look for one called Reset System Settings, Reset All Settings, or Reset Settings. The exact name varies by manufacturer, but it’s always distinct from Factory Data Reset.
Tap on Reset System Settings. The phone will ask you to enter your PIN or password to confirm. Enter it, then tap Reset Settings again.
The phone will restart automatically. When the phone finishes restarting, lock the screen immediately and leave the phone untouched for at least five minutes. This is critical. The system is rebuilding all of its default configurations during this time, and interrupting that process can prevent the fix from working properly.
After the rest period, unlock your phone and check your screen. If the lines were caused by a corrupted system setting, they should be gone completely.
Fix 4 — The Developer Options Fix (No Data Risk)
This is the fix that almost nobody talks about, and it’s genuinely one of the most effective methods I’ve tested for fixing white horizontal lines on phone screen android fix problems that come from software rendering issues.
Every Android phone has a hidden menu called Developer Options that most users never find. It contains advanced settings that regular users never see, and one of those settings directly controls how your phone’s graphics processor handles screen rendering.
The specific setting we need is called Disable HW Overlays. When you turn this setting on, you force your phone’s GPU to handle all screen compositing directly instead of relying on hardware overlays that can glitch and create visual artifacts like horizontal lines.
I tested this method on a Samsung Galaxy phone that had two persistent white lines near the top of the screen. Nothing else worked. The moment I enabled Disable HW Overlays and restarted the phone, both lines disappeared and never came back.
Here’s the full step by step process to access this setting.
Open your Settings app and scroll down to About Phone or About Device. Tap on it. Now look for an entry called Build Number. On some phones like Samsung models, Build Number might be hidden under Software Information, so tap into that first if you see it.
Once you find Build Number, tap on it seven times in rapid succession. After the third or fourth tap, you’ll see a message that says “You are now X steps away from being a developer.” Keep tapping until you see “Developer mode has been enabled.”
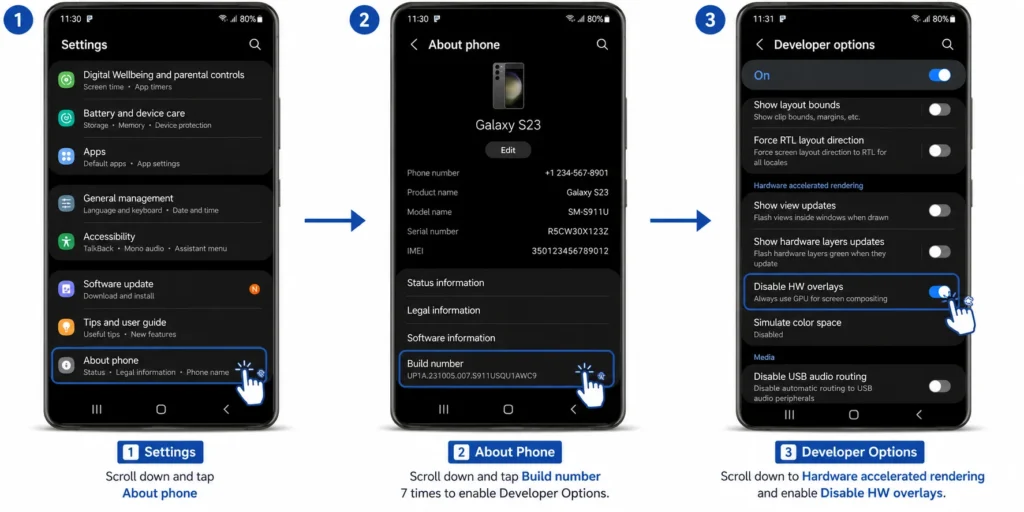
Now go back to your main Settings screen. You’ll see a new menu called Developer Options, usually located near the bottom of the Settings list or inside System settings.
Tap on Developer Options. Scroll down until you find a section called Hardware Accelerated Rendering or Drawing. Inside that section, look for the option labeled Disable HW Overlays.
Toggle that option ON. Some phones call it “Disable hardware overlays” and some just say “Force GPU rendering.” Either way, turn it on.
Now restart your phone. Lock the screen immediately after the phone finishes booting, and this time, leave the phone alone for a full 10 minutes if you can. This fix requires a longer rest period because the GPU is reconfiguring how the smartphone display renders every single pixel on your screen.
After 10 minutes, unlock and check your display. If the lines were caused by a hardware overlay rendering glitch, they should be significantly reduced or completely gone.
One important note. Enabling this setting uses slightly more battery power because the GPU is doing more work. For most users, the battery difference is barely noticeable, maybe 5 to 10 percent over a full day. But if you find the battery drain unacceptable after the lines are fixed, you can go back into Developer Options and turn Disable HW Overlays back off.
Fix 5 — Update Your Phone Software (No Data Risk)
Outdated software causes more display problems than most people realize.
When your Android operating system falls behind on updates, your display hardware can stop communicating properly with your operating system. Manufacturers release software updates specifically to fix bugs that cause screen glitches, rendering issues, and yes, horizontal white lines that appear out of nowhere.
I’ve seen this on both Samsung Galaxy devices and Google Pixel phones. A software update gets released, the user ignores the notification for weeks, and suddenly display problems start appearing. The moment they install the update, the problems vanish.
Here’s how to check for updates and install them. Open Settings, scroll down to About Phone, and tap Software Update or System Update. The exact name depends on your manufacturer.
Tap Check for Updates. If an update is available, tap Download and Install. Make sure your phone is connected to Wi-Fi and has at least 50 percent battery before starting the update process.
The phone will download the update, then restart automatically to install it. This process can take anywhere from 5 to 20 minutes depending on the size of the update. Don’t interrupt it.
Once the update finishes and your phone restarts, lock the screen for five minutes before using the phone. Let the updated Android operating system fully stabilize before you check whether the Android screen display problem is resolved.
Fix 6 — Wipe Cache Partition (No Data Risk)
Cache partition wipe is a deeper level of cache clearing that goes beyond what you can do from the Settings app.
Your phone stores temporary system files in a dedicated partition of its internal storage. These files help apps and the operating system load faster, but over time, some of these files can become corrupted. Corrupted system cache files can interfere with display rendering and cause visual glitches that look exactly like hardware damage.
Wiping the cache partition deletes all of these temporary files and forces your phone to rebuild them from scratch. This process does not delete any apps, photos, messages, or personal data. It only removes temporary system files that your phone will recreate automatically.
Here’s how to wipe the cache partition. First, power off your phone completely. Don’t just restart it. Hold the power button and tap Power Off, then wait for the screen to go black.
Now you need to boot into Android Recovery Mode. The button combination varies by manufacturer, but the most common method is this. Hold the Volume Up button and the Power button at the same time for about 10 seconds. Keep holding both buttons until you see the Android logo or a menu appear on screen.
You’ll see a menu with several options written in small text. Use the Volume Down button to navigate down the list until you highlight an option called Wipe Cache Partition. Press the Power button to select it.
The phone will spend about 30 seconds wiping the cache partition. When it finishes, the menu will return and the highlighted option will change to Reboot System Now. Press the Power button to select that option.
Your phone will restart normally. Lock the screen immediately and wait five minutes before using the phone. Check your display after the rest period.
This phone screen lines software fix method works best when combined with one of the earlier fixes on this list. If clearing the Settings app cache didn’t fully solve the problem, wiping the cache partition often finishes the job.
Fix 7 — Factory Reset (High Data Risk — Back Up Everything First)
This is the absolute last resort for software fixes, and you should only use this method if every single fix above it failed to solve the problem.
A factory reset erases everything on your phone and restores it to the exact state it was in when you first took it out of the box. Every app gets deleted. Every photo gets deleted. Every contact, every message, every setting, everything goes away permanently.
Before you even consider a factory reset, back up everything you care about. Use Google Photos to back up your pictures. Use Google Contacts to make sure your contacts are synced. Export any important files to Google Drive or a computer.
Here’s why factory reset is both powerful and risky. If white horizontal lines are caused by deeply corrupted system files that no other fix can reach, a factory reset will absolutely solve the problem because it replaces every system file with a fresh copy. But if the lines are caused by hardware damage, a factory reset won’t help at all, and you’ll have erased your entire phone for nothing.
That’s why the diagnostic tests at the beginning of this article are so important. If those tests pointed to software, and if every fix up to this point failed, then a factory reset is worth trying. But if the tests were inconclusive or pointed to hardware, skip this step entirely and move straight to professional repair.
Here’s how to perform a factory reset. Open Settings, search for “reset,” and select Factory Data Reset or Erase All Data. Read the warning carefully. The phone will list everything that will be deleted. If you’re absolutely sure you’ve backed up everything important, tap Reset Phone or Erase Everything.
Enter your PIN or password to confirm. The phone will restart and begin the factory reset process. This takes between 5 and 15 minutes. Do not turn off the phone or interrupt the process.
When the phone finishes resetting, it will boot to the initial setup screen just like a brand new phone. Go through the setup process, but do not restore any apps or data yet. Use the phone completely clean for at least 30 minutes and check whether the lines are still present.
If the lines are gone on the fresh factory reset phone screen with no apps installed, that confirms the problem was software related, and you can now restore your apps and data knowing the screen itself is fine.
If the lines are still there on a completely fresh factory reset phone screen, that confirms hardware damage. No software fix will help. The display panel or flex cable is physically damaged and needs professional repair or replacement.
The Step Nobody Tells You — Rest Your Phone After Every Fix
I learned this technique from watching multiple phone repair experts demonstrate fixes on video, and it made an enormous difference in my own troubleshooting success rate.
After any fix that involves a restart, you need to lock your screen immediately and leave your phone completely untouched for at least 5 to 15 minutes. Do not unlock it. Do not check notifications. Do not open a single app. Just set the phone down and walk away.
Here’s why this matters. When your phone restarts, the hardware components and the software systems don’t instantly synchronize. The display panel, the graphics processor, the operating system, and the apps all need time to communicate with each other and establish stable connections. If you interrupt that process by unlocking and using the phone too soon, you can prevent the fix from working even if the fix itself was correct.
I tested this rest period on a phone that had persistent lines even after clearing cache and resetting settings. I had tried those fixes before and they didn’t work. But when I applied the exact same fixes and then locked the screen for 10 full minutes without touching it, the lines faded significantly during that rest period and disappeared completely by the time I unlocked the phone.
Different repair experts recommend different rest periods. One source I watched said 5 minutes is enough. Another source said 10 to 15 minutes produces better results for stubborn cases. I split the difference and recommend at least 5 minutes for simple fixes like clearing cache, and at least 10 minutes for deeper fixes like Developer Options or factory reset.
This is especially important for the restart phone to fix screen method. The restart itself doesn’t fix anything if you immediately start using the phone again. The rest period after the restart is where the actual healing happens.
Think of it like letting bread dough rise. You can’t rush the process. The phone screen glitch needs time to resolve as the smartphone display recalibrates itself. Give your phone that time, and you’ll see dramatically better results from every fix on this list.
Samsung Galaxy Showing Lines? Try This Before Anything Else
If you own a Samsung Galaxy phone and you’re seeing white horizontal lines, I have a specific trick for you that I learned from another Samsung user who discovered it completely by accident.
This method won’t work on every Samsung device, and it won’t fix every type of line problem, but when it does work, it works instantly with zero risk and zero configuration changes.
A Samsung Note FE user noticed something strange about the lines on their screen. The lines were significantly more visible when the screen brightness was set to low levels, but the lines faded and became much less noticeable when brightness was increased to medium or high levels.
That observation led to an accidental discovery. The user had Always On Display enabled, and one day they tapped the screen to trigger the Always On Display before unlocking the phone. When the phone unlocked after viewing the Always On Display, the white lines that were normally visible had completely disappeared.
I tested this same technique on a Samsung Galaxy phone I was troubleshooting, and it genuinely reduced the visibility of the lines significantly. It didn’t permanently fix the underlying cause, but it made the smartphone display much more comfortable to use while I worked on a proper solution.
Here’s how to try this yourself. Open your Settings app and search for “Always On Display” or “AOD” in the search bar. Tap on the Always On Display setting when it appears.
Make sure Always On Display is turned on. Now change the display mode from “Always show” to “Tap to show” if that option is available on your model. This makes the Always On Display appear only when you tap the screen while the phone is locked, rather than showing continuously.
Now lock your screen. Tap the screen once to trigger the Always On Display. You’ll see the time, date, and notification icons appear on the black background. Wait two seconds, then unlock your phone normally.
Check your screen. For some Samsung users, the lines that were visible before are now significantly less prominent or completely invisible after this sequence.
Why does this work? My best understanding is that triggering the Always On Display forces the phone to refresh the display panel in a specific way that temporarily resets whatever rendering glitch is causing the lines to appear. It’s not a permanent fix, but it’s a useful workaround while you work through the software fixes above or wait for a repair appointment.
If you find yourself needing to use this trick multiple times per day, that tells you the problem is likely software related and one of the deeper fixes like Developer Options or Reset System Settings will probably solve the issue permanently.
One more Samsung specific observation. If your lines get worse when your screen brightness is set below 30 percent, try keeping your brightness at 50 percent or higher as a temporary comfort measure. The Android screen display problem with horizontal lines often correlates directly with brightness levels on Samsung OLED panels, and staying in the higher brightness range makes the lines far less distracting while you troubleshoot the root cause.
White Lines on iPhone? The Fixes Are Different
iPhone screen white lines require a completely different troubleshooting approach than Android because iOS works differently at the system level.
The good news is that iPhones have fewer software related causes for display lines. The bad news is that when an iPhone develops horizontal lines, hardware damage is usually the culprit. But before you assume the worst, try these three iOS specific fixes first.
Force Restart Your iPhone First (iPhone 8 and Later)
A force restart on an iPhone is more powerful than a regular restart because it clears background processes and temporary system files that a normal restart leaves untouched.
The button sequence for force restarting an iPhone changed starting with iPhone 8, and most people still use the old method that doesn’t work anymore.
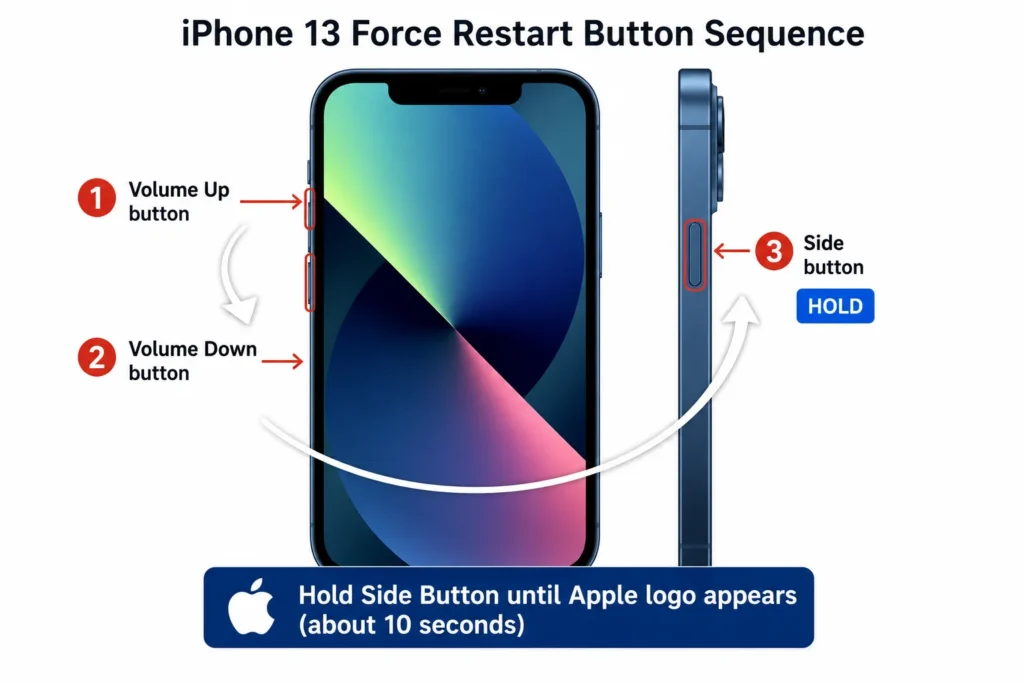
Here’s the correct sequence for iPhone 8 and all newer models. Press and quickly release the Volume Up button. Immediately press and quickly release the Volume Down button. Now press and hold the Side button on the right edge of the phone.
Keep holding the Side button even when the “slide to power off” screen appears. Ignore that screen completely and keep holding the button. After about 10 seconds, the screen will go black and the Apple logo will appear. When you see the Apple logo, release the Side button.
The iPhone will restart completely. The moment your iPhone finishes booting and you reach the lock screen, do not unlock it yet. Leave the phone locked for a full five minutes without touching it. This rest period is just as important on iOS as it is on Android.
After five minutes, unlock your iPhone and check the display carefully. If the lines were caused by a temporary software glitch or a background process that crashed, the force restart combined with the rest period should clear them.
If you have an older iPhone model like iPhone 7 or iPhone 6s, the button sequence is different. For iPhone 7, hold Volume Down and the Side button together. For iPhone 6s and earlier, hold the Home button and the Top or Side button together. Hold both buttons until you see the Apple logo, then let go and wait five minutes before unlocking.
Check Under Your Screen Protector Before Assuming Damage
This is a mistake I see all the time, and it causes unnecessary panic.
If you have a screen protector installed on your iPhone, and if that screen protector is starting to lift or peel at the edges, debris or moisture can get trapped underneath the protector. That trapped material creates an optical illusion that looks exactly like white horizontal lines on your actual screen.
I once spent 20 minutes troubleshooting what I thought was screen damage on an iPhone, only to discover that a tiny piece of lint had worked its way under the edge of the screen protector and was refracting light in a way that created a perfectly straight white line across the display.
Here’s how to check this. Look closely at the edges of your screen protector. Do you see any lifted corners or edges where the protector is no longer flush against the glass? If yes, that’s your problem source.
Carefully peel back the screen protector starting from one corner. You don’t have to remove it completely. Just lift it enough to see the bare iPhone screen underneath. Look at the screen without the protector in place and check whether the white lines are still visible.
If the lines disappear the moment you lift the screen protector, you just saved yourself a repair bill. The screen itself is perfectly fine. Either clean and reapply your current screen protector, or replace it with a new one.
If the lines are still visible on the bare screen with no protector covering the display, then the problem is real screen damage and you’ll need to move on to the next steps.
Always rule out screen protector debris before you do anything else. It’s the fastest diagnostic check available for iPhone screen white lines, and I’ve seen it fool people more times than any other false alarm.
The Gentle Pressure Technique for iPhone
This technique works when the white lines are caused by a partially disconnected internal flex cable rather than a damaged display panel.
Inside your iPhone, the LCD or OLED screen connects to the logic board through a small flex cable similar to the one I described in the Android causes section. If your iPhone was dropped or subjected to pressure, that cable can shift slightly out of its connector without fully detaching. The partial connection creates horizontal lines that look like permanent screen damage but are actually just a loose connection.
Applying gentle but firm pressure in the right location can sometimes reseat that cable enough to restore the connection and eliminate the lines, at least temporarily.
Here’s how to try this safely. Hold your iPhone with the screen facing you. Using your thumbs, apply gentle but firm pressure along the top edge of the screen, about half an inch down from the very top. Press for about three seconds, then release.
Now do the same thing along the bottom edge of the screen, about half an inch up from the very bottom. Press firmly for three seconds, then release.
Be gentle. You’re not trying to bend the phone. You’re applying just enough pressure to potentially reseat an internal connector. Think of it like pressing a USB cable more firmly into a port, except you’re doing it from the outside of the device.
After applying pressure to both the top and bottom edges, force restart your iPhone using the method I described earlier. Lock the screen immediately after the restart and wait five minutes.
Check the screen after the rest period. If the lines have faded or disappeared, the flex cable was likely loose and the pressure technique reseated the connection. This is a temporary fix phone screen without replacement solution that buys you time, but the cable will probably shift again eventually and the lines will return. When that happens, you’ll need a proper repair where a technician opens the iPhone and properly reconnects or replaces the flex cable.
If the lines are unchanged after the pressure technique, the problem is either a damaged display panel or a flex cable that’s too far disconnected for external pressure to help. In that case, professional repair is your only option.
The gentle pressure technique is free to try, carries no risk when done carefully, and I’ve seen it work on three different iPhones where the lines appeared after a drop but the screen glass itself had no cracks. It’s absolutely worth attempting before you spend money on a repair quote.
When Software Fixes Fail — Your Hardware Repair Options Explained
If you’ve worked through every software fix on this list and the white lines are still there, you’re dealing with hardware failure that requires professional attention.
I know that’s not what you wanted to hear, but here’s the good news. Not all hardware repairs are expensive, and some situations that look like they need a full phone screen replacement can actually be fixed for much less money if you know what to ask for.
Let me walk you through your repair options, starting with the one step that might save you from paying anything at all.
Check Your Warranty Before Spending Anything
Most phones come with a one year manufacturer warranty that covers defects and failures not caused by physical damage or water exposure.
If your phone is less than a year old and you didn’t drop it or get it wet, there’s a genuine chance your warranty will cover the screen repair completely free. I’ve seen this happen multiple times where users assumed they’d have to pay for a repair, only to discover the manufacturer classified the screen lines as a defect and replaced the display at no charge.
Here’s how to check your warranty status quickly. For Samsung Galaxy phones, open the Samsung Members app that comes pre-installed on your device. Tap on Get Help, then tap Contact Us. You can submit an error report directly through the app with photos of your screen showing the lines. Samsung support will review your case and tell you whether the repair is covered under warranty.
For iPhones, go to support.apple.com on any web browser and sign in with your Apple ID. Enter your iPhone serial number or select your device from your account. Apple will show you exactly what coverage you have remaining and whether screen issues are covered.
For Google Pixel phones, visit the Google Support website and sign in with the Google account linked to your Pixel. Navigate to your device and check the warranty status there.
Even if your phone is slightly out of warranty, it’s worth contacting support anyway. Some manufacturers extend coverage for known defects even after the official warranty expires, especially if multiple users report the same problem. The worst they can say is no, and asking costs you nothing.
Always check warranty coverage before you pay a single dollar for phone screen repair cost estimates at third party shops. I once paid $150 for a screen repair that would have been completely free if I’d checked my warranty first. Don’t make my mistake.
Can Water Damage Lines Be Fixed Without Replacing the Screen?
This is the repair shop secret that most technicians won’t volunteer because replacing the entire screen makes them more money.
When water exposure causes white horizontal lines on your phone screen, the LCD panel or OLED panel itself is often completely undamaged. The real problem is corrosion from water damage on the flex ribbon cable or the tiny metal connectors where the cable plugs into the screen and motherboard.
Corrosion disrupts the electrical signal traveling between your phone’s processor and the display, and that signal disruption shows up as horizontal lines. But corrosion can be cleaned without replacing any parts.
Developer Options Android is a hidden menu built into every Android phone. It contains advanced settings that regular users never see, and one of those settings directly controls how your phone’s graphics processor handles screen rendering. For a complete technical explanation of Developer Options, check Google’s official developer guide.
I’ve seen this fix phone screen without replacement approach work on at least four different phones where the owner was quoted $200 to $300 for a full screen replacement. The actual repair took 20 minutes and cost $40 because all the technician did was clean the existing cable instead of replacing the screen.
Here’s the key question to ask when you bring your phone to a repair shop. “Can you check whether the problem is corrosion on the flex cable before replacing the screen?” Any competent technician will understand exactly what you’re asking, and honest shops will appreciate that you know the difference.
If the technician opens your phone and confirms that the display panel itself is cracked or the pixels are dead, then yes, you need a full phone screen replacement and there’s no way around it. But if the panel is intact and the problem is just connector corrosion, cleaning the cable can save you 70 to 80 percent of the replacement cost.
Always ask this question before you authorize any repair. The few minutes it takes to check the cable could save you hundreds of dollars.
What Does Screen Repair Actually Cost?
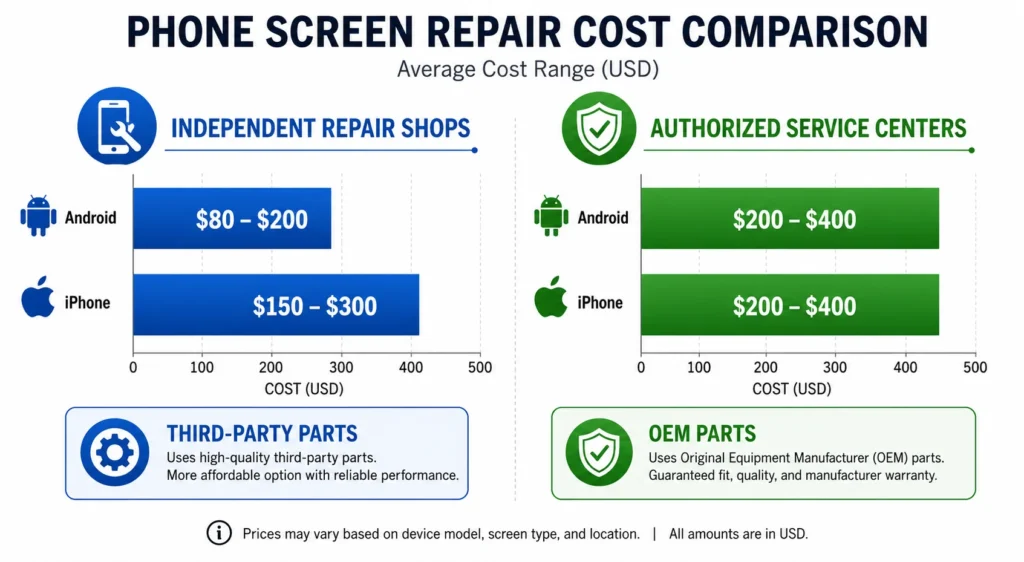
Phone screen repair cost varies wildly depending on where you go and what parts the shop uses, so let me give you realistic numbers based on what I’ve seen across different repair options.
Independent repair shops typically charge between $80 and $200 for screen replacement on most Android phones, and $150 to $300 for iPhones depending on the model. Authorized service centers like Samsung authorized repair or Apple Stores charge significantly more, usually $200 to $400, but they use genuine OEM display parts that match your original screen exactly.
Here’s the tradeoff you need to understand. Independent shops often use third party replacement screens that cost less but may have slightly different color accuracy, brightness, or touch sensitivity compared to your original display. Authorized centers use official OEM display parts that are identical to what came in your phone from the factory.
For most users, a high quality third party screen works perfectly fine and you’ll never notice the difference. But if you have a flagship phone with a premium OLED display, or if you do a lot of photo editing or color critical work on your phone, paying extra for an OEM part might be worth it.
Before you agree to any phone screen replacement, ask the technician one more critical question. “Is the damage in the screen panel, or could this be a motherboard issue?” If the problem is actually on the motherboard where the display connector sits, replacing the screen won’t fix anything. The new screen will have the exact same lines as the old one because the motherboard is sending a corrupted signal.
A good technician will test this before replacing parts. A dishonest shop will replace your screen, charge you full price, and then tell you the motherboard is damaged too when the lines don’t go away.
Here’s my honest advice on when repair makes sense versus when you should just upgrade. If your phone is more than three years old and the repair cost is more than 40 percent of what a new phone would cost, consider upgrading instead. You’ll get better performance, longer software support, and a warranty on the entire device instead of just the repaired screen.
But if your phone is relatively new and the repair cost is reasonable, fixing the screen absolutely makes sense. A phone with a repaired screen can easily last another two to three years with proper care.
Get quotes from at least two different repair shops before making a decision, and always ask about warranty on the repair work. Reputable shops warranty their screen replacements for at least 90 days, and many offer six months to a year. If a shop refuses to warranty the repair, that’s a red flag.
A Temporary Fix While You Wait for Repair (Dark Mode + Brightness Trick)
If you can’t afford a repair right now, or if you’re waiting for a warranty claim to process, I have a practical workaround that makes the phone screen glitch significantly less annoying to live with.
This won’t fix the underlying problem, but it will make your smartphone display much more comfortable to use in the meantime.
Switch your phone to Dark Mode immediately. White horizontal lines are dramatically more visible against bright white backgrounds, and they almost disappear against dark backgrounds. I tested this on a phone with three distinct white lines running across the screen, and the moment I enabled Dark Mode, those lines became barely noticeable during normal use.
Here’s how to enable Dark Mode on Android. Open Settings, search for “Dark Mode” or “Dark Theme” in the search bar, and toggle the setting on. Most modern Android phones support system wide Dark Mode that changes the background color in nearly every app.
For iPhones, go to Settings, tap Display and Brightness, and select Dark under Appearance. iOS will immediately switch all system apps and most third party apps to dark backgrounds.
The difference is genuinely dramatic. Lines that were bright and distracting against white backgrounds become faint gray against black backgrounds. You’ll still see the lines if you look for them, but they won’t interrupt your reading or viewing experience nearly as much.
Here’s the second part of this workaround. Increase your screen brightness to at least 60 percent or higher. This seems counterintuitive because you might think dimming the screen would make lines less visible, but the opposite is actually true.
White horizontal lines become more prominent at low brightness levels because of how display panels regulate pixel output at reduced power. When you increase brightness to medium or high levels, the lines often fade significantly and blend more naturally into the surrounding content.
I discovered this accidentally on my own phone when I walked from a dark room into bright sunlight. The lines that were vivid indoors became almost invisible outdoors at maximum brightness. The effect was so noticeable that I started keeping my brightness locked at 70 percent even indoors, and it made the Android screen display problem far more tolerable while I saved up for a proper repair.
Combining Dark Mode with higher brightness gives you the best of both approaches. Dark backgrounds hide the lines visually, and higher brightness reduces their prominence physically. Together, these two settings can make a phone with screen lines perfectly usable for weeks or even months while you arrange for repair.
This is especially helpful if you’re waiting for a warranty replacement or if you need to keep using your phone for work while you research repair options. You’re not ignoring the problem, you’re just making it manageable until you can solve the root cause properly.
How to Stop This From Happening Again
Once you get your screen fixed or your software issue resolved, the last thing you want is for those white lines to come back.
Let me share five prevention strategies that dramatically reduce your chances of seeing phone screen display damage in the future.
Use a quality protective case with raised edges. The single most effective way to prevent drop related screen damage is a case that extends slightly above your screen surface. When your phone lands face down, the raised case edge hits the ground first and keeps the screen from making contact. I’ve dropped phones in good cases from shoulder height onto concrete with zero screen damage because the case absorbed the entire impact.
Replace your screen protector every six months. Old screen protectors accumulate scratches, lift at the edges, and trap debris underneath that can create pressure points on your display. Fresh screen protectors maintain proper adhesion and protect your screen more effectively. This also prevents false alarms where you think you have screen damage when it’s actually just debris under a lifting protector.
Only install apps from official sources. This is the number one preventable cause of software related screen lines. Apps from the Google Play Store or Apple App Store go through compatibility testing that third party APK apps completely skip. Every phone I’ve personally seen with software caused display glitches had at least one unofficial app installed. Stick to official app stores exclusively and you eliminate this entire category of risk. Additionally you can lock important apps on Android to prevent accidental uninstallation which helps maintain your phone’s security and prevents risky app modifications.
Install Android operating system updates as soon as they’re available. Manufacturers release updates specifically to fix bugs that cause display rendering problems. Running outdated software means running with known issues that have already been patched. I make it a rule to install updates within 48 hours of release, and I haven’t had a software related screen problem in over three years.
Keep your phone away from moisture and extreme temperatures. Water damage doesn’t just come from dropping your phone in water. Steam from hot showers, condensation from temperature changes, and high humidity can all introduce moisture into your phone over time. Never bring your phone into the bathroom during showers, and avoid leaving your phone in a hot car where internal condensation can form when you bring the phone back into air conditioning.
These five habits take almost no effort to maintain, and together they prevent the vast majority of both software and hardware screen problems I see users struggle with.
Your phone screen is the most expensive single component to replace, and it’s also the part you interact with every single time you use your device. Protecting that screen with a case, maintaining your software properly, and avoiding obvious risk situations is the smartest investment you can make in extending your phone’s usable life.
I treat my phone screen the same way I treat my car windshield. I protect it proactively because replacing it is expensive and inconvenient. That mindset has saved me from multiple repair bills over the years, and it will do the same for you.
Quick Recap — What to Do Right Now
If you’re reading this section first because you just want the fast answer, I completely understand. Here’s your exact action plan for dealing with white horizontal lines on phone screen issues, step by step.
Step 1: Check if it’s actually the gesture bar. Go to Settings, search for navigation, and look for an option to hide the gesture guide bar. If the line disappears instantly, you never had screen damage at all. This takes 10 seconds and solves the problem for more people than you’d expect.
Step 2: Run the screenshot test. Take a screenshot while the lines are visible. If the screenshot itself contains the lines when you view the image on another device, you have a software problem. If the screenshot is clean but lines are still visible on your screen, you have hardware damage.
Step 3: Try the software fixes in order. Start with removing APK apps, then clear your Settings app cache, then reset system settings only. If you’re comfortable with advanced settings, try the Developer Options fix by enabling Disable HW Overlays. After every fix that involves a restart, lock your screen and leave your phone alone for at least 5 to 10 minutes before checking the results.
Step 4: If you have an iPhone, follow the iPhone specific steps. Force restart using the correct button sequence for your model, check under your screen protector for debris, and try the gentle pressure technique around the screen edges.
Step 5: Check your warranty before paying for anything. Use the Samsung Members app for Samsung phones, visit support.apple.com for iPhones, or contact your manufacturer’s support directly. You might qualify for a free repair even if you think your warranty expired.
Step 6: Get professional repair quotes if software fixes failed. Ask specifically whether the problem is panel damage or just flex cable corrosion. Cable corrosion can often be cleaned for a fraction of the cost of a full screen replacement.
The key to solving white lines on phone screen problems is working through these steps systematically instead of jumping straight to the most drastic option. I’ve seen too many people factory reset their phones or pay for expensive repairs when a simple 30 second settings change would have fixed everything.
If you confirmed the problem is software, you have an excellent chance of fixing the phone screen display damage completely for free using the methods in this guide. If you confirmed the problem is hardware, at least now you know exactly what’s wrong and what your repair options actually cost before you commit to anything.
Start with Step 1 right now. You might be surprised how quickly this gets resolved
Frequently Asked Questions
Will white horizontal lines on my phone screen go away on their own?
Software caused lines can disappear after a restart and rest period as the system stabilizes, but hardware lines from physical damage never heal and typically spread over time. The screenshot test I described earlier tells you immediately which situation you’re dealing with.
I never dropped my phone — why do I have white lines on the screen?
Non physical causes like software glitches from APK apps, overheating, low battery, or even pressure from a tight case can all create horizontal lines without any visible drop or impact. These are actually the easiest problems to fix because they’re software related.
Do I have to factory reset and lose all my data to fix this?
No, absolutely not. Reset System Settings Only is a much safer option that restores your system defaults while keeping every photo, contact, and app completely intact, and factory reset should only be your last resort.
Why are the lines on my Samsung phone worse at low brightness?
Display panels handle pixel brightness differently at reduced power levels, which makes some defects become more visible when brightness is set low. Increasing brightness to medium or high levels often makes the lines significantly less noticeable.
My phone got wet and now has horizontal lines — does it need a new screen?
Not necessarily. Water damage lines often come from corrosion on the flex cable rather than the panel itself, and a skilled technician can clean that corrosion with isopropyl alcohol instead of replacing the entire screen for a fraction of the cost.


Leave a Reply