
If your Lenovo laptop screen has suddenly gone black, started flickering, or is showing a distorted image, I completely understand that sinking feeling.
You were in the middle of something and now your screen just will not cooperate. The good news is that most Lenovo laptop display issues are fixable at home, often in under a minute, and nothing in this guide will touch your personal files or data.
This display troubleshooting guide walks you through everything step by step from identifying your exact symptom, to trying fixes in order from simplest to most advanced, to deciding when professional repair makes sense.
Whether your screen is completely black, flickering after a Windows update, or showing strange lines, let me show you where to start.
The good news is that most Lenovo laptop display issues are fixable at home, and in many cases the fix takes less than a minute.
This display troubleshooting guide will walk you through everything step by step. I will help you figure out what is actually wrong with your screen, try the fixes in order from the simplest to the most advanced, and then decide whether a professional repair is the right call.
Nothing in this guide will delete your files or data, so you can follow along with confidence.
Whether your screen is completely black, flickering after a Windows update, or showing strange lines and colors, there is a fix here for you. Let me show you where to start.
What Type of Lenovo Display Problem Do You Have?
Before jumping into fixes, it helps to identify exactly what your screen is doing. Lenovo laptop display issues come in several different forms, and each symptom points toward a different cause. Getting this right from the start saves you a lot of time and effort.
Here are the most common display problems I see on Lenovo laptops:
Lenovo laptop black screen The laptop powers on, the keyboard lights up, and you can hear the fan running, but the screen stays completely dark.
This is among the most frequently reported Lenovo display problems and can be caused by anything from a drained battery to a driver crash or a hardware fault.
Lenovo laptop screen flickering or blinking The screen flashes rapidly or blinks on and off while you are using the laptop. Flickering and blinking actually stem from different root causes than a black screen. Flickering is most often tied to software issues like incompatible drivers, a wrong refresh rate setting, or a recently installed app that is conflicting with your display.
White or distorted screen The screen shows a washed out white image, strange colors, or heavy distortion. If you connect your Lenovo laptop to an external monitor and the external display looks perfectly normal, that is a strong confirmation that your laptop screen panel itself is defective rather than the motherboard or graphics chip.
Lenovo laptop screen lines or distortion Horizontal or vertical lines running across the display, or patches of pixels that look wrong, usually point toward either a damaged LCD panel or a loose video cable inside the lid.
Screen works on external monitor but not on laptop display This is a very specific and telling symptom. When the external monitor working but laptop screen not situation happens, it almost always means the internal screen has a physical problem. The good news is the rest of your laptop is likely perfectly fine.
Screen dimming issue on Lenovo or brightness problem The display suddenly becomes very dim or the brightness will not respond to your adjustments. A Lenovo screen brightness problem like this is often caused by auto brightness settings, a driver issue, or Lenovo Vantage settings that need to be adjusted.
Knowing which symptom matches your situation is the first step in this display troubleshooting process. Once you identify your symptom, the sections below will guide you directly to the right fix.
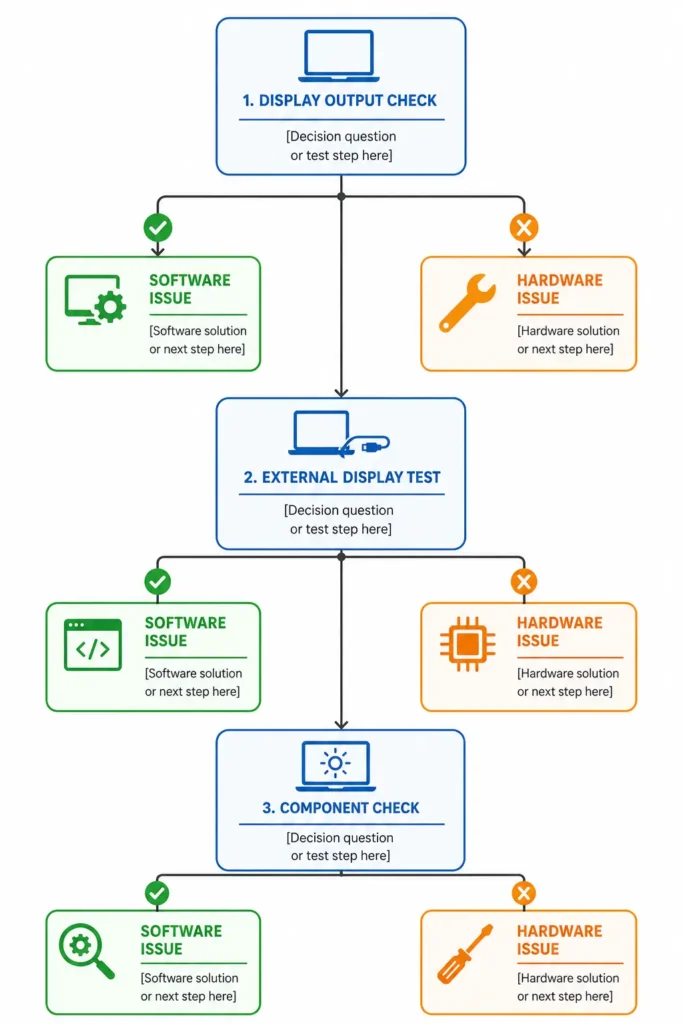
Is It a Software Problem or a Hardware Problem? (Do This Test First)
Jumping straight into solutions without diagnosing the root cause first is one of the biggest time-wasters I see, and it is completely avoidable.
The good news is that most Lenovo display problems turn out to be software related, which means they are fixable at home without spending a single penny.
The Task Manager Flicker Test (30 Seconds)
This is the fastest hardware diagnosis test I know, and it works beautifully for flickering screens.
Here is how to do it:
- Press Ctrl + Alt + Delete on your keyboard
- Click on Task Manager to open it
- Watch carefully — does the Task Manager window flicker along with the rest of the screen, or does the Task Manager stay steady while the background flickers?
Here is what your answer means:
If only the background flickers and Task Manager stays steady: The problem is a software conflict, most likely caused by a recently installed app or a display adapter driver issue. This is great news because software problems are easy to fix.
If both the Task Manager and the background flicker together: The issue points toward a driver level or hardware problem. This does not automatically mean your screen is broken, but it does tell you that driver fixes or deeper diagnostics are the next step.
This single test takes 30 seconds and immediately narrows down your entire troubleshooting path.
The External Monitor Test
This test is especially useful when your Lenovo laptop screen is completely black or showing a white distorted image. The external monitor test tells you whether your Lenovo laptop graphics card and motherboard are working correctly, or whether the internal screen panel itself has failed.
Here is how to run the test:
- Get an HDMI cable and connect your Lenovo laptop to an external monitor or TV
- Power on the laptop and watch what appears on the external screen
- Observe the result carefully
Here is what your answer means:
If the external monitor working but laptop screen not: This is actually a helpful finding. When an HDMI external monitor displays a clear and normal image while the laptop screen stays blank or distorted, it confirms that the GPU and motherboard are both functioning correctly. The problem is isolated to the LCD panel of the laptop screen itself.
If the external monitor also shows a black or distorted image: The issue may be deeper possibly related to the graphics chip or motherboard and professional diagnosis would be the smarter next step.
Running this test first saves you from chasing driver fixes when the real problem is a physical screen fault.
The Safe Mode Boot Test
Safe Mode is a stripped down version of Windows that loads only the essential drivers and nothing else. If your Lenovo display problem disappears in Safe Mode, the cause is definitely a software or driver conflict in normal Windows. If the problem continues in Safe Mode, the issue is hardware related.
Here is a simplified way to enter Safe Mode on a Lenovo laptop:
- Click the Start menu and go to Settings
- Go to Update and Security then Recovery
- Under Advanced Startup click Restart Now
- After the laptop restarts select Troubleshoot
- Go to Advanced Options then Startup Settings then Restart
- When the menu appears press 4 on your keyboard to enter Safe Mode
Now observe your screen in Safe Mode:
If the flickering or display issue stops in Safe Mode: The problem is 100% software related. A recently installed application or a driver conflict is the cause, and the software fixes in the next section will resolve it.
If the display issue continues in Safe Mode: The problem is a hardware issue, not a software conflict. In this case you can skip the driver and software fixes and move directly to the hardware focused sections further in this guide.
These three tests together give you a complete picture of your Lenovo display situation before you touch a single setting.
How to Fix Lenovo Laptop Display Issues (Start Here Step by Step)
Here are seven fixes ordered from fastest to most advanced. Try them in order most people resolve their Lenovo laptop display problem by Fix 3 or Fix 4 and never need to go further.
None of these fixes will delete your personal files or data.
Fix 1 Try This Keyboard Shortcut First (Takes 10 Seconds)
Before you change any settings or restart your laptop, try this keyboard shortcut first. It works for both black screens and flickering displays on Lenovo laptops, and it takes about ten seconds.
Press and hold Windows Key + Shift + Ctrl + B all at the same time.
What this shortcut does is send a signal to your GPU to restart the display driver immediately, without rebooting the entire laptop. The screen will go dark for a second, possibly flash once, and then come back. Give it about 30 to 60 seconds to fully recover before deciding if it worked.
This is the single fastest way to restart a Lenovo laptop with black screen symptoms caused by a frozen or crashed display driver. If your screen comes back after this shortcut, your issue was a temporary driver crash and no further action is needed.
If the screen does not recover after 60 seconds, move to Fix 2.
Fix 2 Hard Reset Your Lenovo Laptop
A hard reset clears the temporary power state stored in your laptop’s memory. This is one of the most effective first steps for a Lenovo laptop black screen, and it is completely safe with no data loss.
Here is how to do it:
- Press and hold the Power Button for about 30 seconds until the laptop completely shuts off
- Wait 10 seconds after the screen goes dark
- Press the Power Button normally to turn the laptop back on
A hard reset on a Lenovo laptop forces the system to start completely fresh, which resolves display issues caused by stuck processes, power state errors, or a display driver that did not load correctly on startup.
If your screen comes back after the hard reset, great. If the laptop starts but the screen is still blank or flickering, continue to Fix 3.
Fix 3 Update or Reinstall Your Display Drivers
Corrupt or outdated display drivers are one of the most common causes of Lenovo laptop display problems, and there is one critical thing most guides get wrong: you need to uninstall both the Monitor driver and the Display Adapter driver, not just one of them.
Uninstalling only the display adapter and leaving the monitor driver in place can mean the issue persists even after a restart.
Here is how to do a full Lenovo display driver update through Windows Device Manager:
- Right click the Start button and select Device Manager
- Expand the Display Adapters section
- Right click your graphics card listed there and select Uninstall Device
- Check the box that says “Delete the driver software for this device” if it appears
- Now go back up and expand Monitors
- Right click the monitor listed there and select Uninstall Device
- Restart your laptop
When your Lenovo laptop restarts, Windows will automatically detect and reinstall both the display adapter driver and the monitor driver fresh. This clears any corrupted driver files that were causing the display issue.
If the problem started after a Windows update pushed a new driver, this fix resolves it in most cases.
Fix 4 Check and Change Your Screen Refresh Rate
A wrong refresh rate setting is one of the most overlooked causes of Lenovo laptop screen flickering, and it very commonly happens after a Windows update quietly resets your display settings. The correct refresh rate for most Lenovo laptop displays is 60Hz, and setting it to anything else can cause constant flickering.
Here is how to check and fix the refresh rate:
- Right click your desktop and select Display Settings
- Scroll down and click Advanced Display Settings
- Click Display Adapter Properties
- Go to the Monitor tab
- Under Screen Refresh Rate change the value to 60 Hertz
- Click Apply then OK
This is a very effective laptop screen flickering fix for Lenovo users whose screen started flickering after a Windows update. The update changes display settings without warning, and manually resetting the refresh rate to 60Hz as part of a Windows display settings reset resolves the flickering instantly in many cases.
If your screen was fine and then a Lenovo laptop screen not working after update situation appeared, this is almost always the first setting worth checking.
Fix 5 Remove Any Recently Installed Apps
Sometimes the cause of a Lenovo display problem has nothing to do with drivers or Windows at all. A recently installed third party application can create a software conflict that directly affects how the screen behaves.
Think back to when your display issue first started — did you install any new software around that same time?
Here is how to remove recently installed apps:
- Open the Control Panel
- Click Programs then Programs and Features
- Click the Installed On column to sort apps by installation date
- Identify any apps installed just before your display issue started
- Right click the app and select Uninstall
- Restart your laptop and check the display
A software conflict from a screen recording tool, a graphics customization app, or even an antivirus update can interfere with how Windows communicates with the display adapter. Removing the recently installed app and restarting often clears the issue completely.
This fix is especially relevant if your Lenovo laptop screen not working after update situation appeared alongside a new software installation on the same day.
Fix 6 Uninstall Recent Windows Updates
Windows updates are helpful most of the time, but occasionally a quality update or feature update ships with a display driver that conflicts with your specific Lenovo hardware. When that happens the screen starts flickering or going black shortly after the update installs.
A quality update is a regular monthly patch that fixes bugs and security issues. A feature update is a larger update that adds new Windows features and can significantly change how drivers behave.
Here is how to uninstall a recent Windows update:
- Press and hold the Power Button to force shut down your laptop 2 to 3 times in a row until you see the Preparing Automatic Repair screen
- Select Troubleshoot
- Select Advanced Options
- Select Uninstall Updates
- First try Uninstall Latest Quality Update and restart
- If the display issue continues repeat the steps and this time choose Uninstall Latest Feature Update
Always try uninstalling the quality update first before touching the feature update, as quality updates are smaller and easier to reverse. This step resolves a Lenovo laptop screen not working after update in the majority of cases where a Windows update was the cause.
Fix 7 BIOS Recovery (For Completely Blank Screens)
This fix is for one specific situation: your Lenovo laptop powers on, the fan runs, the indicator lights are on but the screen shows absolutely nothing no logo, no loading screen, complete darkness. In this case a BIOS level recovery can bring the display back.
The BIOS recovery method works by triggering a built in recovery process in your Lenovo laptop’s firmware. This process is safe and does not delete any of your personal files or data.
Here is how to do it:
- Make sure your laptop is plugged into the charger
- Press and hold the Power Button for at least 15 seconds to fully shut the laptop off
- Now press and hold both the Windows Key and the B key at the same time
- While still holding those two keys press the Power Button once
- You should see a BIOS recovery or BIOS update screen appear
Important warning: Do not turn off your laptop once the BIOS recovery screen appears. Interrupting a BIOS recovery process can cause serious damage to the laptop firmware. Let the process run fully until it prompts you to press Enter to continue.
Once the BIOS screen on your Lenovo laptop completes the recovery process your laptop will restart and the display should come back to normal.
If none of these seven fixes resolved your display issue, the problem is most likely a physical hardware fault. The next sections will cover what to do from here.
Mistakes People Make When Fixing Lenovo Display Issues
Most people who struggle to fix their Lenovo display problem are not doing the wrong fix. They are doing the right fix incorrectly. These five mistakes come directly from hands-on experience, and avoiding them will save you time, frustration, and in one case potentially serious damage to your laptop.
Mistake 1: Turning Off the Laptop During BIOS Recovery
This is the most important warning in this entire guide. If you use the BIOS recovery method from Fix 7 and the recovery screen appears, do not turn off your laptop for any reason until the process is fully complete.
Interrupting a BIOS recovery mid-process can corrupt the firmware on your Lenovo laptop in a way that is very difficult and expensive to reverse.
The recovery screen may sit there for several minutes and feel like nothing is happening but the laptop is actively working in the background. Be patient let the process finish and only press a key when the screen prompts you to do so.
Mistake 2: Uninstalling Only One Driver Instead of Both
When fixing Lenovo display issues through Windows Device Manager, most guides tell you to uninstall the display adapter driver and stop there. The problem is that your system actually uses two separate drivers to control the screen: the display adapter driver for the graphics card and a separate monitor driver for the screen panel itself.
If you uninstall only the display adapter and leave the monitor driver in place, a corrupted monitor driver can continue causing flickering or screen issues even after the graphics driver reinstalls cleanly. Always uninstall both drivers together in the same session and then restart so Windows can reinstall both fresh.
Mistake 3: Jumping Straight to Hardware Fixes Without Testing Safe Mode First
I completely understand the impulse to assume the worst when a screen goes black or starts flickering. But skipping the software diagnostic steps and going straight to hardware diagnosis wastes a lot of time and can lead you toward unnecessary repairs.
Safe Mode is a clean Windows environment that loads only essential system processes. If your Lenovo display problem disappears completely in Safe Mode, the cause is a software conflict and not a hardware fault. Hardware problems do not magically disappear in Safe Mode so if the screen is fine there, you can rule out physical damage entirely.
Laptop screen hardware failure signs look very different in Safe Mode, which is exactly why running the Safe Mode test first is so valuable before drawing any hardware conclusions.
Mistake 4: Prying the Screen Bezel from the Outside Edge
If you have reached the point of physically replacing your Lenovo laptop screen, this mistake can cost you before the repair even begins. The screen bezel is the plastic frame that surrounds the display, and it is held in place by small plastic clips along its inner edge.
Many people instinctively try to pry the bezel open from the outer edge where there appears to be a gap. Doing this applies force in the wrong direction and snaps the plastic clips, cracking the bezel permanently. The correct approach is to start prying gently from the inner edge, pulling the bezel toward you. The clips will release with a soft snapping sound rather than breaking.
Mistake 5: Reassembling the Laptop Before Testing the New Screen
This one is a purely practical lesson. After fitting the replacement LCD panel and reconnecting the display cable, there is a strong temptation to screw everything back together and snap the bezel on before powering the laptop on.
Do not do this. Always connect the new screen, leave the bezel off and the screws out, and then power on the laptop to confirm the new display works correctly before you reassemble anything. If the replacement screen turns out to be defective or the cable connection is not seated properly, you will have to take everything apart all over again. Testing before reassembly takes an extra two minutes and can save you thirty.
When Your Lenovo Screen Needs Physical Replacement
If you have run through all seven software fixes and the external monitor test confirmed that your laptop screen panel itself is the problem, physical screen replacement is the next step.
The good news is that replacing a Lenovo laptop LCD panel is a manageable DIY repair for most people, and the replacement screens are widely available and reasonably priced. That said, if you are not comfortable opening a laptop, taking the device to a qualified repair shop is always a sensible choice.
A laptop display cable problem or a physically cracked LCD panel cannot be fixed through software, and no amount of driver reinstalling will bring a broken screen back. Once the external monitor test points clearly to the screen panel, replacement is the practical path forward.
Before worrying about laptop screen repair cost, the first thing you need to do is identify the exact screen your Lenovo laptop uses. Getting the wrong replacement panel is the most common ordering mistake, and it is completely avoidable.
How to Find Your Lenovo Screen’s Exact Model Number
Every laptop LCD panel has a sticker on its back that contains the exact model number of that specific screen. This number is what you need to order the correct replacement, and searching by laptop model name alone is not reliable enough because the same laptop model can ship with several different screen panels depending on the production batch.
Here is how to find the screen model number:
- Carefully open your Lenovo laptop lid fully
- Using a plastic pry tool or a flat guitar pick start gently separating the screen bezel from the inner edge, not the outer edge, working your way around until all the plastic clips release
- Remove the screws holding the LCD panel to the lid frame
- Tilt the screen panel forward carefully to reveal the back of the panel
- Look for the white or silver sticker on the back of the LCD panel. The model number will look something like N156BGA-EA2 or B140HAN04.0
Once you have found the sticker, take two photos: one of the model number sticker itself and one of the video cable connector at the bottom of the screen. Send both photos to the seller before placing your order on Amazon or eBay. This one extra step takes 30 seconds and completely removes the risk of getting a screen that does not fit.
The laptop display cable problem is separate from the panel itself, but photographing the connector lets you spot if the cable also needs replacing at the same time.
Test Before You Reassemble Here’s Why This Matters
Once your replacement LCD panel arrives, connect the video cable to the new screen and lay the panel gently on the keyboard, face up, without screwing anything in or snapping the bezel back on. Then plug your Lenovo laptop into its charger and power it on.
Watch the new screen carefully during startup. A working replacement panel will show the Lenovo boot logo and load normally. If the new panel shows lines, flickering, or a blank display right away, the replacement unit itself may be defective and needs to be returned before you invest another hour in reassembly.
This pre-assembly test is one of the most valuable habits in laptop repair. Defective replacement screens are not common, but they do happen.
Finding the problem before reassembly means a quick return or exchange. Finding it after snapping the bezel shut means starting the entire disassembly from scratch and that is a frustrating way to spend an afternoon.
Once the new screen passes the power-on test, screw the panel back into the lid frame, reconnect the bezel starting from one corner and pressing firmly along the inner edge until all the clips snap back into place, and your Lenovo laptop display replacement is complete.
If the laptop screen repair cost or the complexity of the process feels like too much a local repair shop can typically replace a Lenovo laptop screen for a reasonable fee, and many will source the correct panel themselves if you bring the laptop in.
Lenovo Display Issues by Model What’s Different?
Not all Lenovo laptops behave the same way when a display problem appears. The fixes in Section 3 work across all models but each Lenovo product line has its own common display patterns that are worth knowing about.
If you know which model you own this section will help you understand what is most likely causing your specific screen problem.
Lenovo IdeaPad Display Problems
The IdeaPad is Lenovo’s most widely used consumer laptop line, and Lenovo IdeaPad display problems are among the most commonly reported across user forums and support threads.
The most frequent display complaints on IdeaPad models include sudden black screens after Windows updates, screen flickering at lower brightness levels, and displays that go dim or completely dark while the laptop is still running. IdeaPad screens are also more sensitive to driver conflicts than some other models, which means the display driver reinstall in Fix 3 resolves IdeaPad display issues more often than any other single step.
If your IdeaPad screen flickers specifically at low brightness settings, check whether the auto brightness or adaptive brightness feature is enabled in your Windows display settings and turn it off. Many IdeaPad users find this one setting change stops the flickering entirely.
Lenovo ThinkPad Screen Issues
The ThinkPad is Lenovo’s business and professional laptop line, and a Lenovo ThinkPad screen black issue tends to appear in slightly different circumstances than on consumer models.
ThinkPad laptops are built with stricter power management settings, and a ThinkPad screen goes black situation is very often triggered by an aggressive sleep or display timeout policy rather than a hardware or driver fault.
Before assuming a deeper problem on a ThinkPad, go to your Windows Power Settings and check both the screen timeout and the sleep timeout values. Setting both to a longer duration or disabling them temporarily will quickly tell you whether power management is the cause.
ThinkPad models also respond well to the BIOS recovery method from Fix 7, as ThinkPad firmware is designed with recovery features in mind.
If your ThinkPad screen stays completely blank after startup, the BIOS recovery shortcut is a strong first hardware-level attempt before seeking professional service.
Lenovo Legion Display Problems
The Legion is Lenovo’s gaming laptop line, and Lenovo Legion screen issues tend to be very different in nature from those on IdeaPad or ThinkPad models. Gaming laptops push the GPU hard and run at higher refresh rates, which creates a different set of display vulnerabilities.
The most common Legion display complaints involve screen tearing, flickering at high refresh rates, and sudden black screens when switching between integrated graphics and the dedicated GPU.
Legion laptops often come with displays capable of 120Hz, 144Hz, or 165Hz refresh rates. When a Windows update resets the refresh rate setting or a driver gets corrupted, the mismatch between driver expectation and screen capability causes visible flickering or tearing.
For Legion display problems specifically, always check the refresh rate setting first as described in Fix 4, and make sure the dedicated GPU driver is fully up to date through Lenovo Vantage. Legion laptops also benefit from keeping GPU drivers current more regularly than other Lenovo models because gaming workloads stress the display pipeline much harder.
Lenovo Yoga Screen Issues
The Yoga is Lenovo’s convertible laptop line, and Lenovo Yoga display issues are often tied directly to the touchscreen digitizer and the 360-degree rotation mechanism rather than the display panel itself.
When a Yoga laptop is rotated into tablet mode or tent mode the screen orientation sensor and the touchscreen layer are both actively involved in the display process.
Yoga users sometimes report that the screen goes dark when rotated to a specific angle, or that the touchscreen stops responding while the display continues working normally. In most cases these Yoga-specific display problems are caused by a driver conflict between the rotation sensor software and the display driver, not a hardware failure.
The fix for most Lenovo Yoga display issues involving rotation or touch is to update both the display driver and the HID sensor driver through Windows Device Manager.
If the screen goes black only in specific rotation positions, a loose display hinge cable is also worth checking, as the flexible cable that runs through the Yoga hinge can develop micro-fractures over time with repeated folding. In that case a professional repair is the recommended path.
Should You Repair or Replace Your Lenovo Screen? (Real Cost Breakdown)
Once you have confirmed that your Lenovo laptop has a hardware display failure, the next question most people ask is a practical one: is it worth fixing, or is it time for a new laptop?
The honest answer depends on three things: the age of your laptop, the cost of the repair, and whether any warranty coverage still applies.”
Let me break this down clearly so you can make the right call for your situation.
Check Your Lenovo Warranty First
Before spending any money on a screen repair, check whether your Lenovo laptop is still covered under warranty. Lenovo warranty screen repair can cover display defects at no cost to you if the damage falls within the warranty terms, and many people skip this step and pay for a repair they could have received for free.
You can check your Lenovo warranty status directly on the
official Lenovo Warranty Lookup page
The serial number is usually printed on a sticker on the bottom of the laptop. If your device is still within warranty and the display failure was not caused by accidental physical damage, Lenovo may repair or replace the screen at no charge.
Accidental damage such as a cracked screen from a drop is typically not covered under standard warranty, but manufacturing defects and screen failures that occur during normal use often are.
What Does Lenovo Screen Replacement Actually Cost?
If your warranty has expired, laptop screen repair cost will depend on whether you go the DIY route or use a professional repair service.
Here is a realistic breakdown:
DIY replacement: Replacement LCD panels for Lenovo laptops typically cost between $30 and $100 depending on the screen size, resolution and model. Standard 15.6 inch FHD panels for IdeaPad models are on the lower end of that range.
High resolution or touch-enabled panels for Yoga and Legion models sit higher. Ordering directly using the screen model number from the sticker, as covered in Section 5, is the most cost-effective approach.
Professional repair service: A local repair shop will usually charge between $80 and $200 for a Lenovo screen replacement when you factor in both the part and the labour. Prices vary depending on your location and the specific model being repaired.
Lenovo authorised service: Getting the screen replaced directly through a Lenovo service centre is typically the most expensive option but comes with the assurance of genuine parts and certified technicians.
When to Replace the Screen vs When to Replace the Laptop
Knowing when to replace laptop screen components versus when to move on entirely is an important financial decision.
Screen replacement makes good sense when:
- Your Lenovo laptop is less than four years old
- The rest of the laptop runs well with no other issues
- The total repair cost is less than 40 percent of the laptop’s current value
- You need the laptop immediately and a replacement is not in the budget
Replacing the entire laptop makes more sense when:
- The laptop is five years old or older and already showing other problems
- The screen damage is severe enough that a display cable problem or motherboard connection issue is also suspected
- The repair cost approaches or exceeds half the cost of buying a comparable new machine
- Multiple components are failing at the same time
A screen failure on its own is rarely a reason to give up on a laptop that otherwise works well. But when a display fault arrives alongside battery problems, slow performance, or overheating, it is often smarter to put the repair budget toward a newer machine instead.
How to Use Lenovo Vantage to Fix and Monitor Your Display
Most people troubleshooting a Lenovo display problem go straight to Windows settings or Device Manager without realizing that Lenovo already built a dedicated tool for exactly this purpose.
Lenovo Vantage is a free official app developed by Lenovo that lets you update drivers, run hardware diagnostics, and manage display settings all from one simple interface, and it is far easier to use than Device Manager for anyone not comfortable with technical Windows menus.
If Lenovo Vantage is not already installed on your laptop, you can download it for free from the Microsoft Store by searching for “Lenovo Vantage.”
Run a Hardware Scan to Check Your Display
The first thing I recommend doing in Lenovo Vantage when you have a display problem is running a hardware scan.
Lenovo Vantage includes a built-in diagnostic tool that checks your display, battery, memory, and other components and tells you in plain language whether anything is detected as faulty.
Here is how to run it:
- Open Lenovo Vantage from your Start menu
- Click on Device at the top of the screen
- Select My Device Settings then scroll to find the Hardware Scan option
- Click Run All Scans and wait for the process to complete
The hardware scan will flag any display issues it detects and suggest next steps. This is one of the most reliable Lenovo support troubleshooting methods for confirming whether a display problem is hardware related before you spend time on manual fixes.
Update Display Drivers Through Lenovo Vantage
Lenovo Vantage can also update your display drivers automatically, which is simpler than the manual Device Manager method for beginners. The advantage here is that Vantage delivers drivers specifically tested and approved for your exact laptop model, rather than the generic drivers that Windows Update may push.
Here is how to update your drivers through Lenovo Vantage:
- Open Lenovo Vantage
- Click on Device then go to System Update
- Click Check for Updates
- If a display driver update appears in the list select it and click Install
- Restart your laptop after the installation completes
Keeping the display driver current through Lenovo Vantage is one of the most effective ways to prevent a Lenovo laptop display problem from recurring after you have fixed it.
Adjust Display Settings and Prevent Overheating
Lenovo Vantage display settings give you direct control over colour profile, eye care mode, and display refresh rate without needing to navigate through multiple Windows menus. If your refresh rate laptop display setting was reset by a Windows update, Lenovo Vantage lets you restore the correct setting in just a few clicks.
Lenovo Vantage also monitors system temperature, which is relevant because a Lenovo laptop overheating screen issue can cause the display to dim, flicker, or shut off as a protective measure.
If your screen problems happen during heavy use or after the laptop has been running for a while, check the temperature readings in Lenovo Vantage under the Device section. Consistent high temperatures during normal use suggest the cooling system needs attention, which in turn protects the display from heat-related stress.
5 Habits That Will Stop Lenovo Display Problems From Coming Back
Fixing a display problem once is satisfying. Fixing the same problem three months later because the same cause crept back in is frustrating. These five habits take very little time to build, and each one directly reduces the chance of your Lenovo laptop screen acting up again in the future.
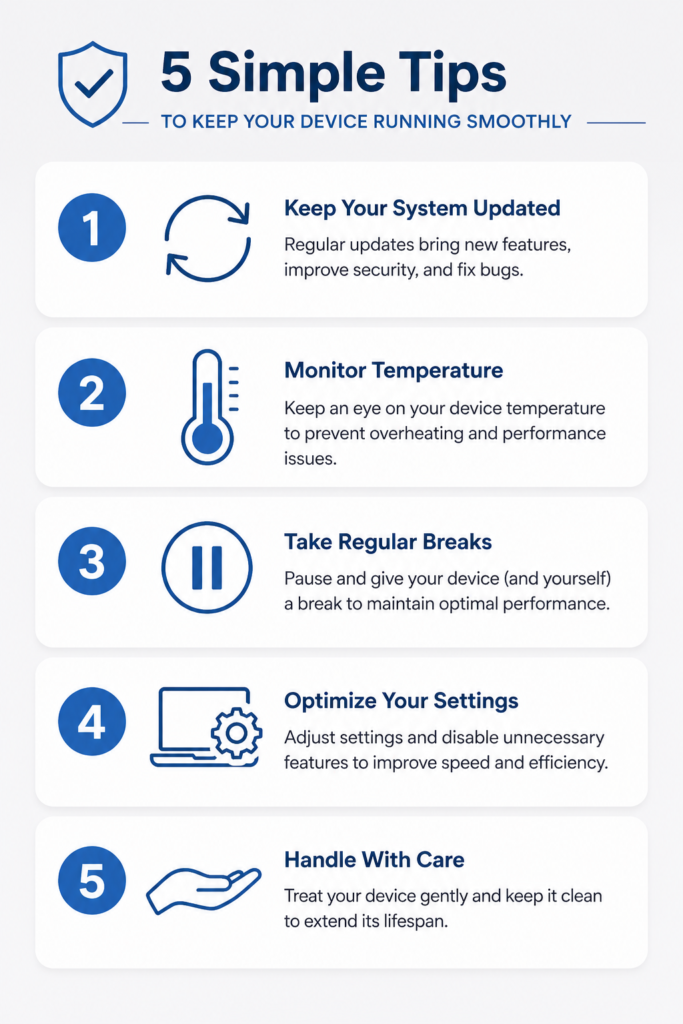
Habit 1: Update Your Display Drivers on a Regular Schedule
A Lenovo display driver update is not something you need to do every week, but checking once a month takes about two minutes and prevents a lot of problems. Outdated display adapter drivers are one of the most common causes of recurring screen flickering and black screen issues on Lenovo laptops.
The easiest way to stay current is to open Lenovo Vantage once a month, go to System Update, and let the app check for any available driver updates automatically. This is far simpler than hunting for drivers manually and ensures you always get the version tested for your specific hardware.
Habit 2: Do Not Let Your Lenovo Laptop Overheat
A Lenovo laptop overheating screen issue happens more often than most people realize, and heat is one of the quieter causes of long-term display damage. When a laptop runs too hot for extended periods the display components are under constant thermal stress, which over time leads to flickering, dimming, and in worse cases permanent LCD degradation.
Keep your laptop on a hard flat surface where the vents underneath can breathe freely. Avoid using it on soft surfaces like beds or cushions that block airflow. If your laptop fan runs loudly during normal tasks, using a cooling pad and cleaning the vents periodically makes a genuine difference.
Habit 3: Pause Windows Updates and Test Before Full Installation
One of the most consistent patterns I see in Lenovo laptop display problems is that the issue starts within a day or two of a Windows update. Windows Update can push a new display adapter driver that conflicts with your Lenovo hardware without any warning.
You can manage this by going to Windows Update settings and setting your active hours so Windows does not automatically install updates while you are working. After an update installs, take five minutes to check that your display looks normal before using the laptop heavily. If something changes, you now know exactly which update to uninstall.
Habit 4: Use Lenovo Vantage Display Settings to Keep Things Optimised
Lenovo Vantage display settings give you direct control over colour profile, eye care mode, and refresh rate from one place. Taking five minutes to set these correctly once means your display preferences are saved and will not get quietly reset by a Windows update.
I also recommend using the Lenovo Vantage hardware scan feature every few months as a general health check. Running a scan takes about ten minutes and flags any early signs of hardware issues before they become serious problems. Catching something early is always better than dealing with a full display failure later.
Habit 5: Handle the Screen and Lid with Care
This last habit is simple but often overlooked. Physical stress on the laptop lid is a common contributor to display cable problems over time. Opening and closing the lid from the centre rather than one corner distributes the force evenly and reduces strain on the internal display cable.
Avoid pressing on the screen surface directly, and if you carry the laptop in a bag make sure nothing heavy is pressing against the lid. Small physical habits like these extend the life of the display significantly, and they cost nothing to practice.
Frequently Asked Questions About Lenovo Laptop Display Issues
Q: How do I know if my Lenovo display problem is hardware or software?
The fastest way to find out is to run two quick tests. First, open Task Manager with Ctrl+Alt+Delete and watch whether Task Manager itself flickers along with the screen. If only the background flickers and Task Manager stays steady, the cause is software.
If both flicker together, the issue is at the driver or hardware level. Second, boot your Lenovo laptop into Safe Mode. If the display problem disappears in Safe Mode, the cause is definitely a software conflict in normal Windows. If the problem continues in Safe Mode, it is a hardware issue.
Q: What does pressing Win+Shift+Ctrl+B actually do on a Lenovo laptop?
Pressing Windows Key plus Shift plus Ctrl plus B sends a direct signal to your GPU to restart the display driver immediately without rebooting the entire laptop. The screen goes dark for a moment and then recovers, usually within 30 to 60 seconds.
This keyboard shortcut is built into Windows and works on all Lenovo laptops. It resolves display issues caused by a frozen or crashed display driver, which is one of the most common reasons a Lenovo laptop screen suddenly goes black or starts flickering during normal use.
Q: Is BIOS recovery safe on a Lenovo laptop and will it delete my files?
Yes, the BIOS recovery method using Windows Key plus B and the Power Button is safe and does not delete any personal files or data. The BIOS recovery process only affects the firmware layer of the laptop, not your stored documents, photos, or applications.
The one critical rule is to never turn off your Lenovo laptop while the BIOS recovery screen is running. Interrupting the process partway through can damage the firmware. Let the recovery complete fully and only press a key when the screen asks you to.
Q: My Lenovo laptop screen is black but it works perfectly on an external monitor. What does that mean?
This is actually a very helpful diagnostic result. When a Lenovo laptop displays a clear image on an external monitor via HDMI but the internal screen stays black or distorted it confirms that the GPU, motherboard, and graphics processing components are all working correctly.
The problem is isolated to the internal LCD panel itself. This typically means a physically defective screen panel, a loose or damaged display cable connection, or a connector that has come partially unseated inside the lid. In most cases this requires either a screen replacement or a professional inspection of the display cable.
Q: How do I find the right replacement screen for my Lenovo laptop?
Remove the existing screen panel from the lid, find the model number sticker on the back of the panel, and use that exact number to search on Amazon or eBay. The model number will look something like N156BGA-EA2 and is unique to your specific screen.
Take a photo of both the sticker and the video cable connector and send both photos to the seller before purchasing. This confirms that the replacement panel uses the same connector type and is fully compatible with your Lenovo laptop model.
Q: Will fixing my Lenovo display issue delete my data?
No. All the software fixes in this guide including driver reinstalls, hard resets, refresh rate changes, Windows update removal, and BIOS recovery are safe and do not affect your personal files.
Physical screen replacement is also a hardware process that does not touch your stored data in any way. The only action that would put your data at risk is a full factory reset, which this guide does not recommend as a troubleshooting step.
Q: Why did my Lenovo screen start flickering right after a Windows update?
Windows updates occasionally push a new display adapter driver that conflicts with the specific hardware in your Lenovo laptop. When this happens the screen starts flickering, dimming, or behaving erratically within hours or days of the update installing.
The most reliable fix is to first try resetting the refresh rate back to 60Hz in your display settings and if that does not help to uninstall the latest quality update through the Advanced Options menu.
Uninstalling the quality update rolls back the problematic driver and restores normal display behaviour in the majority of cases.
CONCLUSION
Lenovo laptop display issues can feel overwhelming at first, but as you have seen throughout this guide, the vast majority of screen problems have a straightforward fix. The key is always to diagnose before you repair — run the Task Manager test, the Safe Mode test, and the external monitor test first, and let those results point you to the right solution.
Start with the software fixes. Most people resolve their Lenovo display problem with Fix 1 or Fix 2 without touching a single setting. Work through the steps in order and you will likely have your screen back to normal within the hour.
If the software fixes do not solve the problem and the external monitor test points to a hardware fault, the screen replacement and cost breakdown sections will help you decide your next step. And if you are ever uncertain, Lenovo’s official support team is always available.
Did one of these fixes work for your screen? Drop a comment below and let me know which fix solved it, it helps other Lenovo users find their answer faster.
How do I know if my Lenovo display problem is hardware or software?
Press Ctrl+Alt+Delete and open Task Manager — if only the background flickers and Task Manager stays steady, the cause is software. Then boot into Safe Mode and if the display problem disappears, that confirms a software conflict. If the issue continues in Safe Mode, the problem is hardware related
What does pressing Win+Shift+Ctrl+B do on a Lenovo laptop?
Pressing Windows Key plus Shift plus Ctrl plus B sends a direct signal to your GPU to restart the display driver instantly without rebooting the laptop. The screen goes dark for a second and recovers within 30 to 60 seconds. This shortcut resolves display issues caused by a frozen or crashed graphics driver.
Is BIOS recovery safe on a Lenovo laptop?
Yes, the BIOS recovery method is completely safe and does not delete any of your personal files or data. The only rule is to never turn off your laptop while the recovery process is running. Let the process complete fully and only press a key when the screen prompts you.