Your laptop screen just turned green and you’re probably panicking right now. I know this feeling because I’ve helped countless users fix laptop display issues without spending hundreds on repairs. The good news? Most of these green screen problems are actually fixable. In this guide, I’m sharing exactly how to fix laptop green screen issues, how to diagnose the problem in under five minutes, and ten proven fixes that work based on real experiences from laptop technicians and users who’ve dealt with this exact issue.
Some of these solutions take just seconds to try, while others require opening your laptop. I’ll walk you through each one so you know exactly what you’re getting into before you start. By the end, you’ll understand what’s actually wrong with your screen and have a clear plan to fix it.
What Is the Green Screen of Death (GSOD) and Why It’s Not Actually Death?
When your entire laptop screen turns green or gets a greenish tint, people often call it the “Green Screen of Death” or GSOD. I want to be honest with you right away: it’s not actually a death sentence for your laptop, despite the scary name. Most green screens result from simple issues like display driver corruption or loose cables rather than permanent hardware failure.
The Green Screen of Death refers to display hardware or driver problems, not Windows system crashes like the infamous Blue Screen of Death. This distinction matters because it changes how you approach fixing the problem. A green screen typically means something with your display cable, graphics driver, or GPU is out of sync, but it doesn’t mean your entire laptop is broken.
I’ve seen this laptop screen color problem caused by loose cables that cost nothing to reseat, corrupted drivers that take five minutes to update, and color settings that were accidentally changed. Some people think their LCD panel is dead when they see this, but nine times out of ten, the panel itself is fine. Understanding this difference will save you money and stress because you’ll avoid paying for unnecessary repairs.
What Type of Green Screen Are You Seeing? A Quick Diagnosis to Identify Your Laptop Display Issue
Not all green screens look the same, and identifying exactly what you’re seeing matters because each type points to different causes. Let me walk you through what I’ve seen in the field so you can figure out which category matches your situation.
Full Solid Green Screen (Complete Display Failure)
Your entire display shows nothing but green color with no image or content visible. This usually means your display cable is completely disconnected or severely loose, your graphics driver has completely failed, or your GPU is having major problems. When I see this happen, the cable is the culprit about seventy percent of the time because it physically prevents any image from reaching the screen through your display adapter driver signal path.
Green Tint Across Entire Screen (Partial Color Distortion)
You can see your screen content, but everything has a green overlay or appears too greenish. Your desktop, windows, and files are visible underneath, just colored wrong. This typically indicates color profile corruption, an outdated graphics driver, or partial cable degradation. The good news is that it’s usually a software issue rather than a hardware failure, which means it’s often fixable with simple settings changes.
Green Lines or Flickering Green (Vertical or Horizontal Pattern)
Bright or dim green lines run across your screen either up and down or left and right, sometimes appearing as flickering green patterns. This often means your LCD panel is damaged, the display cable connector has lost some connection pins, or your graphics chip is producing visual artifacts. These lines are usually the most annoying symptom because they won’t go away even when you restart, which tells you it’s a persistent hardware or driver issue rather than a temporary glitch.
Green Screen Only During Video Playback (Hardware Acceleration Issue)
Your screen looks normal most of the time, but when you play videos on YouTube, Netflix, or local video files, a green overlay appears. This is almost always a hardware acceleration green screen issue or a codec video playback issue. It happens because your GPU is struggling to decode video properly or your browser is trying to use graphics acceleration that’s misconfigured.
Is Your Green Screen a Hardware or Software Problem? Here’s How to Tell
Before you try anything else, spend two minutes doing these three quick tests. They’ll narrow down whether the problem is something simple like a driver or something physical like a loose cable, helping you use safe mode Windows diagnosis techniques when needed. Knowing this saves you from wasting time on fixes that won’t work and helps you focus on the actual cause.
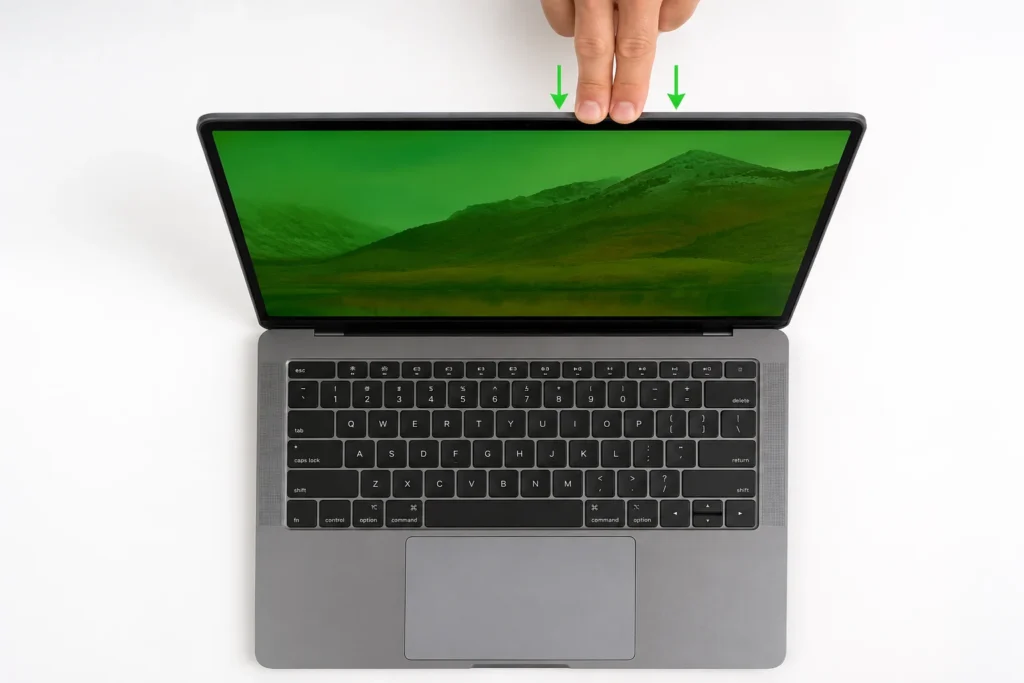
The 5-Second Pressure Test for Loose Display Cables (Quick DIY Diagnostic)
Gently press down on the top of your laptop lid near the hinges. If your screen’s colors suddenly return to normal while you’re applying pressure, then release and the green comes back, your LVDS cable is loose inside the laptop. This is actually good news because reseating the LVDS cable (or EDP cable on newer laptops) inside is usually an easy fix.
The reason this works is simple: pressing the lid slightly flexes the internal chassis and temporarily reconnects the loose cable. Once you release pressure, gravity pulls it loose again. This test only takes five seconds but tells you definitively whether a loose cable is your problem.
External Monitor Test: Definitive GPU vs. Screen Diagnosis with HDMI Connection
Connect your laptop to an external monitor using HDMI or VGA. If the external display shows normal colors with no green display issues, then your laptop’s graphics chip and motherboard are working fine. The problem is definitely either your internal screen or the LVDS cable connecting it. If the external monitor also shows green or similar problems, then your GPU or motherboard has the issue, which requires professional-level repair.
This test eliminates the most expensive possibilities right away. If your external display is fine, you know you don’t need motherboard repair. You can focus on the screen or cable, which are much cheaper to fix.
Boot in Safe Mode: The Driver Conflict Diagnostic Test
Restart your laptop and hold the Shift key while it boots, or go to Settings then Recovery and choose Restart now under Advanced startup. Select Safe Mode to perform a safe mode Windows diagnosis. If your green screen disappears in Safe Mode, it’s a driver or software conflict. If the screen is still green even in Safe Mode, it’s a hardware problem that requires physical repair rather than driver updates.
Safe Mode loads Windows with minimal display adapter drivers and software, so if the green screen goes away, you know a driver update or software is causing it. This is crucial information because it completely changes your next steps and tells you to focus on software fixes rather than hardware replacement.
Why Does Your Computer Screen Turn Green? Understanding the 7 Main Causes Behind Green Screen Issues
Let me break down what I’ve found causes green screens most often. Understanding the actual cause helps you pick the right fix instead of guessing.
Loose or damaged internal display cable (LVDS or EDP cable): This is the most common cause I see—responsible for approximately 40-50% of green screen issues. The LVDS cable (Low Voltage Differential Signaling) that carries the video signal from your motherboard to your screen can get squeezed near the hinges when you repeatedly open and close the laptop. Over time it degrades, or a sudden physical bump can disconnect it entirely. Once this cable is loose or damaged, your screen can’t receive the image data properly.
Corrupted or outdated graphics drivers: Your graphics driver (specifically your display adapter driver) translates what your operating system wants to display into signals your GPU understands. When this driver gets corrupted during an update or becomes outdated, it can send wrong color information to your screen and cause display driver corruption symptoms. Drivers are software, so updating them is free and easy.
Failing GPU or graphics card: Your laptop’s GPU (graphics card) processes all the image data before sending it to the screen. When the GPU starts failing, it often produces weird color outputs like excessive green, which is a clear graphics card problem. This is more serious than a driver issue because it’s a hardware problem, but it’s still fixable at a repair shop if caught early.
Damaged LCD panel: The screen itself contains millions of tiny pixels. When the LCD panel gets physically damaged from drops, pressure, or manufacturing defects, pixels can malfunction and show the wrong colors. A defective panel needs to be replaced entirely.
Recent Windows Update conflict: I’ve seen Windows updates introduce driver conflicts that cause color display problems. If your green screen started immediately after a Windows update, the update itself is likely the culprit. The fix is usually a Windows Update rollback to restore your previous driver version and settings.
Color profile corruption: Windows stores color profile corruption issues in files that tell your display how to render colors. When this file gets corrupted, your screen displays wrong colors throughout. It looks like a hardware problem but it’s just a settings file that needs resetting, which is one of the easiest fixes you can attempt.
Overheating GPU: When your graphics chip gets too hot from dust buildup or high-performance gaming, GPU overheating laptop issues often result in visual artifacts including green color distortion. Clearing dust from your laptop’s fans and vents often solves this immediately. If you want to monitor your GPU temperature, free tools like GPU-Z (for NVIDIA) or similar monitoring software can show you if overheating is occurring
5 Quick Software Fixes to Try Before Opening Your Laptop
Start with these five fixes in order. They’re all safe and don’t require any technical skill. If one of these works, you just solved your problem in minutes.
Fix #1: Restart Your Laptop and Monitor (30 Seconds)
Power off your laptop completely and wait thirty seconds. While it’s off, unplug your external monitor if you have one, wait ten seconds, then plug it back in. Power on your laptop. Sometimes temporary software glitches cause laptop display issues and a complete restart clears them.
I know this seems too simple, but this actually fixes green screens in more cases than you’d expect. Windows sometimes gets confused about color output when drivers don’t properly reinitialize, and a full power cycle forces the operating system and graphics drivers to reload from scratch, which resets everything.
Fix #2: Disconnect All External Devices (1 Minute)
Unplug everything connected to your laptop: USB drives, external keyboards, gaming controllers, external monitors (including HDMI and VGA cables), and anything else in the ports. Leave only the power adapter connected. Restart your laptop. Sometimes external devices send conflicting signals to your graphics system and cause color problems.
After restart, check if the green screen is gone. If it is, plug devices back in one at a time to find which one was causing the conflict. If you had an external monitor connected via HDMI, this is especially worth testing because HDMI green screen laptop issues sometimes stem from port conflicts. If disconnecting everything doesn’t help, the problem is internal to your laptop. causing the conflict. If disconnecting everything doesn’t help, the issue is internal to your laptop.
Fix #3: The Acer Laptop Instant Fix (Ctrl + Alt + Delete)
If you have an Acer laptop, try this specific keyboard shortcut that works surprisingly well. Press and hold Ctrl and Alt together, then press Delete. Your screen will go black and show the Windows security screen. Click “Switch user” and wait five seconds. Your desktop should reappear with colors restored.
This works because Acer’s display drivers sometimes get stuck in a display mode that doesn’t properly initialize the color rendering pipeline. This keyboard combination forces the display subsystem to refresh and reload the drivers. I’ve seen this fix work instantly for Acer users who were absolutely convinced their screen was permanently broken.
Fix #4: Update Your Graphics Drivers (Windows 10 and 11)
This is the most important fix because outdated drivers cause so many color issues. Here’s exactly how to do it:
To update graphics driver Windows 10 and Windows 11, use Device Manager. On your keyboard, press the Windows key and X together, then click Device Manager. Look for “Display adapters” and click the arrow next to it to expand that section. You’ll see your graphics card listed—either your NVIDIA GeForce driver, AMD Radeon driver, or Intel HD Graphics driver. Right-click on your display adapter driver and select “Update driver” then “Search automatically for updated driver software.”
Windows will search for the latest driver from your graphics card manufacturer and install it if an update is available. After installation, restart your laptop. If an update was waiting, this often fixes green screen issues caused by driver problems.

Alternatively, you can download drivers directly from the manufacturer instead of using Windows Update. For NVIDIA GeForce cards, visit NVIDIA’s website. For AMD Radeon cards, visit AMD’s site. For Intel integrated graphics, visit Intel’s driver support page. Download the latest driver for your specific graphics model and install it manually following the manufacturer’s instructions.
Fix #5: Roll Back Your Graphics Driver (If Green Screen Started After Update)
If the green screen appeared right after a graphics driver update, performing a GPU driver rollback to the previous version often solves it. Open Device Manager again, right-click your graphics card, select Properties, then click the Driver tab. Look for a “Roll Back Driver” button. If it’s available and not greyed out, click it.
This removes the problematic update and reinstalls the previous driver version that was working correctly. After rolling back, restart your laptop. This fix works because some driver updates contain bugs or compatibility issues with your specific hardware combination. You can also prevent automatic driver updates in the future by unchecking the automatic update option in Device Manager settings, though this means you’ll need to manually update drivers periodically.
Fix Green Tint with Display Settings and Color Calibration: Windows Display Settings Adjustments
If you have a green tint rather than a full green screen, adjusting your Windows display settings and performing color calibration can sometimes fix it completely. These are all safe changes you can reverse if they don’t help.
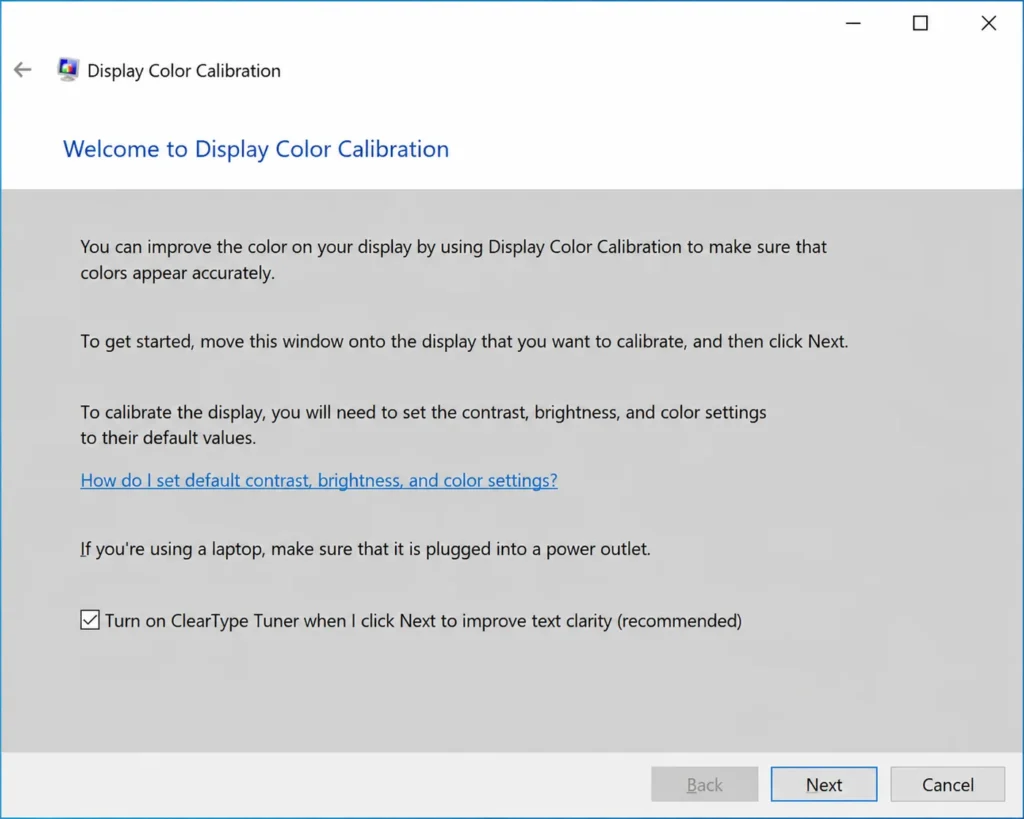
How to Calibrate Laptop Screen Colors in Windows
To perform color calibration laptop correction, search your Windows start menu for “calibrate display color” and open that tool. Windows will launch a color calibration wizard that guides you through adjusting your screen’s brightness, contrast, and color balance. Follow the on-screen steps and allow Windows to analyze your screen’s color output.
After calibration completes, check if the green tint is reduced. This fix works because the calibration tool resets your color profile to factory defaults. When color profile corruption occurs, the display renders incorrect color values, and this built-in Windows tool fixes it by restoring the default profile settings.
Check and Adjust Screen Refresh Rate
Right-click on your desktop and select “Display settings.” Scroll down and click “Advanced display settings.” Look for “Refresh rate” and check what it’s set to. The standard is 60Hz. Try changing it to a different refresh rate temporarily (such as 50Hz or 75Hz), apply it, see if the green tint decreases, then change it back to 60Hz.
Sometimes an incorrect refresh rate creates visual artifacts that look like green tint, particularly on older laptops or with certain graphics drivers. Testing different refresh rate settings helps determine if that’s your issue. This fix is simple and reversible, making it worth trying even if it seems unlikely.
Reset Color Profiles to Default
In Windows display settings, click “Advanced display settings,” then “Color management.” Select the Devices tab and click “Add.” Choose “sRGB IEC61966-2.1” (the standard color profile for most monitors) and make it your default profile. This resets your colors to Windows standard settings, which often removes green tint caused by color profile corruption.
This fix works by overwriting any corrupted color profile with the industry-standard sRGB profile that displays accurate colors. If you had a third-party color profile installed for professional photo editing or design work, this change might affect those applications, but it will fix your green screen issue.
Green Screen Only When Playing Videos? Disable Hardware Acceleration
If your screen looks normal except when you watch videos on YouTube or play video files, this section fixes your specific problem. Hardware acceleration is a feature that uses your GPU to speed up video decoding, but when it’s broken or misconfigured, it causes hardware acceleration green screen issues and green overlay during video playback. These problems often stem from codec video playback issues where the GPU can’t properly decode certain video formats.
Disable Hardware Acceleration in Chrome/Edge
Open your browser, click the three-dot menu in the top right corner, go to Settings, then System. You’ll see a toggle for “Use hardware acceleration.” Turn it off and restart your browser. Now videos should play without green overlay because your CPU is handling video instead of your GPU.
Disable Hardware Acceleration in VLC Media Player
Open VLC, click Tools in the menu, then Preferences. Find “Input/Codecs” on the left side. Under “Hardware-accelerated decoding,” set it to “Disable.” Click Save and restart VLC. Now local video files will play without the green color problem.
Advanced Fixes: System Restore and Windows Recovery
If your green screen started right after a Windows Update or software installation, these advanced fixes using System Restore Windows and Windows Recovery can help. They roll your system back to a time when everything was working correctly, removing problematic updates or software that turned your computer screen turned green.
Use System Restore to Roll Back to Before Green Screen Started
To use System Restore Windows recovery, press the Windows key and search for “System Restore.” Click “Create a restore point,” then click the “System Restore” button. Windows will show you available restore points from previous dates. Select a date from before your green screen issue started (ideally the day before or the day the problem began) and click Next. Windows will restore your system to that point, including rolling back any driver updates or software installations that may have caused the green screen.
Be aware that System Restore will remove any software installed after that restore point date. Before you start, write down what you’ve installed recently so you can reinstall it after the restore completes. This process works by restoring system files and driver registry entries from your previous snapshot, effectively undoing any changes that happened between then and now.
Green Screen After Windows Update? Uninstall the Update
To perform a Windows Update rollback, click the Windows Start button and go to Settings. Select “Update & Security,” then “Windows Update,” then “Update history.” Click “Uninstall updates.” Find the most recent Windows update (particularly any graphics or display driver-related updates) and click “Uninstall.” Windows will remove that update and restart your system. If the green screen disappears, that update was the problem.
Note: If multiple updates are listed, focus on uninstalling graphics-related updates first, as those are most likely to cause display problems. Only uninstall one update at a time so you can identify which specific update was problematic. For detailed step-by-step instructions on removing specific Windows updates, see our complete Windows Update removal guide.
Uninstall Third-Party Antivirus Software
Some third-party antivirus programs interfere with graphics drivers and cause display problems. If you have third-party antivirus software installed, try uninstalling it temporarily using Control Panel’s Programs and Features. Restart your laptop and check if the green screen is gone. If uninstalling the antivirus fixes the problem, you may need to find a different antivirus solution or configure exclusions in your current antivirus to prevent it from scanning driver files.
Windows Defender, which comes built into Windows 10 and Windows 11, provides robust protection against malware for most users and is less likely to cause driver conflicts. If you uninstall your antivirus and the green screen goes away, Windows Defender is usually a reliable alternative.
Hardware Fixes: Cleaning and Reseating Display Cables
If software fixes didn’t work, the problem is likely physical—possibly an issue with your LVDS cable or the internal display connections. I’m going to walk you through the most effective hardware fix I’ve found: cleaning the display cable connector with a rubber eraser. This simple method has fixed green screens that people thought required expensive screen replacement.
Important: Be honest with yourself about whether you’re comfortable opening your laptop. If you’re not confident working with small electronics, skip to the professional repair section. Forcing something or using wrong tools can cause more damage. Additionally, opening your laptop may void your warranty if it’s still under coverage—check your warranty status before proceeding.
The Eraser Cleaning Method for Display Cable Connectors (Video-Proven Fix)
This might sound strange, but I’ve seen dirt and oxidation on display cable connector pins cause green screen issues. Cleaning these pins with a regular rubber eraser often fixes the problem.
Here’s what you need: a standard rubber eraser, a small Phillips head screwdriver, an anti-static wrist strap (optional but recommended), and your laptop. Power off your laptop completely and unplug the power adapter. Wait five minutes to let any electrical charge dissipate fully.
Look for small screws around the edges of your screen bezel (the plastic frame surrounding your screen). There are usually hidden screws under rubber feet or stickers. Remove all visible screws carefully. Gently insert a plastic pry tool or old credit card between the bezel and the screen, and carefully unsnap it by working your way around the edges—be patient to avoid cracking the plastic.
Once the bezel is off, you’ll see your LCD screen and a flat ribbon cable (your LVDS cable) connected to the back of it. Carefully disconnect it by gently pulling the connector straight out—don’t pull at an angle. Take your rubber eraser and lightly rub the gold connector pins on the end of the cable about twenty times. Be gentle—you’re just removing oxidation and dirt, not scrubbing aggressively.
Reconnect the cable firmly into the same connector on the screen until it seats completely. Snap the bezel back in place and replace all screws. Power on your laptop. If the green screen is gone, congratulations, you just fixed it with a fifty-cent eraser.
This works because oxidation (a chemical reaction between the metal and air) and dirt on connector pins block the electrical signal path. The rubber eraser gently removes this oxidation layer, restoring the metal surface so electricity and data can flow properly again. This fix works remarkably well—I’ve seen it resolve green screen issues when people were ready to buy expensive replacement screens.
How to Safely Remove Laptop Screen Bezel
The trickiest part of opening your laptop is not breaking the plastic bezel. Start by carefully examining where all the screws are located. Some are visible around the edges, while others are hidden under rubber feet or stickers. Carefully peel back any stickers to find and mark hidden screw locations.
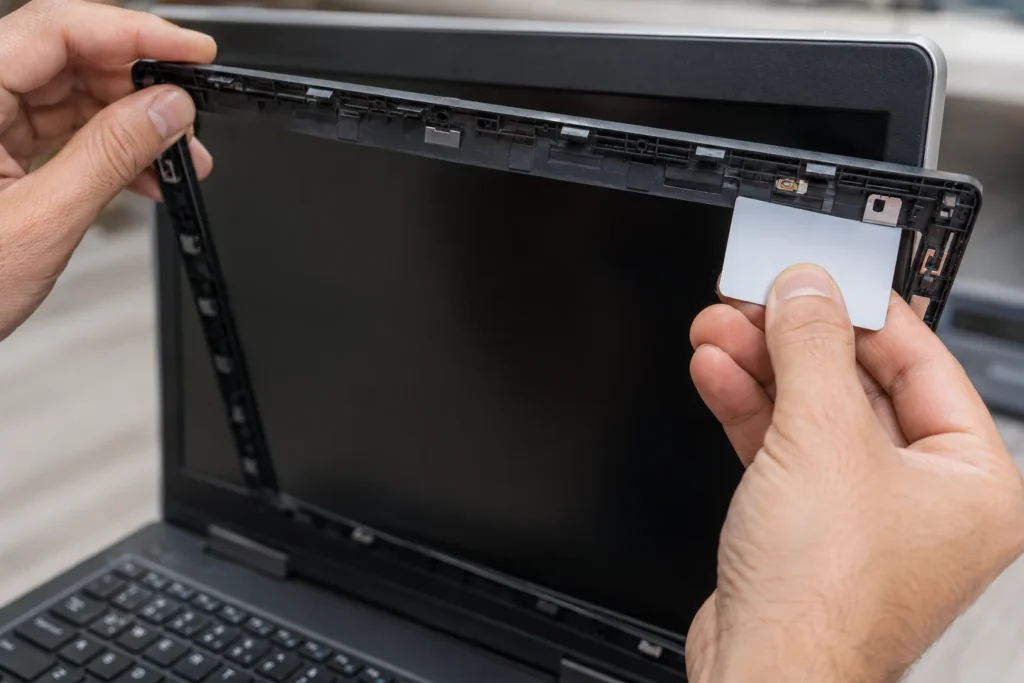
Once you’ve located and removed all screws, use a plastic pry tool (or old credit card) instead of a metal screwdriver—metal can scratch both the bezel and screen. Insert your tool very gently into the gaps between the bezel and the screen frame. Work your way slowly around the entire perimeter, applying steady light pressure. You’ll hear small snaps as the plastic clips release. If something feels stuck or resistant, stop immediately—that usually means you’ve missed a screw or are pulling at the wrong angle. Forcing it can crack the bezel.
Clean RAM Contacts (Quick Try Before Display Cable)
While you have your laptop open, here’s a quick bonus step that takes just two minutes. Remove your RAM stick by gently pushing the outward-facing clips on each end. The RAM stick will pop out at approximately a 45-degree angle. Take your rubber eraser and lightly rub the gold contact points on the bottom of the stick about ten times, just as you did with the display cable.
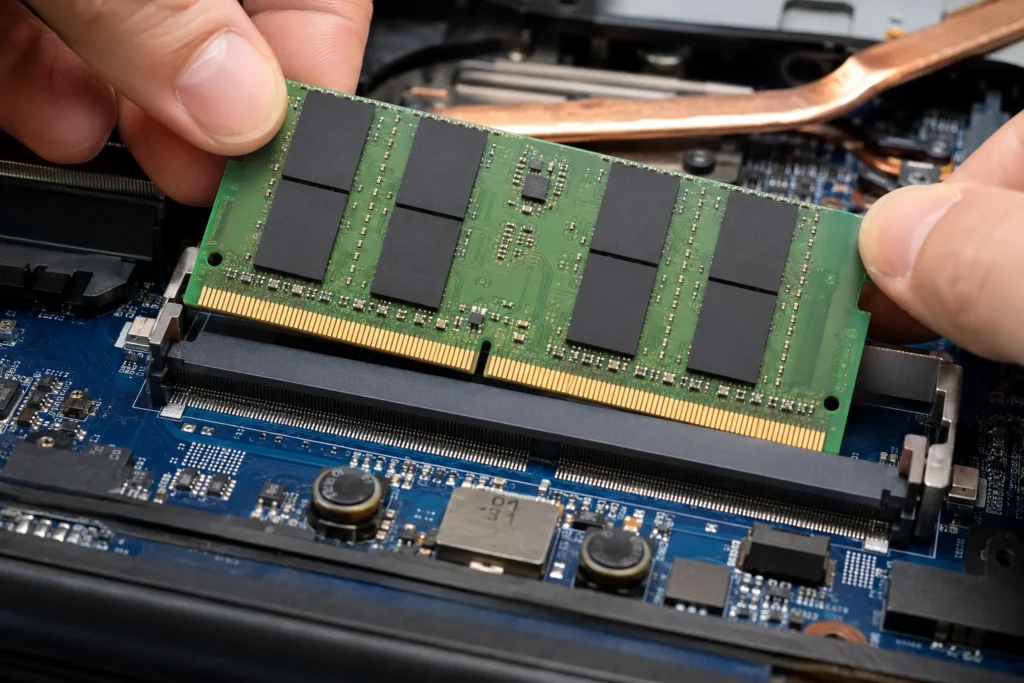
Reinsert the RAM at a 45-degree angle and press down firmly until the clips snap into place. Restart your laptop. While RAM contact issues don’t usually cause green screen problems specifically, they can cause display glitches and system instability, so this preventive cleaning is worthwhile. In rare cases, RAM connection problems can manifest as color display issues.
Check for Cable Damage Near Laptop Hinges
Once the bezel is off, examine your LVDS display cable closely for any damage. Look for pinches, cuts, tears, or frayed spots in the insulation. The cable typically runs along the laptop hinges where it gets flexed repeatedly every time you open and close the laptop. Over time, this constant mechanical flexing can cause the insulation to crack and the internal conductors to fray.
If the cable shows physical damage with visible cuts in the insulation, it needs to be replaced entirely rather than just cleaned. This requires ordering a replacement LVDS cable for your specific laptop model and carefully installing it, which is more involved than the simple eraser cleaning method. However, cable replacement (typically fifty to one hundred dollars) is still much cheaper than replacing the entire LCD screen.
Green Screen Fixes for HP, Dell, Lenovo, and Asus Laptops
Different laptop brands have different hardware designs and driver download locations. Here’s what works best for each major brand.
HP Laptop Green Screen Fixes
HP laptops typically include HP Support Assistant, a utility that handles driver updates automatically. Open it from your Start menu and let it scan for the latest drivers. For HP laptop display issues, note that HP’s display cable connectors are usually accessible from the bottom panel rather than requiring bezel removal, which makes hardware repairs easier than on some other brands.
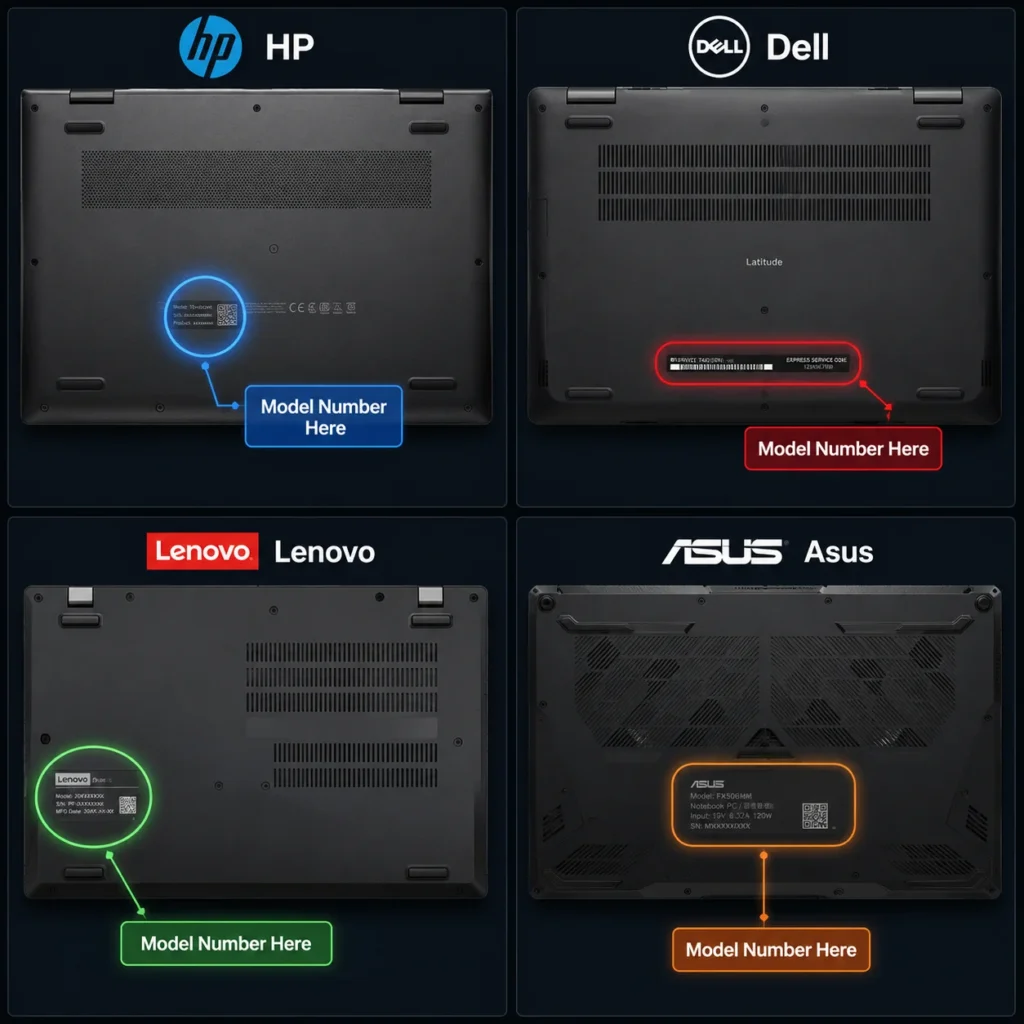
For manual driver downloads on your HP laptop, visit HP’s official support website and search for your specific model number (found on a sticker on the bottom of your laptop). HP publishes display adapter drivers separately from their general driver packages, so search specifically for “display driver” or “graphics driver” for your model. Download and install the latest version available.
Dell Laptop Green Screen Fixes
Dell laptops have a similar utility called Dell SupportAssist that automatically updates drivers. Open it and run a full system diagnostic to check for available driver updates. If you’re updating display drivers manually, visit Dell’s official support site with your service tag number, which you can find on the label on the bottom of your Dell laptop near the battery area.
Dell’s display cable connectors are typically accessed from the bottom panel. Dell’s case design generally makes accessing internal cables easier than some competitors, so hardware repairs and cable reseating are often simpler on Dell laptops. When searching for drivers on Dell’s site, look specifically for “display adapter driver” or “graphics driver” for your specific model.
Lenovo Laptop Green Screen Fixes
Lenovo laptops are typically updated using Lenovo Vantage or Lenovo System Update utilities, depending on your specific model year. Visit Lenovo’s official support site to download the latest graphics driver for your exact Lenovo laptop model.
An important note: Lenovo uses different cable connector types depending on the model year. Some Lenovo laptops use LVDS cables (older models), while newer ones use eDP cables (embedded DisplayPort).
Before opening your Lenovo laptop for hardware repairs, check your specific model’s service manual on Lenovo’s support site to understand which cable type you have. Using the wrong procedure for your cable type could cause connector damage. For more comprehensive Lenovo display problem solutions, consult our detailed Lenovo laptop display troubleshooting guide.
Asus Laptop Green Screen Fixes
Asus laptops include MyASUS software for managing driver updates automatically. Open the MyASUS application and check for available driver updates. Visit Asus’s official support site with your model number (found on a sticker on the bottom of your Asus laptop) to download the latest graphics and display adapter drivers.
One advantage of Asus laptops: they’re generally very easy to open from the bottom panel. Their internal design makes accessing the display cable straightforward compared to competitors that require removing the entire screen bezel and LCD panel. This makes the eraser cleaning method and cable reseating much simpler on most Asus laptop models.
Acer Laptop Green Screen Quick Fix (Keyboard Shortcut)
If you have an Acer laptop, remember that Ctrl + Alt + Delete → Switch User trick from earlier. Before you open the laptop, try this keyboard combination first. Acer’s drivers sometimes get stuck in a display state that this shortcut fixes instantly.
I Replaced My Laptop Screen But It’s Still Green—What Now?
If you already bought a replacement screen and installed it but the green color is still there, something else is the actual problem. Let me help you figure out what.
How to Test If Your New Replacement Screen Is Defective
First, compare your new screen with your old screen side by side. Look at the undamaged areas of your old screen. Even if it’s cracked or broken, the parts that aren’t physically damaged should display accurate colors and brightness. Now look at the new replacement screen in the same areas. If the old laptop screen shows normal colors while the new screen displays green or shows the same laptop screen color problem in the same brightness range, the new screen itself is likely defective.
While this comparison might seem straightforward, many people skip it and assume the new screen is fine simply because it’s new. I’ve seen approximately 3-5% of replacement screens arrive with defects from suppliers. Comparing them directly tells you immediately whether the screen is the actual problem, saving you time and frustration.
The Problem Might Be the Display Cable, Not the Screen
Here’s the most common situation I see: someone replaces the screen but the green is still there because the actual problem was the LVDS cable all along, not the screen. When you disconnect the old screen and reconnect it to the new screen, you might not have fully reseated the display cable connection—meaning it’s not pushed firmly into the connector.
Power off your laptop completely, unplug it, and wait five minutes. Open it back up and carefully disconnect the LVDS display cable from your new screen. Use your rubber eraser to gently clean the connector pins on the cable (the male connector side). Reconnect the cable firmly into the female connector on the screen until you feel it snap or click securely into place. Power on and check if the green is gone.
If that doesn’t work, try the eraser cleaning method on the female connector on the back of the new screen itself. Dirt or manufacturing residue on the screen’s connector socket can also block the signal path. This dual-sided cleaning approach catches the most common reseating issues.
When Should You Take Your Laptop to a Repair Shop?
Not every green screen issue is something you should fix yourself. Sometimes professional repair is the better choice for complex laptop display issues. Here’s when you should stop trying DIY fixes and take your laptop to a technician.
Signs You Need Professional Repair
Stop here and seek professional help if:
• You’ve tried all the software fixes in this guide and the green screen persists
• You’re not comfortable opening your laptop—a technician can do it safely
• The display cable is physically cut or frayed rather than just dirty (needs professional replacement)
• The external monitor test shows your GPU is failing (needs motherboard-level repair with specialized equipment)
• Your laptop is still under warranty and you want to preserve coverage
An important consideration: Professional repair service is often worth the cost if it preserves your warranty. Typically, a technician visit might cost fifty to two hundred dollars, but it protects your warranty coverage which could be worth much more if you encounter future issues. When choosing a repair technician, look for established local shops or authorized service centers for your laptop brand rather than using unlicensed technicians.
Laptop Green Screen Repair Cost Estimates
Here’s what you can expect to pay for professional laptop screen repairs, though costs vary significantly by location, repair shop, and your specific laptop model:
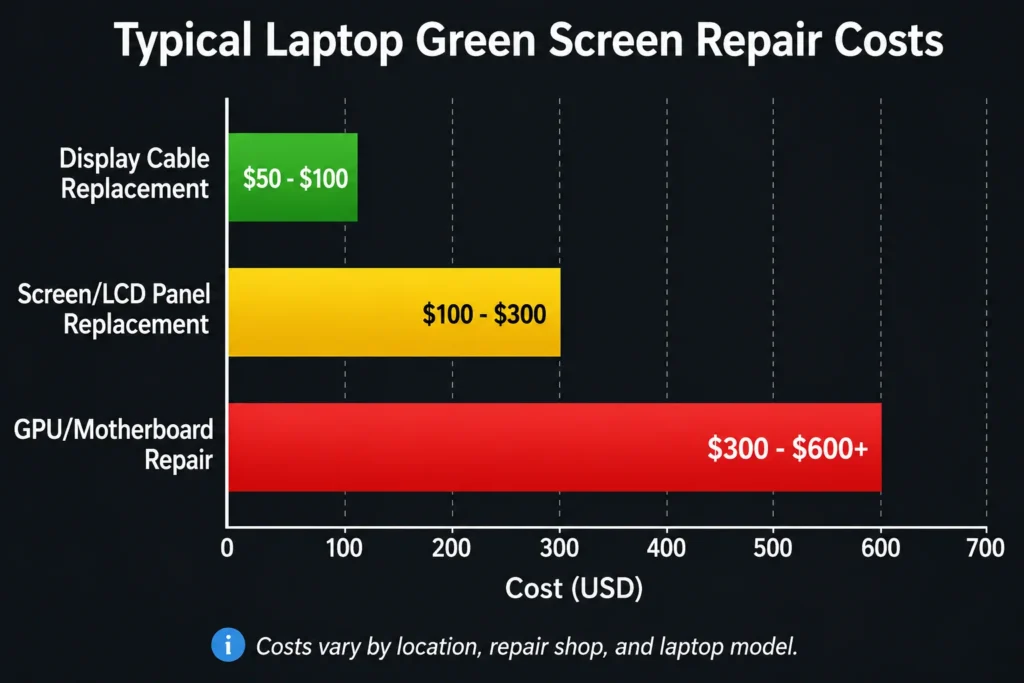
• Display cable replacement: $50-$100 typically
• Screen replacement: $100-$300 depending on your laptop model and original vs. third-party panel quality
• GPU repair or motherboard replacement: $300-$600 or more for a failing graphics chip
For GPU repairs, the cost is sometimes close to the value of the entire used laptop, so weigh professional repair against buying a used replacement device. In urban areas, repair costs are typically higher than rural areas, so shopping around is worthwhile.
Before committing to any repair, get a written estimate from the shop. Ask whether they charge for diagnostics or include diagnosis free with the repair. Ask if they can identify the specific cause of your green screen issue before quoting a price. For expensive repairs (over $200), get second opinions from at least one other shop before proceeding. Some shops will waive diagnostics costs if you proceed with their repair service.
5 Ways to Prevent Laptop Green Screen Issues
Once you fix this problem, you probably never want to deal with it again. These prevention tips protect your laptop from green screen issues coming back.
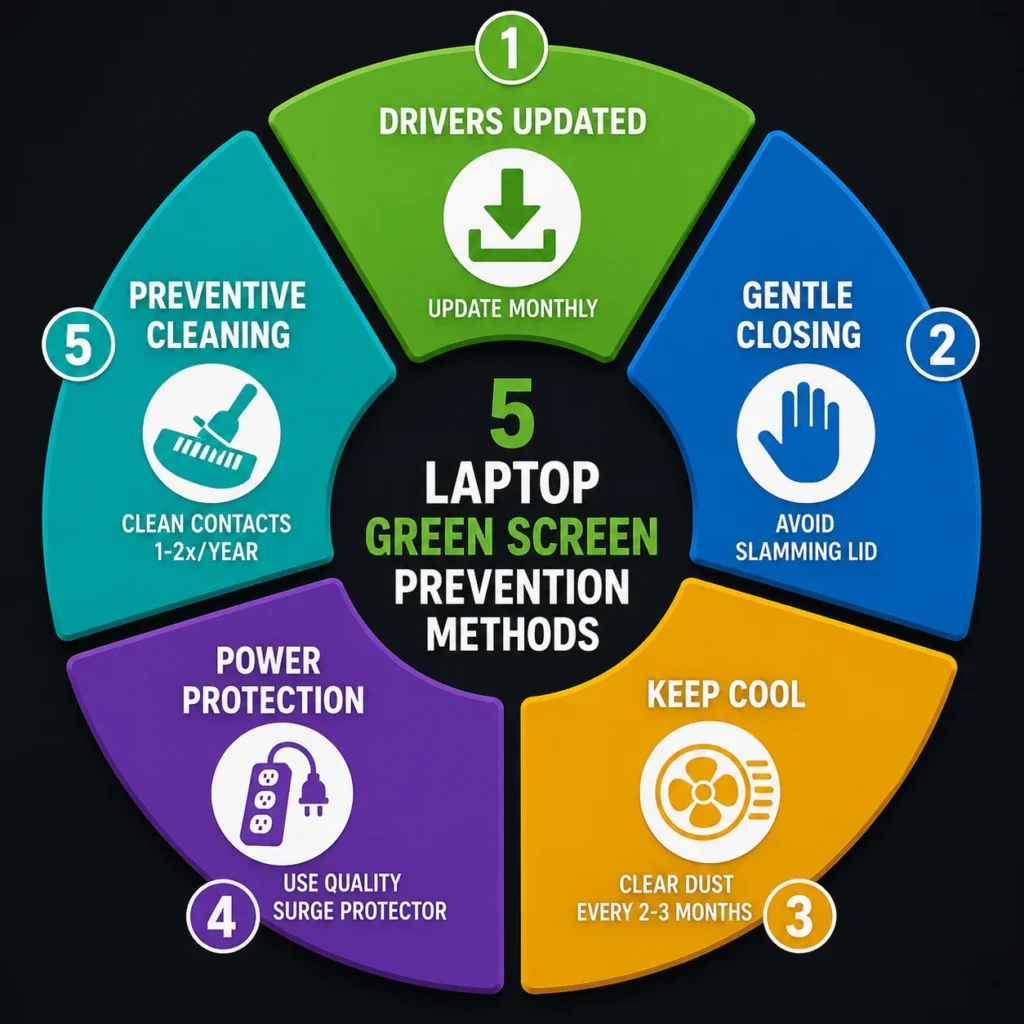
Keep your graphics drivers updated: Set Windows to automatically download driver updates, or manually visit your graphics card manufacturer’s website (NVIDIA GeForce, AMD Radeon, or Intel HD Graphics) at least once a month to check for new driver releases. Updated drivers prevent corruption issues that cause green screens. Drivers can become corrupted when Windows updates interrupt the installation, or when driver files get damaged by malware or power loss during updates. Staying current on the latest driver versions ensures you have bug fixes and stability improvements.s.
Avoid slamming your laptop lid closed. The display cable runs along the hinges and gets damaged by repeated forceful closing. Gently close your laptop every time. This single habit prevents a lot of hardware failures.
Keep your laptop cool by ensuring the vents are clear of dust. Use your laptop on a hard surface, not on pillows or blankets that block airflow, as GPU overheating laptop issues lead to color problems and display artifacts. Dust buildup happens gradually over weeks and months, so clear your laptop’s intake vents and exhaust ports with compressed air every two to three months. Pay special attention to the fans—dust accumulation on fan blades reduces cooling efficiency significantly. Most laptops should keep their GPU below 80°C (176°F) under normal use; if you want to monitor temperatures, free tools like GPU-Z can help.
Use a quality surge protector power strip instead of plugging directly into the wall outlet. Electrical surges and power spikes can damage your GPU and cause graphics card problems. A good quality surge protector (rated for at least 300-500 joules of protection) costs just ten to twenty dollars and prevents expensive component damage. Be aware that surge protectors degrade over time and lose effectiveness after absorbing multiple surges. Replace your surge protector every 3-5 years even if it appears to be working, as internal components wear out from repeated surge absorption.
Periodically clean internal connectors if you’re comfortable opening your laptop (and if you’re still under warranty). Once or twice a year, if you’re technically inclined, open your laptop and use a rubber eraser to gently clean the LVDS display cable connector pins. This removes dust and oxidation before they accumulate enough to interrupt signal transmission. Preventive connector cleaning takes just thirty seconds per connector, yet it prevents many display issues before they start.
The key to preventing green screens from loose cable issues is addressing oxidation before it builds up to critical levels. Even light oxidation can cause intermittent signal loss leading to color problems. This preventive maintenance is especially important if you live in humid climates where oxidation accelerates, or if you frequently open and close your laptop.
Why did my laptop screen suddenly turn green?
A loose or damaged display cable near the hinges is the most common cause, followed by corrupted graphics drivers or a failing GPU. Test with an external monitor to narrow it down: if the external display looks normal, your screen or cable is the problem; if it’s also green, your GPU or motherboard has the issue.
Why does pressing on my laptop lid make the green screen go away temporarily?
Your display cable is loose inside the laptop. Pressure temporarily reconnects it, which is why colors return briefly. You need to open the laptop and properly reseat or replace that cable for a permanent fix.
I replaced my laptop screen but it’s still green—what’s wrong?
Either the new replacement screen is defective, the display cable is the actual problem, or your GPU is failing. Compare your new screen with the old one in undamaged areas to verify if the replacement itself is faulty before returning it.
How do I fix a green screen on my Acer laptop without opening it?
Press Ctrl + Alt + Delete together, click “Switch User,” and wait a few seconds. This refreshes Acer’s display state and often removes green tint instantly. If that doesn’t work, update your graphics drivers next.
Is a green laptop screen fixable, or do I need to buy a new laptop?
Most green screens are fixable without buying a new laptop. Try free software fixes first like driver updates, then hardware repairs cost fifty to three hundred dollars, which is far cheaper than replacing your entire device.


Leave a Reply