
One moment your screen is perfectly fine, and the next it is sideways or completely upside down. If you are trying to figure out how to rotate screen on Windows, you are not alone. This screen flip happens to a lot of people on Windows 10 and Windows 11, either from accidentally pressing the wrong keys or from intentionally wanting to rotate display windows to set up a vertical monitor for reading or coding.
I have been through both situations. The accidental screen flip is genuinely frustrating because when the screen rotates, your mouse movements feel completely reversed. Moving the mouse right sends the cursor left. Clicking anything feels like a guessing game. It is disorienting in a way that text cannot fully describe until it happens to you.
The good news is that fixing it or changing the screen layout on Microsoft Windows takes less than a minute once you know where to look. In this guide I will walk you through four working methods, explain exactly why the Ctrl+Alt+Arrow shortcut may not be working for you, and show you how to use rotation lock to prevent your screen from rotating accidentally again.
What Screen Rotation Actually Does (And When You Would Actually Need It)
Screen rotation on Windows changes the display orientation, which means it changes the direction your screen renders everything from icons and text to videos and windows. Most people never touch this setting intentionally, but there are real situations where rotating your display genuinely improves how you work or use your computer.
The most common reason people intentionally rotate a screen is to use portrait mode on Windows for reading long documents, articles, or code. This monitor rotation to a vertical screen shows significantly more content from top to bottom without scrolling, which is why many developers and writers prefer it. If you have ever seen someone with a monitor turned sideways at a desk setup, that is exactly what they are doing.
Screen rotation on Windows is a software setting, not a hardware change. Changing it does not damage your monitor or affect performance in any way.
One thing worth knowing before we get into the methods is that not every screen can be rotated using software alone. Most modern monitors and laptop screens support all four orientation options through Windows Display Settings.
However, Some older monitors or displays using certain graphics adapters may not support software rotation, in which case the orientation option may appear greyed out. If you’re experiencing other display problems beyond rotation issues, check out our guide on diagnosing and fixing laptop display issues.
The Four Orientation Options Windows Gives You
Windows offers four display orientation choices in the screen orientation settings. Here is what each one actually does.
Landscape is the default horizontal orientation, also called landscape mode on Windows. This is what your screen looks like in normal use, wider than it is tall. Almost every monitor and laptop defaults to this mode.
Portrait rotates the screen 90 degrees clockwise, making the display taller than it is wide. This is the mode you want for reading long documents, coding, or using a physically rotated monitor in a vertical position.
Landscape (Flipped) flips the screen 180 degrees, making everything appear upside down. This is rarely used intentionally. Most people who end up in this mode got there by accident.
Portrait (Flipped) rotates the display 270 degrees, or 90 degrees counterclockwise. This is essentially portrait mode but mirrored. It is used when a monitor is physically rotated in the opposite direction from the standard portrait setup.
When I set up a vertical monitor for reading, I always use standard Portrait. The flip monitor screen options (Landscape Flipped and Portrait Flipped) are mostly useful for specialized setups or for correcting an accidentally rotated display.
How to Rotate Screen on Windows Using Display Settings (Works Every Time)
The Display Settings method is the most reliable way to rotate your screen on Windows. It works on every Windows PC regardless of which graphics card or driver you have installed. Whether you are on a desktop, a laptop, or a 2-in-1 device, this method always gives you access to the display orientation dropdown.
The fastest way to get there is to right-click on any blank area of your desktop and select Display Settings from the menu that appears. This right-click Display Settings shortcut takes you directly to the display configuration page without navigating through the Start Menu. I always use this method because it saves several clicks compared to going through Settings manually.
Resolution controls how sharp and detailed your screen looks. Orientation controls which direction your screen renders content. For more details about display settings, see Microsoft’s official guide to display resolution and layout. You will find both in the same Display Settings page, but make sure you are changing the orientation dropdown and not the resolution.
Steps for Windows 10
Here is how to change the display orientation on Windows 10 using the Windows Display Settings.
Step 1. Right-click on any empty area of your desktop and select Display Settings.
Step 2. The Settings window will open directly on the Display page. Scroll down until you see the Scale and Layout section.
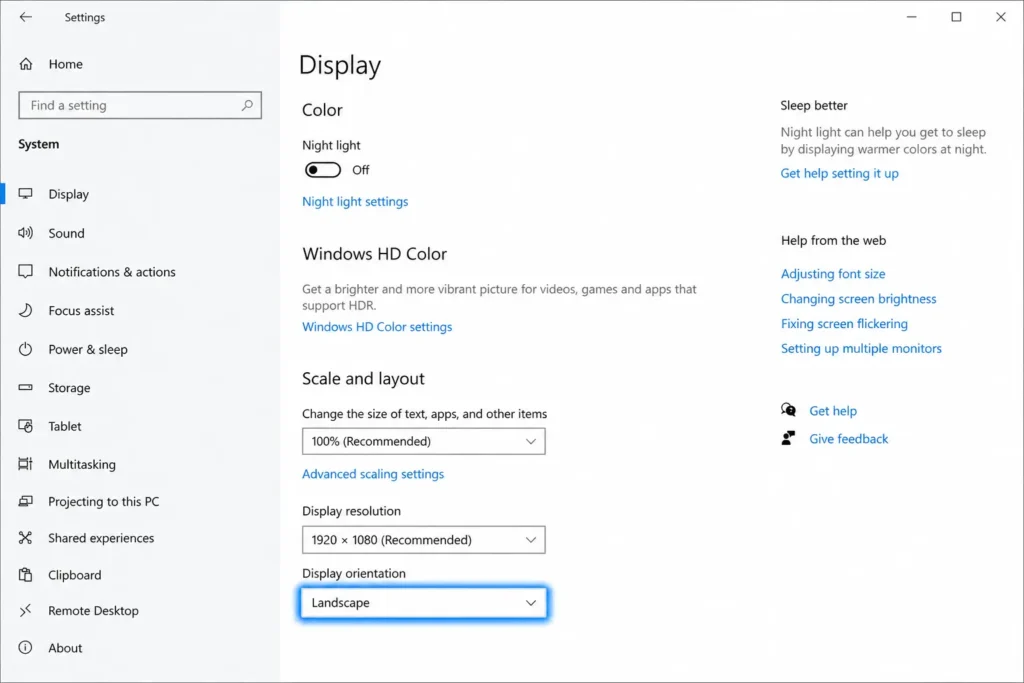
Step 3. Look for the dropdown labeled Display Orientation. Click the dropdown to see all four options.
Step 4. Select the orientation you want. Landscape returns the screen to normal. Portrait rotates it 90 degrees. Landscape Flipped turns it upside down.
Step 5. A confirmation prompt will appear on screen. Click Keep Changes to save your selection. Do not skip this step.
If you prefer the Start Menu path, go to Start, open Settings, click System, then select Display from the left sidebar. The same orientation dropdown will be there.
Steps for Windows 11
The process for Windows 11 is nearly identical but the Settings layout looks slightly different because Microsoft redesigned the interface.
Step 1. Right-click on a blank area of your desktop and select Display Settings.
Step 2. The Settings page opens directly to the System Display section. Scroll down to the Scale and Layout section.
Step 3. Find the Display Orientation dropdown and click it to expand the options.
Step 4. Choose your desired screen orientation from the list.
Step 5. When the confirmation prompt appears, click Keep Changes immediately.
In Windows 11 the settings are organized slightly differently with more visual spacing, but the display orientation dropdown is in the same Scale and Layout section as Windows 10.
One Thing to Do After Changing Orientation (Most People Miss This)
After you select a new orientation, Windows does not apply the change permanently right away. A confirmation prompt appears on screen asking whether you want to keep the new display settings or revert to the previous orientation.
You have a short countdown window to click Keep Changes. If you do not click it before the countdown ends, Windows automatically reverts your screen back to the previous orientation. This is a built-in safety feature so users never get permanently stuck in a wrong orientation.
I have seen people think the method did not work because they waited too long and Windows reverted the change without them realizing it. The moment you see the prompt, click Keep Changes. If you want to undo the change instead, click Revert or simply wait for the timer to expire.
How to Rotate Your Screen With a Keyboard Shortcut (Ctrl+Alt+Arrow Keys)
The keyboard shortcut method is the fastest way to rotate your screen on Windows, but there is an important detail that most articles skip entirely. The Ctrl+Alt+Arrow Keys shortcut is not a built-in Windows feature. It is a hotkey provided by your graphics driver, specifically Intel HD Graphics. If you try this shortcut and nothing happens, it is not because your keyboard is broken or Windows is glitched. It is almost certainly because the hotkey feature is disabled or your system uses a different graphics driver.
I will explain both how to use the shortcut and exactly what to do if it does not work on your computer.
What Each Ctrl+Alt+Arrow Combination Does
When the keyboard shortcut is active and working on your system, here is what each hotkey combination does to rotate your screen.
Ctrl + Alt + Up Arrow returns the screen to the standard Landscape orientation. This is your go-to reset shortcut if your screen is rotated in any direction and you want to get back to normal quickly.
Ctrl + Alt + Down Arrow rotates the screen 180 degrees, flipping everything upside down into Landscape Flipped mode.
Ctrl + Alt + Left Arrow rotates the screen 90 degrees counterclockwise into Portrait orientation.
Ctrl + Alt + Right Arrow rotates the screen 90 degrees clockwise into Portrait Flipped orientation.
The Up Arrow combination is the most important one to remember. If your screen ever ends up sideways or upside down, pressing Ctrl+Alt+Up Arrow is the quickest fix if your system supports the hotkey rotate screen function.
Why the Shortcut Does Not Work (And the Fix for Intel Graphics)
If pressing Ctrl+Alt+Arrow Keys does nothing on your computer, the most likely reason is that Intel HD Graphics system hotkeys are not enabled. This shortcut only functions when the Intel Graphics Command Center has the hotkey feature switched on, and it is not always enabled by default.
Here is how to fix the screen rotation shortcut not working on a system with Intel graphics.
Step 1. Open the Intel Graphics Command Center. You can find it by searching for it in the Windows Start Menu search bar. If you do not have it installed, you can download it from the Microsoft Store.
Step 2. Once the app is open, look for the Hotkeys tab in the navigation options.
Step 3. Inside the Hotkeys section, find the toggle labeled Enable System Hotkeys and switch it to the On position.
Step 4. Close the Intel Graphics Command Center and test the shortcut again by pressing Ctrl+Alt+Down Arrow. Your screen should rotate.
This is the fix that the Reddit thread ranking at position one for this topic never clearly explains in structured steps. Once you enable Intel graphics screen rotation hotkeys, the shortcut works reliably every time.
If you do not have Intel HD Graphics, do not worry. The next subsection covers the fix for NVIDIA and AMD systems.
Using NVIDIA Control Panel or AMD Radeon Settings to Rotate Your Screen
If your computer uses an NVIDIA or AMD graphics card, the Ctrl+Alt+Arrow shortcut may not apply to your system at all. Instead, you can rotate your screen directly through the graphics card control panel.
For NVIDIA Control Panel:
Right-click on your desktop and select NVIDIA Control Panel from the context menu. In the left sidebar, click on Display to expand the display options. Select Rotate Display. Choose your desired rotation angle from the options provided and click Apply.
For AMD Radeon Settings:
Right-click on your desktop and open AMD Radeon Settings or AMD Software. Navigate to the Display tab. Look for the rotation or orientation option and select your preferred angle. Apply the change and confirm if prompted.
Both NVIDIA display rotation and AMD Radeon screen rotation give you the same four orientation options as Windows Display Settings. The graphics card panel method is particularly useful on systems where the Windows Display Settings orientation dropdown appears greyed out, as the display adapter settings in the graphics panel often bypass that restriction.
Screen Sideways or Upside Down? Here Is How to Fix It in 30 Seconds
If your screen just flipped and everything looks wrong, stop what you are doing and read this screen upside down fix before you click anything. The fastest way to fix an accidental screen rotation on Windows is to press Ctrl+Alt+Up Arrow on your keyboard. If that works on your system, your screen returns to normal landscape orientation instantly. If the shortcut does nothing, I will walk you through the Display Settings fix right below, and it takes under 30 seconds.
Accidental screen rotation is one of the most disorienting things that can happen on a computer, and I mean that literally. When your screen flips sideways or upside down, your entire sense of direction on that computer breaks down. Most people start clicking frantically trying to fix it, which usually makes things worse.
Before you do anything else, take a breath and read the next section.
Why Your Mouse Feels Backwards When Your Screen Is Rotated
Here is something no other guide tells you, and it is the reason accidental screen rotation feels so much worse than it should. When your screen rotates, your mouse cursor movement does not rotate with it in the way your brain expects.
If your screen is rotated 90 degrees to the left, moving your mouse to the right actually moves the cursor downward on screen. Moving the mouse upward sends the cursor to the right. Every direction feels wrong because your eyes are reading the screen in one orientation while your hand is moving the mouse in a completely different one.
When the taskbar appears on the side of your screen instead of the bottom, and your desktop icons look misaligned or stacked in an unusual direction, that is a clear sign your display orientation has changed. Your screen is not broken. The orientation setting simply changed, most likely from an accidental key press.
The most important thing to do in this situation is move your mouse slowly and deliberately. Plan exactly where you need to click before you move the cursor. Random fast movements will send your cursor somewhere unexpected and you may accidentally close something you need or click the wrong setting entirely.
A laptop screen sideways situation feels especially disorienting because the physical device is still in the same position while the display content is rotated. Your instinct is to tilt your head or physically rotate the laptop, but the fix is purely in the software settings.
The Step-by-Step Fix for a Rotated Screen
Once you are ready to fix the screen flip on Windows 10 or Windows 11, follow these steps carefully and slowly.
Step 1. Move your mouse carefully to a blank area of the desktop. Right-click slowly and deliberately. The context menu will appear, possibly in a rotated position depending on how your screen is oriented. Look for Display Settings in the menu and click it.
Step 2. The Windows Display Settings page will open. Use your mouse carefully to scroll down to the Scale and Layout section.
Step 3. Find the Display Orientation dropdown. Click the dropdown to open the list of orientation options.
Step 4. Select Landscape from the list. This is the most important part. Always choose Landscape regardless of what orientation is currently selected. Do not experiment with Portrait or Landscape Flipped trying to guess your way back. Landscape is always the correct choice to return your screen to the normal upright position.
Step 5. The screen will straighten immediately. A confirmation prompt will appear. Click Keep Changes right away to make the fix permanent.
Selecting Landscape always fixes an accidentally rotated screen on Windows, no matter which wrong orientation the screen ended up in. This works the same way on Windows 10 and Windows 11.
One thing to watch for is that the right-click context menu may also appear rotated or in an unusual position when your screen is sideways. Do not let that confuse you. The menu options are still the same and Display Settings will still be in the list. Just click it carefully using slow deliberate mouse movements.
How to Rotate Your Laptop Screen on Windows 10 and 11
Rotating a laptop screen on Windows 10 or Windows 11 works the same way as rotating a desktop monitor. The Windows Display Settings method is your most reliable option and it works on every laptop regardless of brand or graphics driver. Right-click on your desktop, select Display Settings, scroll to the Display Orientation dropdown, choose the orientation you want, and click Keep Changes.
That said, there are a couple of laptop-specific things worth knowing before you start, because laptop screen rotation behaves slightly differently from a desktop in two situations.
The first difference is with the keyboard shortcut. On many laptops, especially those using integrated AMD or NVIDIA graphics rather than Intel HD Graphics, the Ctrl+Alt+Arrow Keys shortcut may not work at all. This is not a fault with your laptop. Laptop graphics configurations vary more than desktop setups, and the hotkey feature depends entirely on which graphics driver is active. If the shortcut does nothing on your laptop, go straight to the Display Settings method and skip the shortcut entirely.
The second difference involves how the right-click menu behaves on a laptop touchpad versus a desktop mouse. On a laptop, right-clicking with the touchpad can sometimes require pressing both fingers simultaneously or pressing the lower right corner of the touchpad, depending on your touchpad settings. If right-clicking on the desktop feels tricky, you can also access the same Windows Display Settings page by going to Start, opening Settings, clicking System, and then selecting Display from the sidebar.
I have fixed a sideways laptop screen using both methods and the Display Settings path through the Start Menu is sometimes easier on a laptop when the touchpad feels uncooperative.
Once you are inside Display Settings, the screen orientation dropdown works identically to a desktop. Select Landscape to return to normal, Portrait for vertical mode, or whichever orientation you need. The Keep Changes confirmation prompt will appear just as it does on a desktop, so click it promptly to save your selection.
What to Do If Your Laptop Screen Keeps Rotating on Its Own
If your laptop screen keeps rotating by itself without you touching any settings or keyboard shortcuts, that is a completely different situation. A laptop screen that rotates automatically is responding to a built-in motion sensor, which is found on touchscreen laptops and 2-in-1 devices.
This auto rotate Windows tablet feature is designed for tablets and convertible laptops so the screen adjusts when you flip or tilt the device. When you are using the laptop in standard clamshell mode at a desk, auto rotation can feel annoying because tilting the laptop slightly triggers an unwanted screen rotation.
The fix for a laptop screen that keeps rotating on its own is called rotation lock, and it is a separate setting from manual screen rotation. Rotation lock tells Windows to stop responding to the motion sensor and keep the screen orientation fixed regardless of how you tilt or move the device.
I cover exactly how to enable rotation lock on Windows 11 in the next section, including both the quick Action Center method and the Settings method for a more permanent fix.
How to Rotate Just One Monitor in a Dual-Screen Setup
Yes, you can rotate just one monitor in a dual-screen setup without affecting the other screen at all. Windows Display Settings lets you apply a different display orientation to each monitor independently, which makes multiple monitor rotation one of the most practical features for anyone running a productivity or creative workspace.
The most popular reason to do this is setting up one monitor in portrait mode for reading documents, browsing long web pages, or reviewing code, while keeping the primary screen in the standard landscape position. I have seen this setup used by developers, writers, and designers who want the best of both orientations without needing two separate computer setups.
There is one important thing to know before you start. Rotating a monitor in a dual-screen setup is a two-step process. You first need to physically rotate the monitor on its stand, and then update the Windows display settings to match the new physical position. Skipping either step leaves you with a screen that is either physically turned but digitally wrong, or digitally changed but physically unchanged. Both situations are equally unusable.
Step 1. Check that your monitor stand supports physical rotation. Many modern monitors have an adjustable stand that lets you rotate monitor 90 degrees into a vertical portrait position. Tilt the monitor upright carefully and position it the way you want it to appear.
Step 2. Once the monitor is physically in the correct position, right-click on your desktop and open Windows Display Settings.
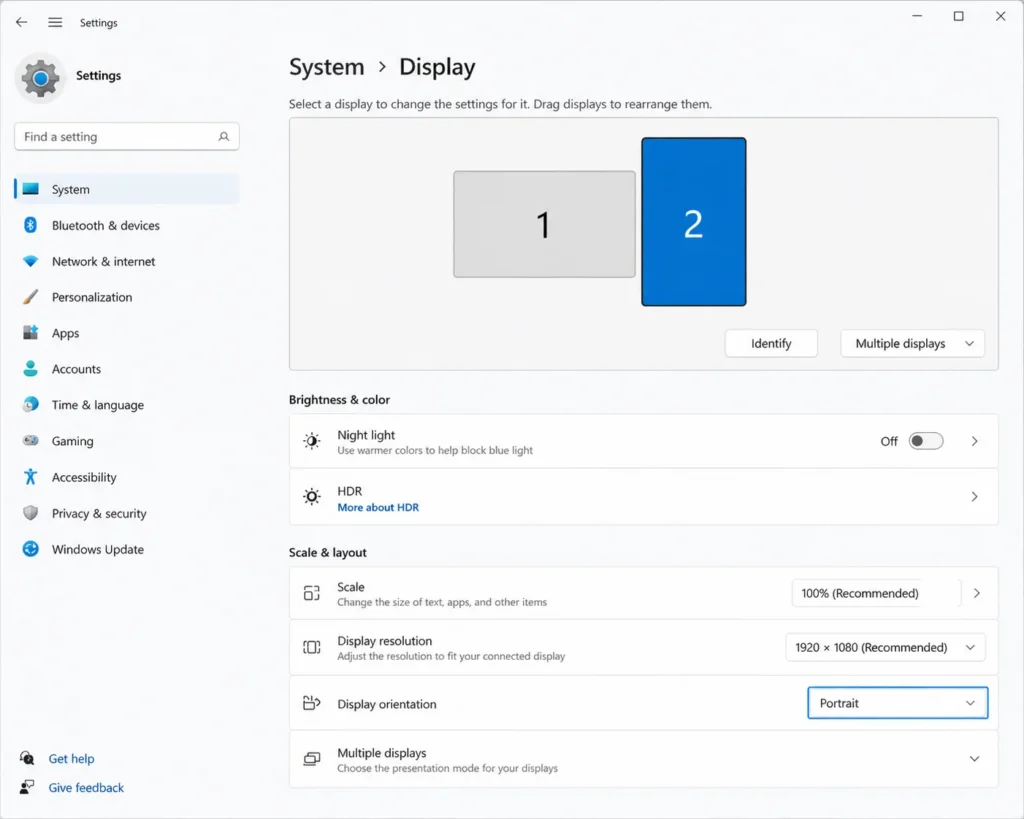
Step 3. At the top of the Display Settings page you will see a diagram showing your monitors as numbered boxes, for example box 1 and box 2. This is where most people make the critical mistake covered in the next section.
Step 4. Click on the numbered box that represents the monitor you physically rotated. When you click the correct box, it becomes highlighted to show it is selected. The settings below the diagram now apply only to that specific monitor.
Step 5. Scroll down to the Scale and Layout section and click the Display Orientation dropdown. Select Portrait from the list.
Step 6. A confirmation prompt appears asking whether you want to keep the new display settings. Click Keep Changes to finalize the monitor rotation.
Your second monitor is now in portrait mode windows style while your primary screen stays in landscape orientation exactly as before.
The Right Way to Select Which Monitor to Rotate (Most People Get This Wrong)
This is the step that causes the most confusion in a dual-monitor setup, and it is something no other guide explains clearly enough. When you open Windows Display Settings with two monitors connected, the orientation dropdown at the bottom of the page applies to whichever monitor is currently selected in the diagram at the top of the page.
If you do not click on a specific monitor box to select it first, Windows defaults to applying any changes to the primary monitor. So if you go straight to the Display Orientation dropdown and change it to Portrait without first clicking on the correct monitor in the diagram, you end up rotating your main screen instead of the secondary one. I have seen this happen and it creates exactly the kind of accidental screen rotation panic described earlier in this article.
The fix is straightforward but you need to do it in the right order every time.
Always click the monitor number in the diagram first. Click on box 2 if you want to rotate your second monitor. Watch for the box to become highlighted or for the word Selected to appear below it. Only after the correct monitor is selected should you scroll down and change the Display Orientation setting.
Multiple monitor rotation in Windows works on a per-monitor basis, meaning each display remembers its own orientation setting independently. Once you set monitor 2 to Portrait and click Keep Changes, that monitor stays in portrait mode windows orientation even after you restart your computer, while monitor 1 remains in landscape mode exactly as you left it.
If you are ever unsure which numbered box in Display Settings corresponds to which physical monitor on your desk, click the Identify button on the Display Settings page. Windows will briefly flash the corresponding number on each physical screen so you can match them up correctly before making any changes.
How to Stop Your Screen From Rotating Automatically (Rotation Lock on Windows 11)
If you have a Windows 11 tablet or a 2-in-1 laptop and your screen keeps rotating by itself every time you tilt or move the device, you need to enable rotation lock. Rotation lock tells Windows 11 to ignore the built-in motion sensor and keep the screen orientation fixed regardless of how you hold or position your device.
This is a completely different setting from manual screen rotation. Auto rotate on Windows tablets is designed to help touchscreen users by switching between landscape and portrait automatically when they flip the device. But when you are using the device on a desk or in your lap and the auto rotation triggers by accident, rotation lock is the fix.
There are two ways to disable screen rotation on Windows 11. The Action Center method is the fastest and works as a quick toggle whenever you need it. The Settings method is more permanent and stays active until you manually turn it back off.
Note that the rotation lock option only appears on devices with a gyroscope sensor. If you are using a standard desktop PC or a non-touchscreen laptop, you will not see rotation lock in Windows 11 because your device does not have the hardware to auto-rotate in the first place.
Turning Off Auto-Rotate From Action Center
The Action Center rotation toggle is the quickest way to lock screen orientation on a tablet or 2-in-1 device running Windows 11.
Step 1. Swipe in from the right edge of your screen if you are using a touchscreen, or click the notification icon in the taskbar at the bottom right corner next to the date and time.
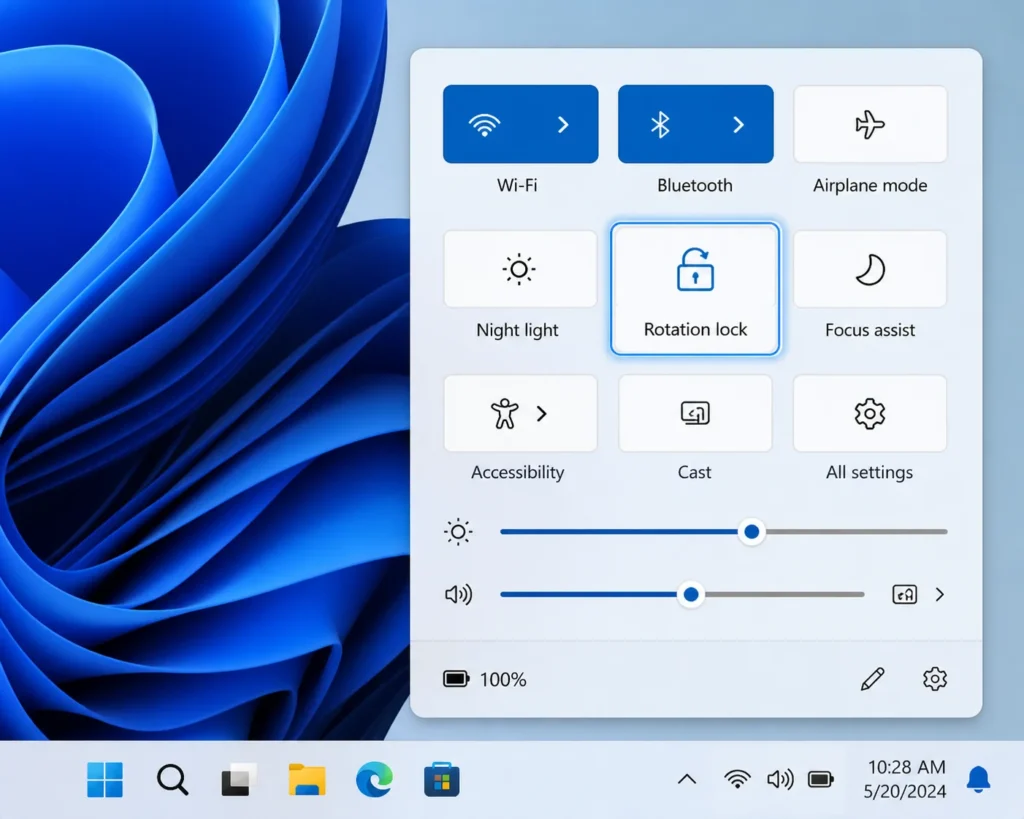
Step 2. The Action Center panel slides open from the right side of your screen. Look for the Rotation Lock tile in the Quick Settings section. The tile shows a small padlock icon with a screen orientation symbol.
Step 3. Click or tap the Rotation Lock tile to turn it on. When rotation lock is active, the tile becomes highlighted to show the feature is enabled.
If you do not see the Rotation Lock tile in your Action Center, click the Edit Quick Settings button at the bottom of the panel. A customization screen appears where you can add or remove tiles. Find Rotation Lock in the list of available tiles and click Add to pin it to your Quick Settings panel for easy access.
Once rotation lock is enabled through the Action Center, your screen stays in its current orientation no matter how you tilt or rotate the physical device. Auto rotation will not trigger until you turn rotation lock back off by clicking the tile again.
Turning Off Auto-Rotate From Settings
For a more permanent fix that stays active across restarts, you can enable rotation lock directly in Windows 11 Display Settings.
Step 1. Right-click on your desktop and select Display Settings, or open the Settings app from the Start Menu and navigate to System then Display.
Step 2. Scroll down in the Display Settings page until you find the Rotation Lock toggle switch. This toggle appears in the same general area as the Display Orientation dropdown but it is a separate setting.
Step 3. Click the Rotation Lock toggle to turn it On. When enabled, the toggle switch moves to the right and turns blue or shows an On label.
Enabling rotation lock in Windows 11 Settings keeps the feature active permanently until you return to the same page and toggle it back off. This method is better for users who never want auto rotation to activate, while the Action Center method is better for users who want to toggle rotation lock on and off quickly depending on how they are using the device at the moment.
Screen Rotation Not Working? Try These Fixes
If you tried the methods above and your screen rotation still does not work, there are a few specific issues that block screen rotation on Windows. Most of these problems have straightforward fixes once you know what to look for.
The most common reason screen rotation fails is that the keyboard shortcut is disabled or unsupported on your system. The second most common reason is that the Display Orientation option appears greyed out and cannot be clicked. I will walk you through how to diagnose and fix both situations.
Shortcut Not Working — Quick Diagnosis Checklist
When Ctrl+Alt+Arrow Keys does nothing on your computer, run through this quick checklist to find the problem.
Is Intel Graphics Command Center installed on your system? The keyboard shortcut for screen rotation only works when you have Intel HD Graphics and the Intel Graphics Command Center app is installed. If you do not have Intel graphics or the app is not installed, the shortcut will never work. The fix is to use the Display Settings method instead or install Intel Graphics Command Center from the Microsoft Store if your system uses Intel graphics.
Are system hotkeys enabled in Intel Graphics Command Center? Even with Intel graphics installed, the shortcut only works when hotkeys are turned on. Open Intel Graphics Command Center, go to the Hotkeys tab, and make sure the Enable System Hotkeys toggle is switched to On. This is the fix that most people miss.
Is your laptop using an external GPU that overrides Intel graphics? Some gaming laptops have both Intel integrated graphics and a dedicated NVIDIA or AMD graphics card. When the dedicated GPU is active, it may override Intel hotkeys entirely. In this case, rotate your screen through the NVIDIA Control Panel or AMD Radeon Settings instead of using the keyboard shortcut.
Is a fullscreen application blocking the shortcut? If you have a game, video player, or presentation running in fullscreen mode, Windows may block certain system hotkeys including screen rotation shortcuts. Exit fullscreen mode, try the shortcut again, or close the application entirely before attempting rotation.
If none of these situations apply to your system, the Ctrl+Alt+Arrow shortcut simply is not supported on your graphics configuration. Use the Windows Display Settings method as your primary screen rotation tool instead.
Display Orientation Option Is Greyed Out — What to Do
Sometimes the Display Orientation dropdown in Windows Display Settings appears greyed out and you cannot click it to change the orientation. This happens for a few specific reasons and each has a different fix.
Your monitors are set to duplicate mode instead of extended mode. When you duplicate displays, both screens show the same content in the same orientation and Windows locks the orientation setting. Open Display Settings, scroll to the Multiple Displays section, and change the dropdown from Duplicate to Extend. Once the displays are extended, the orientation option becomes available again.
You are connected via Remote Desktop. When you are controlling a computer remotely through Remote Desktop or similar remote access software, display orientation settings are controlled by the local physical computer, not the remote session. You cannot rotate the screen from within a remote desktop window.
A fullscreen application is running. Certain fullscreen apps lock the display adapter settings to prevent resolution or orientation changes mid-session. Close any games, video players, or fullscreen applications and try accessing Display Settings again.
Your display adapter does not support software rotation. Some older monitors and certain graphics card configurations do not support orientation changes through software settings. For other common laptop display problems like black screens or flickering, see our complete laptop display troubleshooting guide
If your monitor or graphics card does not allow rotation, the Display Orientation dropdown will always appear greyed out and the only solution is to use a different monitor that supports the feature.
To check whether your display adapter supports rotation, right-click on your desktop and open your graphics card control panel. Look for display rotation settings in the NVIDIA Control Panel, AMD Radeon Settings, or Intel Graphics Command Center. If rotation options appear there, use the graphics card panel to rotate your screen instead of Windows Display Settings.
Quick Reference — All Screen Rotation Methods at a Glance
Here is a quick summary of every method to rotate screen on Windows and rotate display windows covered in this guide. Bookmark this section if you need a fast reference later.
Method 1: Windows Display Settings
Works on all Windows 10 and Windows 11 PCs. Right-click desktop, select Display Settings, change Display Orientation, click Keep Changes. This is the most reliable method and works every time regardless of your graphics driver.
Method 2: Keyboard Shortcut (Ctrl+Alt+Arrow Keys)
Only works on systems with Intel HD Graphics and requires system hotkeys enabled in Intel Graphics Command Center. Press Ctrl+Alt+Up Arrow to return to landscape, or use other arrow keys for different orientations. Fastest method when it works but not universally supported.
Method 3: Graphics Card Control Panel
Works on systems with NVIDIA, AMD, or Intel dedicated graphics. Open your graphics control panel from the desktop right-click menu, navigate to display settings, and change rotation from there. Useful when the Windows Display Settings orientation option is greyed out.
Method 4: Rotation Lock (For Tablets and 2-in-1 Devices)
Only available on Windows 11 devices with motion sensors. Use the Action Center Rotation Lock toggle or enable rotation lock in Display Settings to stop the screen from auto-rotating when you tilt the device.
No matter which Windows version you are using, the Display Settings method is always your safest and most reliable way to rotate display on Windows. I recommend learning that method first before experimenting with shortcuts or graphics panel options.
If you ever get stuck with a rotated screen and cannot remember the steps, press Ctrl+Alt+Up Arrow first to see if the shortcut fixes it instantly. If nothing happens, right-click your desktop, open Display Settings, select Landscape, and click Keep Changes. That combination solves 99% of screen orientation problems on Windows.
Older Windows? Here Is How to Rotate Your Screen on Windows 7 and 8
If you are still using Windows 7 or Windows 8, screen rotation works slightly differently because these older operating systems use a different Display Settings interface than Windows 10 and 11.
The most reliable method on Windows 7 and Windows 8 is to rotate your screen through the graphics card control panel. Right-click on your desktop and look for either Intel Graphics Options, NVIDIA Control Panel, or AMD Catalyst Control Center depending on which graphics card your computer uses.
Inside the graphics control panel, navigate to the display or screen configuration section. Look for rotation settings or orientation settings and select your desired angle. Apply the changes and your screen rotates immediately.
On Windows 7, you can also try the Ctrl+Alt+Arrow Keys shortcut if you have Intel graphics installed. The shortcut behavior is the same as on Windows 10 and requires Intel graphics hotkeys to be enabled.
Windows 8 introduced a limited version of the modern Display Settings panel. You can access screen orientation settings by right-clicking the desktop, selecting Screen Resolution, and then choosing Orientation from the dropdown menu. The options are the same as newer Windows versions but the interface looks more dated.
For most Windows 7 and 8 users, I recommend using the graphics card control panel method because it is the most consistent and does not depend on which specific version or build of the operating system you are running.
Frequently Asked Questions
Why is my Ctrl+Alt+Arrow key shortcut not working?
The shortcut only works when Intel Graphics Command Center has system hotkeys enabled. Open Intel Graphics Command Center, go to the Hotkeys tab, toggle Enable System Hotkeys to ON, and the shortcut will start working immediately.
How do I get my screen back to normal after it flipped accidentally?
Press Ctrl+Alt+Up Arrow to instantly fix it, or right-click your desktop, select Display Settings, choose Landscape from the Display Orientation dropdown, and click Keep Changes. Always select Landscape to return to normal orientation.
What happens if I do not click Keep Changes after rotating my screen?
Windows automatically reverts your screen to the previous orientation after a countdown timer expires, usually within 15 seconds. To make the orientation change permanent, click Keep Changes before the timer runs out.
Can I rotate just one monitor without affecting the other?
Yes, click on the numbered box of the specific monitor you want to rotate at the top of Display Settings to select it first. Then change the Display Orientation dropdown and the change applies only to that selected monitor.
Why is the Display Orientation option greyed out on my PC?
This happens when your monitors are set to duplicate mode, a fullscreen app is running, or your graphics driver does not support rotation. Switch to extended display mode in the Multiple Displays section or close fullscreen applications to unlock the option.
These are the most common questions about how to rotate screen on Windows. If you followed the methods above, your screen should now be in the correct orientation.