
How to Make a Desktop Shortcut for a Website
I open YouTube at least three times a day, and I used to type the URL every single time. It drove me crazy until I learned how to create a desktop shortcut that takes me straight there with one click.
If you want quick access to websites like Gmail, Amazon, Facebook, or any site you visit daily, you’re in the right place. I’ll show you exactly how to make a desktop shortcut for a website using whichever web browser you already have open on your desktop operating system.
I’m covering multiple methods today tailored to your specific browser and operating system, and you can jump straight to the one that fits your setup. Whether you’re on Windows or Mac, using Chrome, Edge, or Firefox, you’ll find a solution that works for you.
Which Method Is Right for You? (Quick Answer)
Before I walk you through every step, let me help you pick the right method based on what you need.
Use Method 1 if you want the website’s actual logo on your desktop icon. The Chrome menu method creates shortcuts that look professional and clean because they pull the site’s real favicon.
Use Method 2 if you want the fastest possible shortcut creation. The drag and drop shortcut method takes about five seconds and works in Chrome, Edge, and Firefox without opening any menus.
Use Method 3 if you’re not in a browser right now or if you want a method that works no matter which browser you use. The Windows manual method lets you create a shortcut to a website on desktop Windows 10 and 11 systems directly from your desktop.
I’ve tested all of these methods myself, and each one has a specific situation where it works best. The Chrome method gives you a custom icon, but the drag method is faster. The manual method creates a generic browser icon instead of the website logo, but it’s completely browser independent.
If you want your shortcut to open like a standalone app without browser tabs, the Chrome method has an “open as window” option I’ll show you in the steps below. This is similar to how you might install as app on some websites.
How to Make a Desktop Shortcut for a Website on Windows
Creating a website shortcut on desktop Windows systems is straightforward once you know the steps. I use these methods on both Windows 10 and Windows 11, and they work exactly the same on both versions.
I’m going to show you four methods specific to Windows. Pick the one that matches your browser and how you prefer to work.
Method 1: The Chrome Menu Method (Gets the Website Logo)
This is the method I use most often because it creates a desktop icon with the website’s real logo, not a generic browser symbol.
Here’s exactly how to make a desktop shortcut for a website in Chrome:
1. Open Google Chrome and go to the website you want to save. I’ll use Amazon as an example.
- Click the three dots in the top right corner of your Chrome window, which opens the Chrome three dots menu.
- Move your mouse down to “Cast, save and share” and let the menu expand.
- Click “Create shortcut” from the options that appear.
- A small box pops up asking what you want to name your shortcut. Type whatever name makes sense to you.
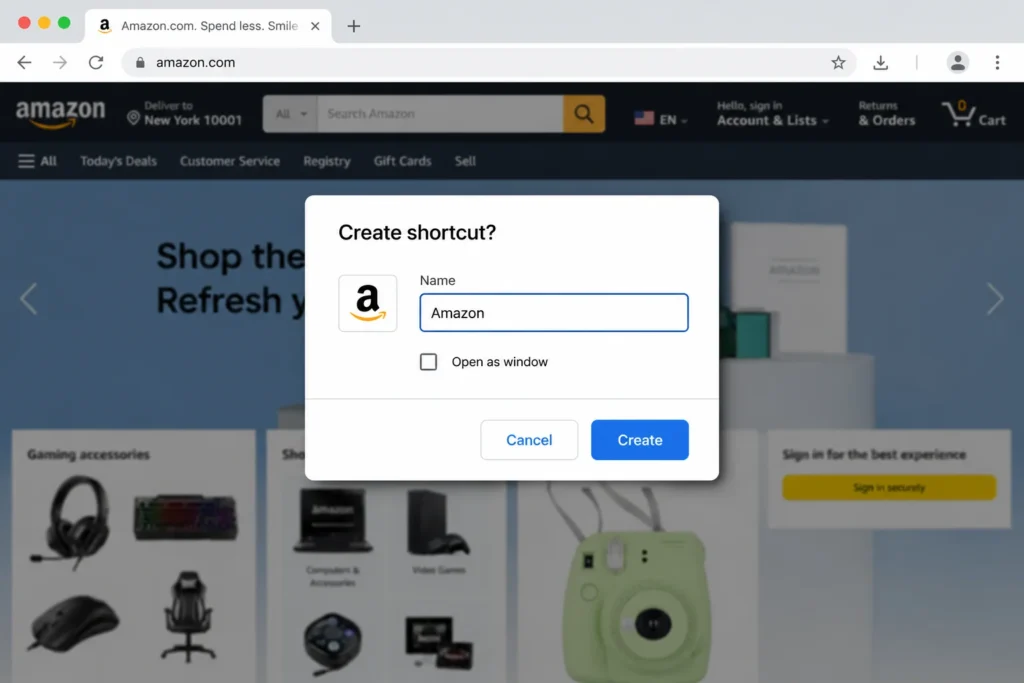
- Click the “Create” button.
Your desktop shortcut appears instantly on your screen with the Amazon logo or whichever site you chose.
Pro tip I discovered: Before you click Create, you’ll see a checkbox that says “Open as window.” If you check this box, the website opens in its own window without the usual Chrome address bar and tabs. It feels just like using an installed app instead of a browser, similar to Progressive Web App behavior. I use this feature for tools I open every day like my email or project management software.
Google Chrome creates shortcuts that include the website’s favicon, which is why your icon looks professional and recognizable instead of showing a generic globe symbol.
Method 2: The Drag and Drop Method (Fastest, Works in Any Browser)
This is my go-to method when I’m in a hurry because it takes about five seconds total.
This technique works in Google Chrome, Microsoft Edge, and Mozilla Firefox without any difference in the steps.
Here’s what I do:
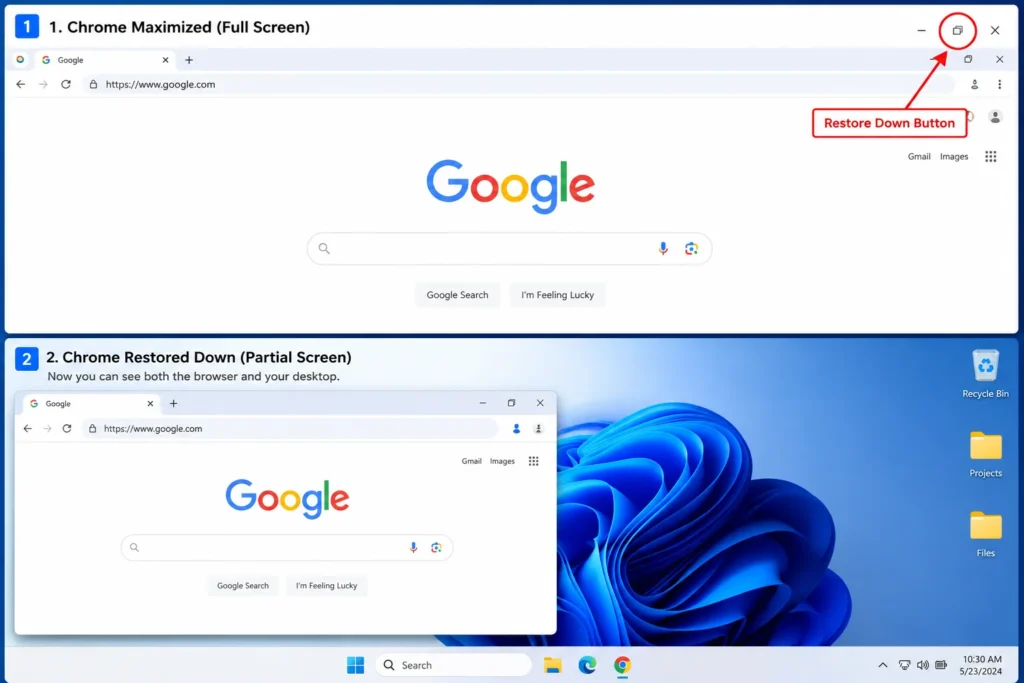
- First, click the restore down button at the top right of your browser window. That’s the middle button between minimize and close. You need to make your browser window smaller so you can see your desktop behind it. This step is critical because if your browser is maximized, the drag won’t work properly.
- Click once inside the address bar at the top of your browser to highlight the entire URL web address.
- Click and hold your mouse on the highlighted web address, then drag it out of the browser window and onto your desktop.
- Release your mouse button to drop it, and your shortcut creates instantly.
Even faster variation: Instead of highlighting the URL text, you can click and drag the small padlock icon that sits on the left side of the address bar. I grab that padlock icon from the address bar, drag it straight to my desktop, and release. It creates the same browser shortcut in half the time.
This method works across all major browsers and creates your shortcut in seconds without touching a single menu.
Method 3: The Windows Manual Method (No Browser Needed)
I use this method when I want to create a shortcut without opening my browser first, or when I need a shortcut that will always open in my default browser no matter which one I was using when I created it.
Here’s how to create a shortcut to a website on desktop using the Windows built-in tool:
- Right-click on any blank space on your desktop to access the right-click menu.
- Move your mouse to “New” in the menu that appears.
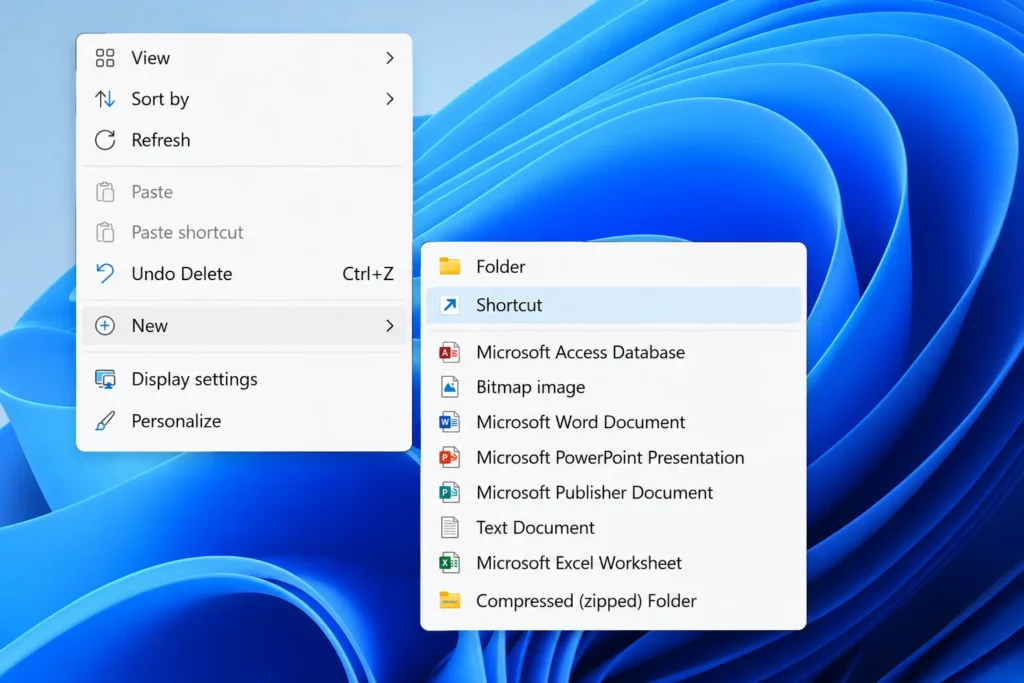
- Click “Shortcut” from the side menu.
- Windows opens a box asking you to type the location of the item. Type the full web address including the www part, like www.facebook.com.
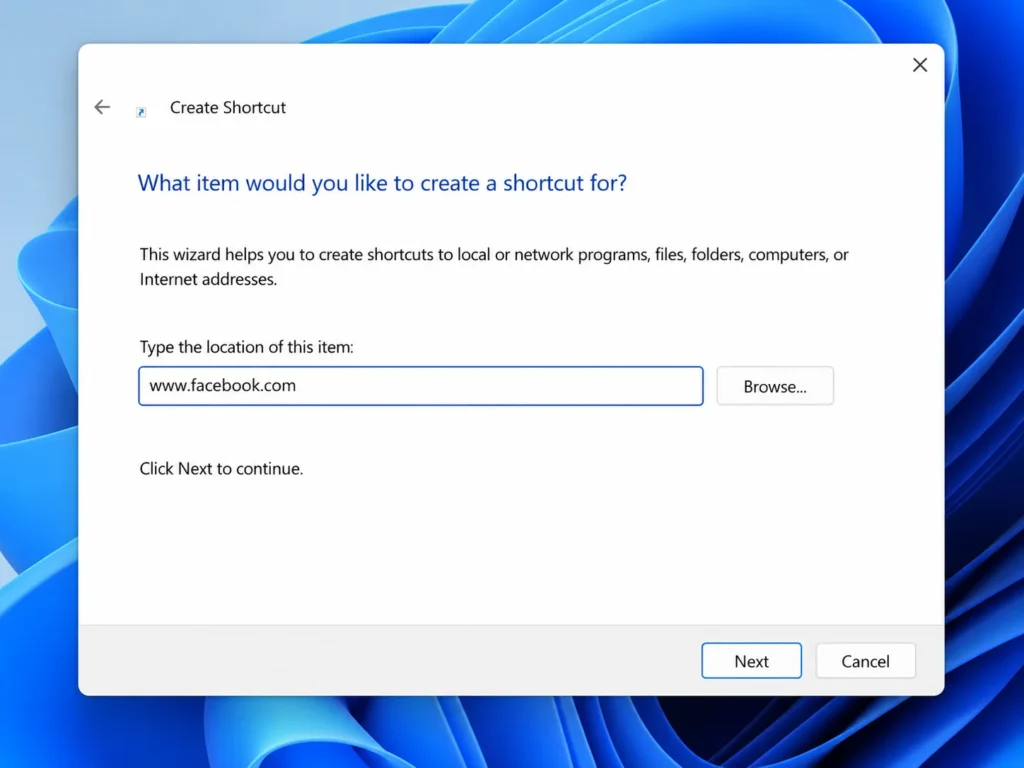
- Click “Next.”
- On the next screen, type a name for your shortcut.
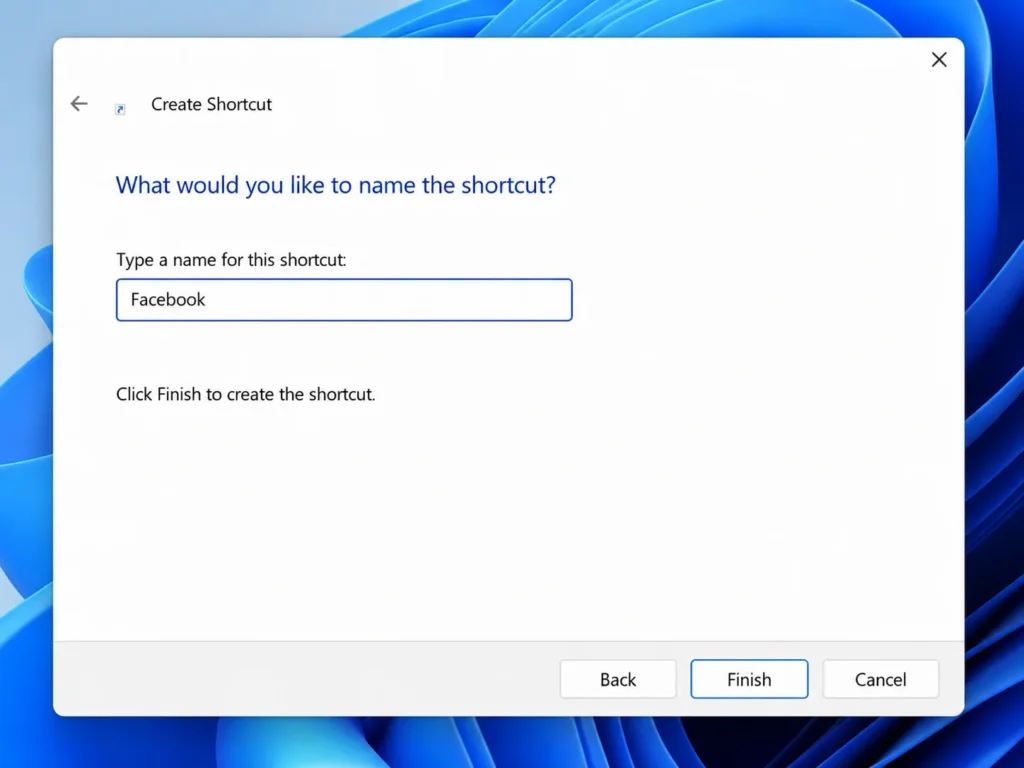
- Click “Finish.”
Your new shortcut appears on your desktop immediately. This creates an internet shortcut file with a .url file extension.
Important warning I learned the hard way: This method creates a generic globe icon or your default web browser logo instead of the actual website’s logo. If you want the real website icon, use Method 1 instead. I only use this Windows manual method when I need to create shortcuts quickly without opening a browser, or when I’m setting up a computer for someone who doesn’t care what the icon looks like.
This approach creates an internet shortcut file with a .url file extension that Windows recognizes and opens in your default web browser.
Method 4: Using Microsoft Edge (Favorites Bar + Desktop)
Microsoft Edge has two built-in ways to save website shortcuts, and I use both depending on whether I want to pin website to desktop or have a browser-based bookmark.
Option A for browser access:
- Click the star icon near the address bar while you’re on the website.
- Type a name for your shortcut in the label field.
- Change the folder dropdown to “Favorites bar.”
- Click “Done.
Your website shortcut now sits at the top of your Edge browser window every time you open a new tab.
Edge also has an Edge Apps menu option that lets you install certain websites as progressive web apps, which open in their own window similar to the “open as window” feature I mentioned in the Chrome method. Not every website supports this, but when it’s available, Edge shows an install icon in the address bar.
How to Make a Desktop Shortcut for a Website on Mac
If you’re on macOS, the process works a little differently than Windows, but it’s just as simple once you know where to look.
I’m covering both Safari and Chrome on Mac because those are the two browsers most Mac users have installed.
On Safari: Drag the URL to Your Desktop
Safari on Mac uses a drag and drop shortcut method that feels natural and works in seconds. You can drag shortcuts to your desktop or add them to your Dock for faster access
Here’s what I do on my MacBook:
- Open Safari and navigate to the website you want to save.
- Click once in the address bar to highlight the entire URL web address.
- Click and hold on the highlighted URL, then drag it out of the Safari window and onto your desktop.
- Release your mouse to drop it.

Safari creates a .webloc file on your desktop. When you double click that file, it opens the website in Safari automatically, which is the standard macOS format for website shortcuts.
This method works on macOS Ventura, Sonoma, and all recent Mac operating system versions. You can also drag the URL to your Dock if you want the shortcut there instead of on your desktop.
On Chrome for Mac: Same Menu, Same Steps
Google Chrome works almost identically on Mac as it does on Windows, which makes it convenient if you switch between systems like I do regularly.
The steps are exactly the same as Method 1 in the Windows section:
- Click the three dots in the top right corner of Chrome to open the Chrome three dots menu.
- Go to “Cast, save and share.”
- Click “Create shortcut.”
- Name your shortcut and click “Create.
On macOS, the shortcut might appear in your Applications folder instead of directly on your desktop depending on your Chrome settings. If that happens, just open your Applications folder, find the shortcut, and drag it to your desktop or Dock.
The Chrome method on Mac creates the same type of desktop shortcut with the website’s actual logo, just like it does on Windows.
Don’t Want a Desktop Icon? Add It to Your Chrome Homepage Instead
I don’t always want website shortcuts cluttering my desktop, so I use this Chrome homepage method for sites I visit constantly but don’t need visible on my desktop screen.
Chrome’s New Tab page has a grid of website shortcuts built right in, and you can add any site you want to that grid for quick access to websites without cluttering your desktop.
Here’s the exact process I follow:
- First, navigate to the website you want to save and copy the URL web address from the address bar. Press Ctrl and C together on Windows, or Command and C on Mac. This step is important because if you switch tabs before copying, you’ll lose the URL and have to go back.
- Open a new tab in Chrome. You’ll see the grid of existing shortcuts and a plus icon that says “Add shortcut.”
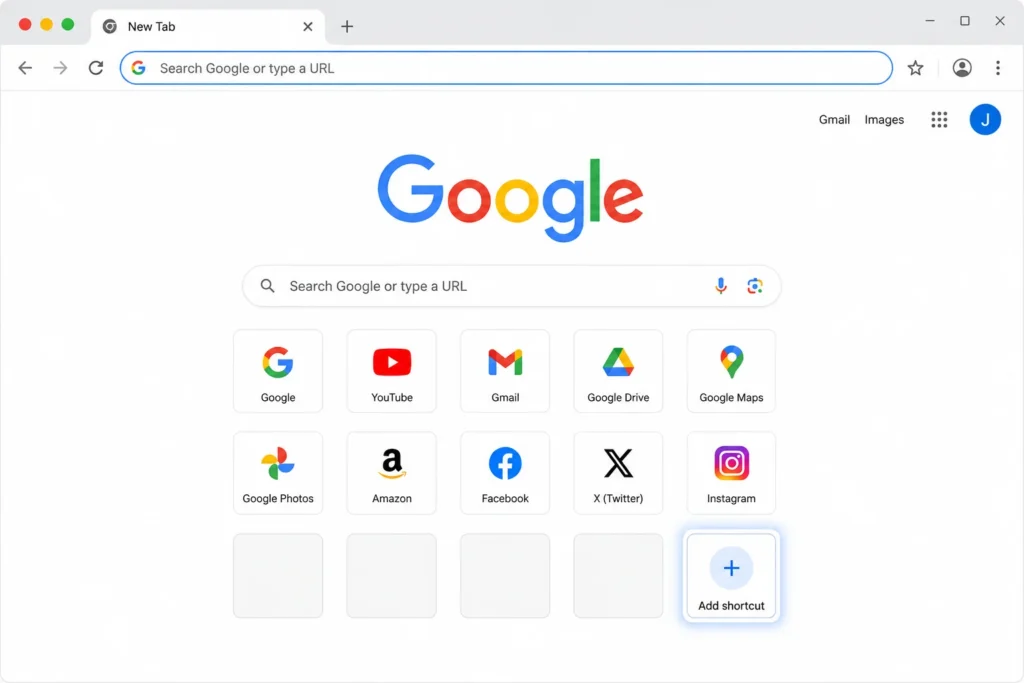
- Click that plus icon.
- Chrome opens a small box with two fields. In the “Name” field, type whatever you want to call this shortcut.
- Click in the “URL” field and paste the web address you copied earlier. Press Ctrl and V on Windows, or Command and V on Mac.
- Click “Done.”
Your new shortcut appears in the homepage grid immediately. Every time you open a new tab in Chrome, that website bookmark sits right there ready to click.
I use this method for my email, calendar, and work tools that I access dozens of times a day. It keeps my desktop clean while still giving me one-click website access inside my browser. This fits perfectly into my productivity workflow because I’m always opening new tabs anyway.
How to Pin a Website Shortcut to Your Taskbar or Start Menu
After you create a desktop shortcut using any of the methods above, you can pin it to your Windows taskbar or Start Menu for even faster access.
I keep my most used sites pinned to my taskbar so I can click them without minimizing windows to see my desktop.
Here’s how to pin a website to desktop taskbar on Windows 10 and Windows 11:
For Windows 11:
- Right click on the desktop shortcut you already created.
- Click “Show more options” from the menu.
- Click “Pin to taskbar” from the expanded menu.
For Windows 10:
- Right click on the desktop shortcut.
- Click “Pin to taskbar” directly from the menu.
To pin shortcuts to your Start Menu instead:
- Right click the shortcut and choose “Pin to Start.”
Once pinned, your website shortcut sits in your taskbar permanently next to your other program icons. I have Gmail, Google Calendar, and my company’s project management tool pinned there because I click them constantly throughout the day. This simple customization is part of optimizing your Windows experience for maximum productivity—similar to how rotating your screen or adjusting other display settings can improve your workflow.
How to Rename or Fix Your Shortcut After You’ve Already Created It
I’ve created hundreds of desktop shortcuts over the years, and I can’t count how many times I’ve typed the shortcut name wrong or later wanted to change where the shortcut actually goes.
The good news is you don’t have to delete your desktop shortcut and start over from scratch. Windows lets you rename any shortcut icon and even change the URL web address it points to, all through a simple Properties window.
Here’s exactly what I do when I need to fix a shortcut I already made:
- Right click on the desktop shortcut you want to change.
- Click “Properties” at the bottom of the menu that appears.
- Look for the “Web Document” tab at the top of the Properties window and click on that tab.
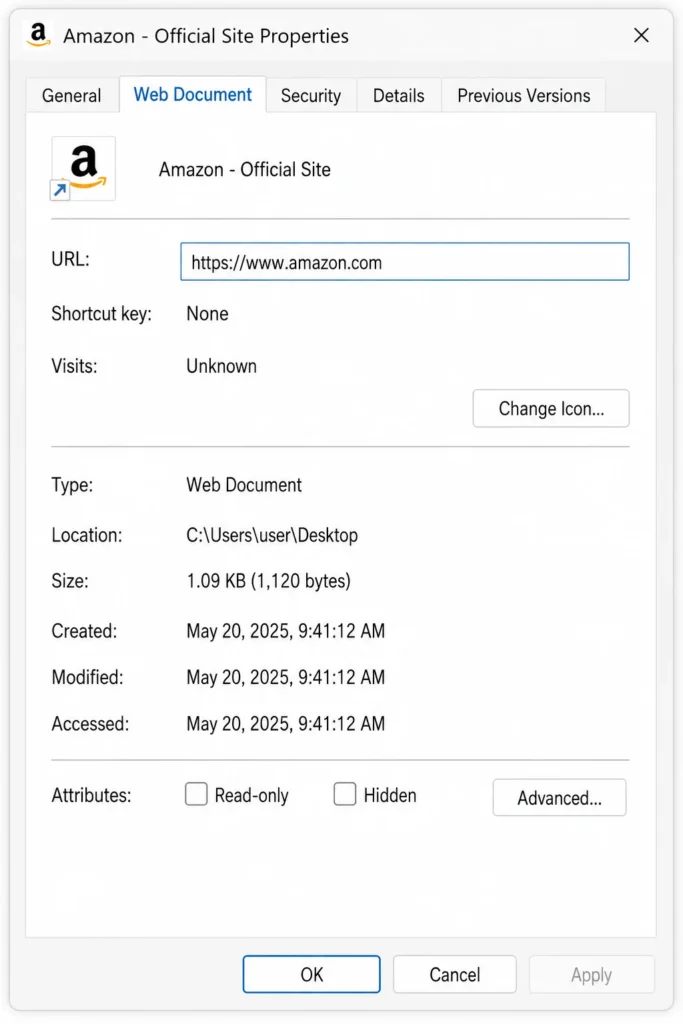
- You’ll see the full URL web address in a field labeled “URL” or “Target.” Click in that field and edit the web address if you need to change where the shortcut goes.
- Now click on the “General” tab at the top of the same Properties window.
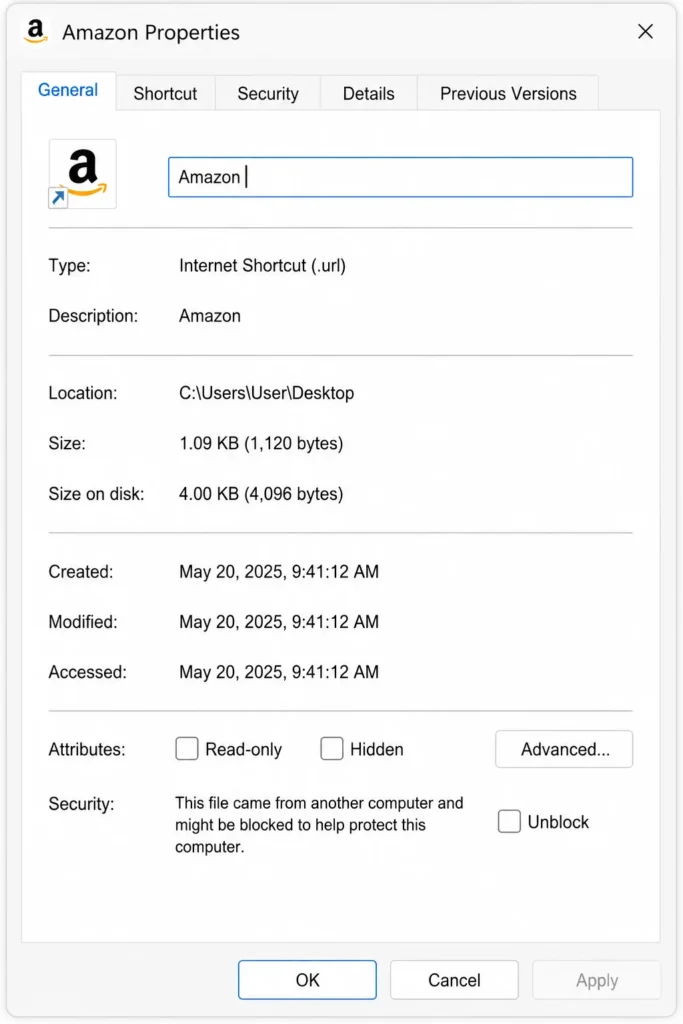
- At the very top under the icon preview, you’ll see a text field with the current name of your shortcut. Click in that field and type whatever new name you want.
- Click “OK” at the bottom to save your changes.
Your desktop shortcut updates immediately with the new name, and if you changed the URL, the shortcut now points to the correct website. I’ve used this when a website changed its URL or when I accidentally typed the wrong address when I first created my shortcut.
I learned this trick after I created a shortcut called “Mail” that I later wanted to rename to “Gmail” so I could tell my different email shortcuts apart. Instead of deleting and recreating the shortcut, I just opened Properties, changed the name in the General tab, clicked OK, and I was done in ten seconds.
This Properties method works for any website shortcut you create using any of the methods I showed you earlier. The shortcut file stores both the display name and the destination URL web address, and Windows lets you edit both whenever you need to.
Shortcut Not Working? Here Are the Quick Fixes
Sometimes a website shortcut doesn’t behave the way you expect, and I’ve run into most of these issues myself at one point or another.
The three problems I see most often are desktop shortcuts showing the wrong icon, the drag method not working, and shortcuts opening in a browser you didn’t want. Each one has a simple fix once you know what’s causing the problem.
My Shortcut Shows a Generic Icon, Not the Website Logo
If your website shortcut shows a plain globe symbol or a browser logo instead of the actual website’s icon, the reason is which method you used to create the shortcut.
The Windows manual right-click method always creates a generic shortcut icon because Windows doesn’t automatically download the website’s favicon when you use that create shortcut wizard. Google Chrome’s built-in shortcut tool does pull the real website logo, which is why shortcuts made through the Chrome menu look clean and professional.
To get the actual website icon on your desktop shortcut, you need to delete the current shortcut and recreate it using Method 1 from earlier in this guide. Open Chrome, go to the website, click the three dots, choose “Cast, save and share,” then click “Create shortcut.” That version will have the proper logo.
I Can’t Drag the URL to My Desktop
When the drag and drop shortcut method doesn’t work, the issue is almost always that your browser window is taking up your entire screen.
If your browser is maximized, you can’t see your desktop behind the browser window, which means you have nowhere to drop the URL when you try to drag it. Windows needs to see both the browser and the desktop at the same time for the drag and drop to register properly.
Click the restore down button at the top right of your browser window. The restore down button sits between the minimize and close buttons and looks like two overlapping squares. Clicking that button makes your browser window smaller so you can see your desktop in the background. Now when you drag the URL from the address bar, you can drop the URL onto your visible desktop and the drag and drop shortcut creation completes correctly.
The Shortcut Opens in the Wrong Browser
Desktop website shortcuts always open in whatever browser Windows has set as your default web browser, regardless of which browser you used to create the shortcut.
If you want your shortcuts to open in a different browser, you need to change your Windows default browser setting. Here’s how I do that on Windows 10 and Windows 11:
- Click the Start button and open Settings.
- Go to “Apps” in the Settings menu.
- Click “Default apps” in the left sidebar.
- Scroll down until you see “Web browser” in the list.
- Click on the current browser name shown there.
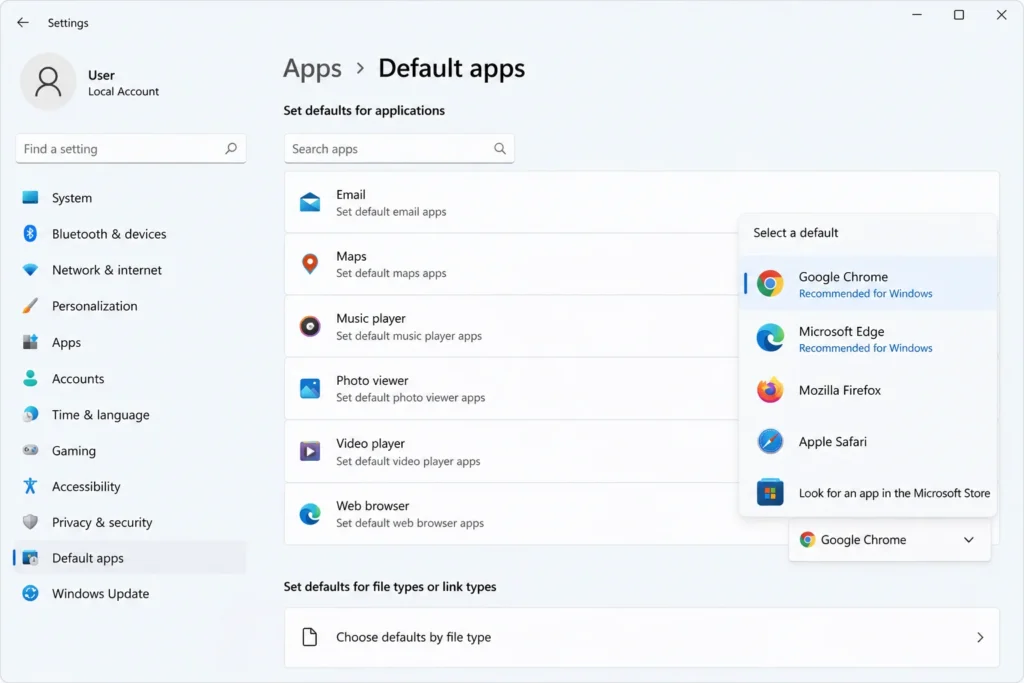
- Choose your preferred browser from the list that appears.
Once you change the default web browser, all your existing website shortcuts will open in the new browser you selected. You don’t need to recreate any shortcuts because the internet shortcut file simply tells Windows to open a URL, and Windows decides which browser to use based on your default setting.
If you’re having broader Windows configuration issues, you might also want to check out how to remove specific Windows updates, which can sometimes interfere with browser settings and application behavior.
For browser-specific instructions, you can also check Mozilla’s official guide on how to make Firefox your default browser if you prefer using Firefox for your shortcuts.
Save Time Every Day – Start With One Shortcut
Now you know how to make a desktop shortcut for a website using every major method available on Windows and Mac.
Use the Chrome menu method if you want the website’s logo on your icon. Use the drag and drop shortcut method if you want the fastest creation process. Use the Windows manual method if you need browser independence.
I recommend starting with just one website you open every single day and creating a desktop shortcut for that site right now. Once you see how much faster one-click website access feels compared to typing URLs or hunting through bookmarks, you’ll probably want to add shortcuts for your other frequently visited sites.
This simple productivity workflow change saves me dozens of clicks and several minutes every single day, and those minutes add up to hours over the course of a month.
Frequently Asked Questions
What does “Open as window” mean when creating a Chrome shortcut?
When you check “Open as window” in the Chrome shortcut creation prompt, the website opens in its own dedicated window without the browser address bar or tabs. The window looks and behaves like an installed app, which I find useful for tools I use daily like email or project management software.
Does the drag and drop method work in Firefox and Edge too?
Yes, dragging the padlock icon or highlighted URL text from the address bar to the desktop works in Chrome, Firefox, and Edge. The shortcut opens in your default browser when you double click the icon.
Why does my shortcut have a generic icon instead of the website’s logo?
The Windows manual method creates a generic globe or browser icon because that process doesn’t download the website’s favicon. To get the website’s actual logo, use the Chrome menu method by clicking the three dots, then “Cast, save and share,” then “Create shortcut.”
Can I add a website shortcut to my taskbar instead of the desktop?
Yes, first create a desktop shortcut using any method above, then right click the shortcut and select “Pin to taskbar.” On Windows 11, you may need to select “Show more options” first before you see the pin option.