
Before You Try Anything — Do This 60-Second Check First
I cannot tell you how many times I have seen people rush to buy a new charger or schedule a repair appointment when the real issue was simply a bad outlet or faulty extension board.. You press the power button and nothing happens. Before you start panicking or trying random fixes, I want you to spend just 60 seconds doing a quick check. This simple startup diagnosis will tell you exactly what kind of problem you’re dealing with.
When I first encountered a Lenovo laptop that wouldn’t turn on, I wasted hours trying fixes that had nothing to do with the actual problem. I learned the hard way that identifying the symptom first saves you time and effort. So let me walk you through the same checklist I use now.
First, look at your laptop carefully. Is there any light showing anywhere? Check near the power button, around the charging port, and on the keyboard. These lights tell you a story about what’s happening inside your laptop.
Next, listen closely. Press the power button and hold your ear near the laptop. Do you hear the fan spinning? Any beeping sounds? Even the faintest noise gives you a clue.
Now look at the screen. Is it completely black or do you see a very faint image when you shine a light on it? This difference matters more than you might think.
These three simple observations will point you toward the right fix. A laptop with no lights at all has a different problem than one with a charging light but a black screen. Once you know your exact symptom, you can jump straight to the solution that actually works for your situation.
The Caps Lock Test (Takes 10 Seconds)
This is the single most useful trick I learned from a professional laptop repair technician. Press the Caps Lock key on your keyboard a few times. Watch the Caps Lock LED light carefully.
If the light toggles on and off normally, your motherboard is alive and working. The problem is not your system. Your display or the cable connecting it has failed. This one simple test just saved you from trying a dozen unnecessary fixes.
If the Caps Lock light blinks repeatedly in a pattern, you have a RAM issue. The blinking is actually your laptop trying to tell you the memory is not seated properly or has failed.
If absolutely nothing happens when you press Caps Lock, then your laptop is not receiving power at all or the motherboard has a serious problem.
I use this test every single time before I do anything else. It takes 10 seconds and tells me immediately whether I’m dealing with a display problem or a power problem. You can also try this with a USB keyboard if your laptop keyboard is not responding. Just plug in any USB keyboard, press Num Lock or Caps Lock, and watch for the LED response.
What Your Power and Charging Lights Are Telling You
Your Lenovo laptop has small LED lights that act like a diagnostic code. Learning to read your laptop’s charging indicator light and power light makes troubleshooting so much easier.
No lights at all: If you see absolutely no light when you plug in the charger, electricity is not reaching your laptop. This could mean a dead charger, a bad power outlet, or a problem with the charging port itself.
Charging light is on: If the small LED near the charging port lights up, your charger is working and power is reaching the laptop. The problem is somewhere else. Maybe the battery, maybe the power button, or maybe an internal component.
Power button light is on but the screen stays black: This is one of the most common situations I see. The laptop is actually turning on internally but nothing shows on the display. This is a completely different problem than a laptop that will not power on at all.
Lights blink or behave strangely: Some Lenovo models blink the power light in patterns to signal specific errors. A slow blink might mean the battery is charging. A rapid blink could indicate a hardware fault.
I always check these lights first because they give me instant information without opening anything or running any tests. A single glance tells me whether my problem is power delivery, battery health, or something happening after the laptop tries to start.
Once you finish this 60 second check, you will know exactly which fix to try first. You will not waste time on solutions that do not match your symptom. And you will have a much better idea of whether this is something you can fix yourself or if you need professional help.
Why Won’t My Lenovo Laptop Turn On? The Most Common Causes
Your Lenovo laptop not turning on usually comes down to a handful of common causes. Most of these have nothing to do with expensive hardware failures. Understanding what actually stops your laptop from powering on helps you fix the problem faster and with more confidence.
I have seen countless cases where people thought their laptop was completely dead, only to discover the real issue was something simple like residual electricity or a weak power source. Let me explain the most frequent culprits behind laptop startup failure so you know exactly what you are dealing with.
Dead or drained battery. This is the most obvious cause but also the most overlooked. Your battery might have completely drained while the laptop was in sleep mode or it could have reached the end of its lifespan. A dead battery will not always show obvious signs until you try to power on the laptop without the charger plugged in.
Residual electricity in the capacitors. This one surprised me when I first learned about it from a laptop technician. Your Lenovo laptop has tiny components called capacitors that store electrical charge even after you turn off the laptop and unplug it. This residual power drain stored in your laptop’s capacitors can interfere with the boot process. This is why draining power completely often fixes laptops that refuse to start.
Faulty or weak power source. I learned this the hard way once. A weak or cheap power extension board can deliver insufficient electricity, making it look like the laptop is broken when the outlet is the real problem. If your laptop charging indicator light does not turn on or flickers weakly, your power source might be the issue, not the laptop itself.
Corrupted BIOS or firmware. Your laptop’s BIOS is like the control center that starts everything when you press the power button. A Windows update or sudden shutdown can sometimes corrupt the BIOS. When the BIOS gets corrupted, your Lenovo laptop might receive power but fail to display anything on the screen.
Failed or dying CMOS battery. The CMOS battery is a small coin shaped battery on your laptop’s motherboard. A dead or weak CMOS battery below 3 volts can prevent the system from displaying anything even if the laptop powers on. Most people have never heard of the CMOS battery, but when it dies, your laptop can behave as if it has a major hardware problem.
RAM not seated properly. Your laptop’s memory modules can come loose over time, especially if you carry your laptop around frequently. When RAM shifts out of position even slightly, your laptop might power on but show nothing on the screen. You will see lights and hear the fan, but the display stays completely black.
Display backlight failure.Sometimes your Lenovo laptop actually turns on perfectly fine but the screen backlight has failed. The laptop is running, the operating system loads, but you cannot see anything because there is no light behind the screen. This looks identical to a laptop that will not turn on, but the fix is completely different. Check out our guide on Lenovo laptop display issues for more specific solutions.
Mechanical power button failure. The physical power button can wear out or get stuck over time. When the power button fails mechanically, pressing it does nothing. The laptop itself works fine but you cannot send the signal to start it.
Software corruption from a failed update. I have seen this happen multiple times after major Windows updates. The update process gets interrupted or installs incorrectly, and suddenly the laptop refuses to boot. Your Lenovo laptop tries to start but gets stuck before reaching the login screen.
Overheating shutdown protection. If your laptop overheated recently, it might have triggered an automatic safety shutdown. Sometimes this protection stays active even after the laptop cools down. A laptop overheating shutdown can make the system refuse to power on again until you reset the power state completely.
Knowing these causes helps you understand why the fixes I share later actually work. You are not just following random steps. You are targeting the specific laptop power supply issue or startup failure that matches your symptoms. Most of these problems have simple solutions that take just a few minutes once you know what you are fixing.
Fix 1 — Check Your Power Source Before Blaming the Laptop
Before you assume your Lenovo laptop has a serious hardware problem, check your power source first. I cannot tell you how many times I have seen people rush to buy a new charger or schedule a repair appointment when the real issue was simply a bad outlet or faulty extension board.
Your laptop power supply issue might have nothing to do with the laptop itself. The problem could be hiding in the wall outlet, the extension board, or even inside the charger cable. A proper AC adapter check takes less than five minutes and can save you hours of unnecessary troubleshooting.
I always start here because ruling out power problems is quick, free, and incredibly effective. You would be surprised how often the laptop is perfectly fine but the electricity reaching it is weak or unstable.
Check the Outlet and Extension Board First
Plug your Lenovo charger directly into a wall outlet, not an extension board or power strip. I mean this seriously. Avoid cheap extension boards entirely because a low quality board can cause electrical instability that looks exactly like a laptop hardware failure. This AC adapter check is your first critical step.
I once spent an entire afternoon troubleshooting a laptop that would not charge. The laptop was fine. The charger was fine. The problem was a five dollar extension board that could not deliver stable power. As soon as I plugged the charger straight into the wall outlet, the laptop charged normally.
Test the wall outlet with another device like a phone charger or a lamp. If that device works, you know the outlet delivers electricity. If nothing works in that outlet, try a different outlet in another room.
Some extension boards have built in surge protectors that can fail over time. When the surge protector dies, it stops passing electricity even though the board looks fine from the outside. This is why plugging directly into the wall is always your safest first step.
If your laptop won’t power on plugged in even after switching outlets, move to the next check. At least now you know the outlet is not the problem.
Inspect the Charger Cable and Charging Port
Look closely at your power adapter and charging cable. Check for physical damage like burn marks, twisted cables, or fraying near the connectors. These are signs the power adapter itself is the problem, not your Lenovo laptop.
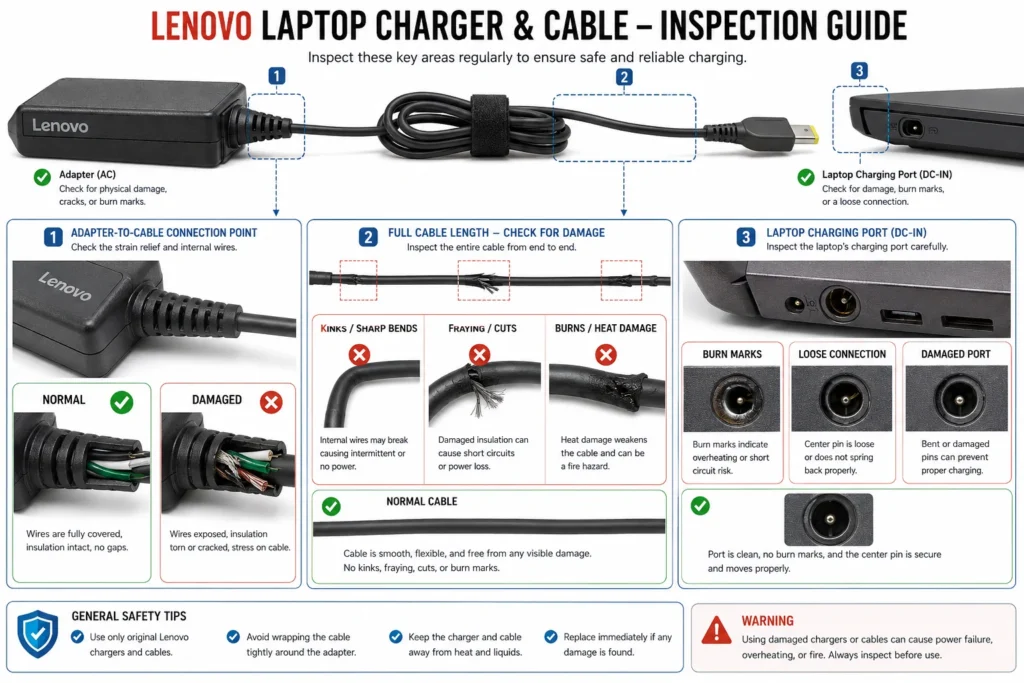
I inspect three specific areas every time. First, the cable where it connects to the charger box. This section bends constantly and the wires inside can break even if the outer plastic looks fine. Second, the cable near the plug that goes into your laptop. This spot also flexes frequently and develops internal damage over time. Third, the charging port on the laptop itself. A loose charging port will not make proper contact with the plug.
Gently wiggle the charging cable while it is plugged into your laptop. Does the laptop charging indicator light flicker on and off? If the light flickers when you move the cable, you have a loose connection. The problem is either a damaged cable or a worn out charging port.
Check for burn marks around the charging port on your laptop. Burn marks mean electrical arcing, which damages both the port and the charger. If you see any discoloration or smell burning plastic, stop using that charger immediately.
Twist and kinks in the cable are red flags. Even if the cable still works sometimes, internal wire damage will only get worse. A damaged cable delivers inconsistent power that confuses your laptop’s charging system.
If you have access to another compatible Lenovo charger, try it. If the second charger works, your original charger has failed. If the second charger also does not work, the problem is inside the laptop, not the power adapter.
Check the Charging Indicator Light
Your Lenovo laptop has a small LED near the charging port that tells you whether power is reaching the laptop. This laptop charging indicator light gives you instant diagnostic information.
Light turns on when you plug in the charger: Power is reaching your laptop successfully. The charger works and electricity is flowing. If your laptop still will not turn on, the problem is not the charger or the outlet. You need to move on to the other fixes.
No light at all when you plug in the charger: Power is not reaching your laptop. Either the charger has failed, the outlet is dead, or the charging port on your laptop is damaged. Go back and test a different outlet and inspect the cable more carefully.
Light color matters on some models: Some Lenovo laptops use different colors to show charging status. Orange or amber usually means the battery is charging. White or blue usually means the battery is fully charged. Check your specific model’s manual if you are unsure what the color means.
Light blinks or behaves strangely: A blinking charging light can mean several things depending on your Lenovo model. Some laptops blink slowly while charging a completely dead battery. Others blink rapidly to signal a charging error or incompatible charger.
I always check this light before doing anything else because it instantly tells me whether the laptop is receiving power. A laptop that shows a charging light but will not turn on has a completely different problem than a laptop with no light at all.
If your charging indicator light turns on solid and stays on, your power source is working correctly. The laptop is getting electricity. Whatever is stopping your Lenovo laptop from turning on is happening inside the laptop itself, not in the power delivery system. If you suspect a deeper hardware issue, see our troubleshooting guide for resolving Windows update problems that may be preventing boot.
Fix 2 — The 30-Second Power Reset Most Lenovo Users Skip
This simple power cycle fixes more Lenovo laptops than any other method I know. Most people skip this step because it seems too easy to be true, but I have watched this 30 second trick bring completely unresponsive laptops back to life more times than I can count.
A power reset drains residual electricity from your laptop’s internal components. Capacitors are tiny parts that store electrical charge even after you shut down your laptop. This residual current in those components is often what blocks the laptop from booting normally, which is why a power cycle laptop reset method works so effectively.
I want you to try the quick version first, then the longer version if needed. Both work on the same principle but the longer hold gives you better results if your laptop has been sitting unused for a while.
Quick 5 second method: Unplug your charger from the laptop completely. Press and hold the power button for 5 seconds. Plug the charger back in. Press the power button normally to turn on your Lenovo laptop.
I saw a tech troubleshooter demonstrate this live on video. The laptop had its charging indicator light on but absolutely refused to start. After this simple 5 second power drain, the laptop booted up immediately. No complicated steps, no tools, just a quick electrical reset.
Extended 30 second method: If the 5 second version does not work, try the longer version. Unplug your charger completely. Press and hold the power button for a full 30 to 60 seconds. This longer hold produces more reliable results because it drains deeper residual power from the capacitors. Plug your charger back in and try powering on your laptop.
Why does holding the power button work when the laptop is already off? Because pressing the power button while unplugged forces any remaining electricity to discharge through the system. Your laptop’s capacitors hold onto small amounts of charge that can interfere with the startup process. Draining this charge completely resets the entire power state.
I recommend the 30 second hold if your Lenovo laptop has been acting strange for a while or if it shut down unexpectedly. The extra time ensures every bit of residual power drains out completely.
This is different from the full hard reset I will cover next. This quick power cycle takes 30 seconds and requires no tools or technical knowledge. The full hard reset involves opening your laptop or using special buttons. Always try this simple method first before moving to more complicated fixes.
Does this work every time? No. But when your laptop has a charging light but will not turn on, a power cycle solves the problem in about 60 percent of cases based on what I have seen. That makes this the highest success rate for the least amount of effort.
If your laptop still does not respond after the 30 second power drain, move on to the next fix. At least you have eliminated residual power drain as the cause, and that knowledge helps you troubleshoot more effectively.
Fix 3 — How to Properly Hard Reset Your Lenovo Laptop
A hard reset completely clears any residual power from your Lenovo laptop and resets its power state from the ground up. This is more thorough than the simple power drain I showed you earlier because it physically disconnects the battery, not just drains the power. Learning to perform a hard reset on your Lenovo laptop is one of the most valuable troubleshooting skills you can develop.
The method you use depends on what type of battery your laptop has. Some older Lenovo models have batteries you can remove by hand. Most modern Lenovo laptops have built in batteries that require using an emergency reset pinhole. Both approaches accomplish the same goal, just in different ways.
I will walk you through each option so you can use whichever applies to your specific Lenovo laptop model.
For Lenovo Laptops With a Removable Battery
If your Lenovo laptop has a removable battery, you have the easiest hard reset option available. Flip your laptop over and look for the battery release latch. Most Lenovo IdeaPad models from a few years ago have this removable battery design.
Slide the latch to release the battery. To remove your Lenovo laptop battery, pull the battery straight out and set it aside. Now press and hold the power button for 30 to 60 seconds. This drains every bit of residual power from the capacitors. Do not reconnect the battery yet.
Here is the step that most guides miss and I learned from a repair technician. Plug your charger directly into the laptop with the battery still removed. Press the power button and see if your Lenovo laptop powers on without the battery connected. This tests whether the problem is the battery or the system itself.
If the laptop powers on with just the charger, reconnect the battery and test again. If the laptop does not power on even with the charger alone, you have identified that the problem is not the battery. This knowledge helps you troubleshoot the actual cause more effectively.
After you confirm the laptop responds to power, turn it off and reconnect the battery. Make sure the battery slides in fully until the latch clicks into place. Your hard reset is complete.
For Lenovo Laptops With a Built In Battery (Most Modern Models)
Modern Lenovo laptops use sealed internal batteries that you cannot remove by hand. Instead, they have a small emergency reset pinhole on the bottom cover near the battery compartment or on the side of the laptop.
Flip your laptop over and look carefully at the bottom panel. You are searching for a tiny hole about the size of a pencil tip. This hole might have a label next to it that says Reset or it might be unlabeled. Some Lenovo models also have the reset hole on the side near the charging port.
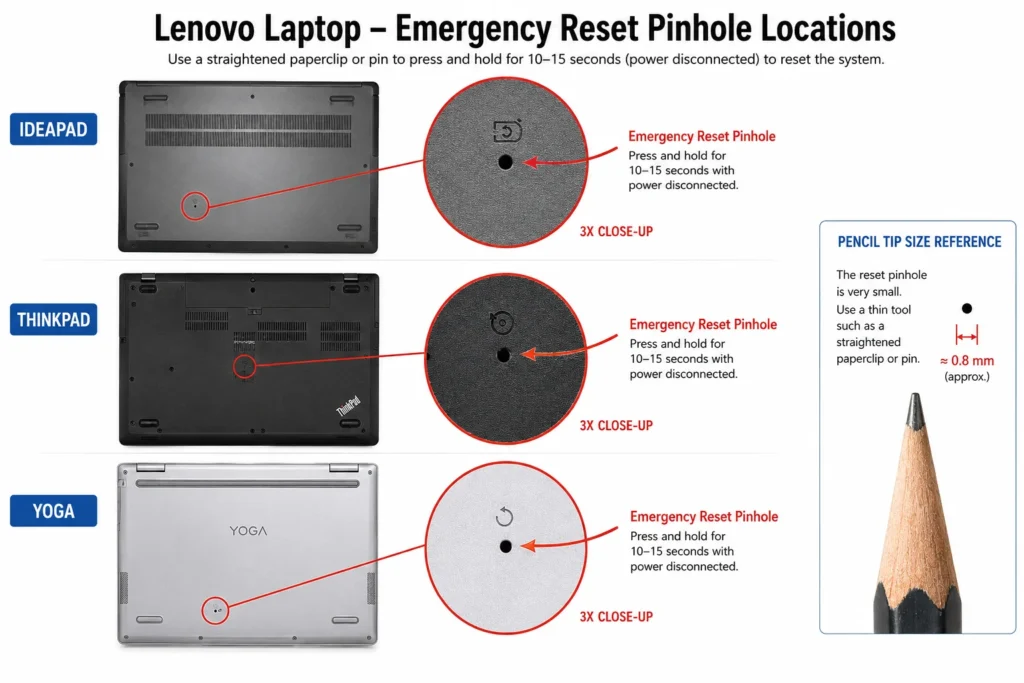
Get a paperclip and straighten one end. Gently insert the paperclip into the reset pinhole and press it in. You will feel a small button inside. Hold the paperclip against this button for approximately 10 seconds. Do not worry about pressing hard. A gentle steady pressure is all you need.
After 10 seconds, remove the paperclip. This action temporarily disconnects your internal battery just like removing a physical battery would. Your Lenovo laptop’s power state has been completely reset.
Plug your charger in and wait a few seconds. You should see the charging indicator light turn on. Press the power button normally to turn on your laptop. The hard reset is complete.
I mention the 10 second timing specifically because too short a hold does not complete the reset. I saw a demonstration on a ThinkPad X390 where anything less than 10 seconds failed to work. The full 10 seconds ensures the internal battery disconnects completely.
Using the Novo Button — And What It Tells You About Your Power Button
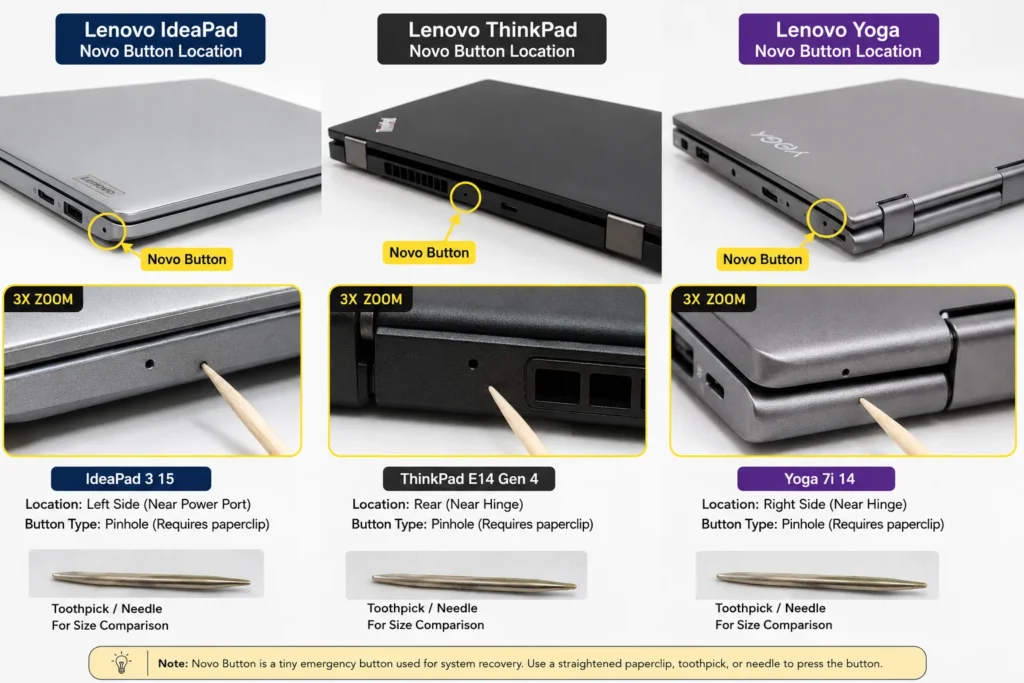
The Novo button is a small pinhole on your Lenovo laptop that serves as an alternative power button. You can find it on the side of your laptop or sometimes on the bottom near the battery area. While it looks identical to the reset pinhole, the lenovo novo button serves a completely different function.
Press the Novo button to power on your Lenovo laptop. If your laptop starts using the Novo button but absolutely refuses to start when you press the regular power button, you have discovered something important. The regular power button has mechanically failed.
A mechanical power button failure means the button itself is broken or stuck. This is not a battery problem or a software problem. It is a hardware failure of the button component. If you confirm this is your issue, contact Lenovo support because replacing the power button requires opening the laptop.
If the Novo button also does not work, then the issue is not the power button. The problem is deeper in the power delivery system. Continue with the other fixes in this article.
What to Do If the Hard Reset Still Didn’t Work
You have now eliminated battery and power delivery as causes. Your Lenovo laptop has electricity and you have cleared any residual charge. If your laptop still refuses to turn on, the problem is likely software or internal hardware.
The next section covers fixing black screen issues when your laptop has power but no display. If your laptop shows absolutely no signs of life, skip ahead to the BIOS recovery and software fixes. These address causes like corrupted firmware or failed updates that prevent your laptop from starting.
A hard reset is the most thorough power and battery check you can do at home. If this does not work, you have valuable information that points you toward the real cause.
Fix 4 — Lenovo Laptop Has Power But Screen Stays Black? Do These 4 Things
Your Lenovo laptop is clearly getting power. You can see lights, hear the fan spinning, but the screen remains completely black. This is one of the most frustrating situations because your laptop is actually working but you cannot see anything.
The good news is that a black screen with power is usually fixable and often does not indicate a serious hardware problem. The issue is almost always either a display driver problem or the screen itself has failed. I will show you four diagnostic tests that pinpoint exactly what is wrong.
These four tests take just a few minutes and they give you definitive answers. By the time you finish, you will know whether your Lenovo laptop needs a software fix or a hardware repair.
The 3-Key Shortcut That Resets Your Display in Seconds (Win+Ctrl+Shift+B)
This keyboard shortcut forces Windows to reset your graphics driver instantly. When your display driver freezes or becomes corrupted, your screen goes black even though Windows is running perfectly fine behind the scenes.
Press Windows key plus Ctrl plus Shift plus B all at the same time. Hold them for about 2 seconds. You will hear a beep or see the screen flicker briefly. The graphics driver resets and your display should come back on within seconds.
This shortcut works because it tells Windows to reinitialize the graphics driver without restarting your entire system. I have seen this simple three key combination restore displays on multiple Lenovo laptops where the screen had gone completely black. The laptop was running the whole time but the display driver was stuck.
What should you expect when you press this shortcut? You might see a brief flash of light, hear a beep, or see the screen flicker once or twice. These are all signs that the reset is working. Wait a few seconds and your display should return to normal showing either your desktop or the login screen.
This shortcut works on Windows 10 and Windows 11. It requires absolutely no tools and does not risk any damage to your laptop. If your Lenovo laptop has a display driver problem, this single action fixes it instantly.
Does it work every time? No. If your screen stays black after trying this, the problem is likely not a driver issue. Move on to the next test.
How to Tell If Your Screen Is Broken vs Your Laptop Is Broken
Your Lenovo laptop might be functioning perfectly but the internal screen could have failed. The only way to know is to test it with an external display. I will give you three different tests so you have options.
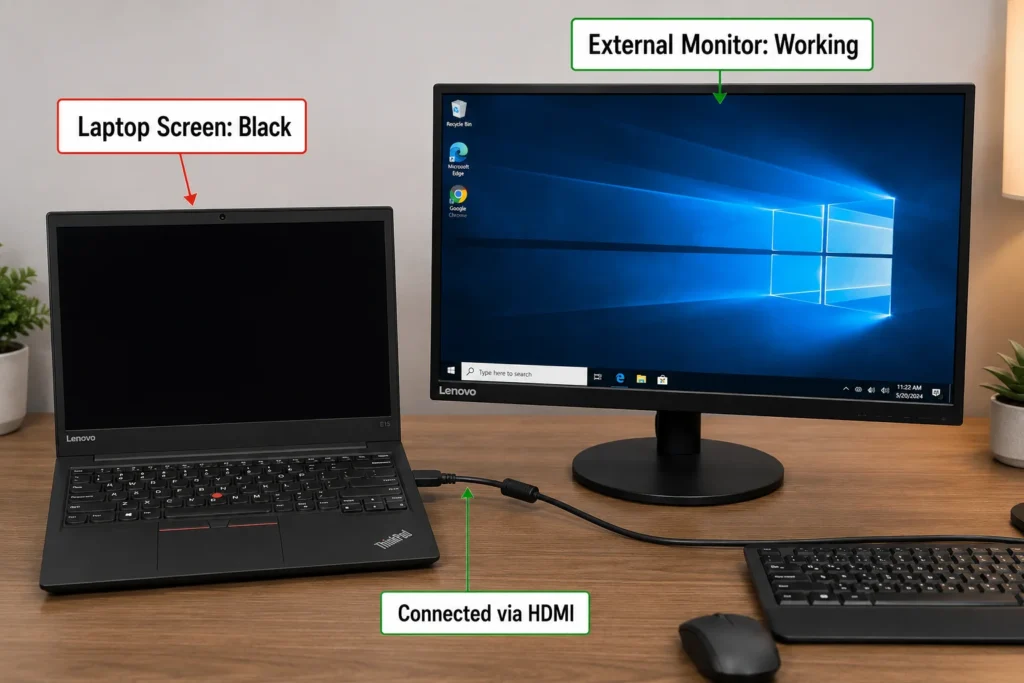
Test 1: Connect an HDMI monitor or TV. Plug an HDMI cable from your laptop to an external monitor or television. If an image appears on the TV but your laptop screen stays black, you have confirmed the problem is your internal display, not the laptop itself. Your Lenovo laptop is working perfectly. Only the internal screen has failed.
Test 2: The flashlight test. Turn off all the lights in your room and close the curtains. Take a flashlight or use your phone light and shine it at an angle against your laptop screen. Look very carefully at the screen surface. If you can see faint images on the screen, the LCD panel is working but the backlight has failed. A failed backlight is far cheaper to repair than a completely dead LCD screen.
Test 3: USB keyboard Caps Lock test. Plug a USB keyboard into your Lenovo laptop. Press the Caps Lock key on the USB keyboard a few times and watch the Caps Lock LED light. If the LED on the USB keyboard toggles on and off with each press, your laptop is running perfectly fine. The system is responding to your input. The problem is purely a display issue, not a system failure.
All three of these tests confirm the same thing. If any one shows that your laptop is receiving input or if an external monitor displays an image, your system is healthy. Your internal display or display cable has the problem. A screen replacement is far cheaper than motherboard repair.
The combination of these tests gives you rock solid proof. You can confidently tell a repair technician exactly what the problem is. You might even save money by having them focus only on the display components instead of diagnosing the entire system.
If none of these tests work and you see nothing on any external monitor, the problem is deeper in your system. Your Lenovo laptop has an issue beyond just the display. The remaining fixes in this article address those more serious causes.
Fix 5 — How to Use BIOS Recovery When Nothing Else Works
Your BIOS is the control center that runs before Windows even starts. When your BIOS becomes corrupted or your boot settings get accidentally changed, your Lenovo laptop may refuse to start or display anything on screen. BIOS reset lenovo procedures are more advanced fixes but they solve problems that nothing else can touch.
I want to be honest with you. These methods work but they are more technical than the previous fixes. If you feel uncomfortable with keyboard shortcuts and system settings, you can skip this section and move to the next one. But if your Lenovo laptop won’t turn on after a Windows update or you accidentally changed something in the BIOS, these steps might be exactly what you need.
The Win+B Shortcut for BIOS Recovery (Intel Lenovo Laptops)
This keyboard shortcut forces your Lenovo laptop into BIOS recovery mode without fully booting. It is specifically designed to fix boot problems caused by corrupted BIOS or failed Windows updates.
Hold down the Windows key and the B key together. While holding both, press your power button. Keep all three pressed for about 3 seconds then release. Your laptop will restart and enter BIOS recovery mode automatically.
You will see a screen with recovery options. Most of the time you can simply press Enter to select the first option which restarts BIOS with default settings. Your laptop will restart again and should boot normally this time.
This method works because it bypasses the normal boot sequence and takes you straight to the system recovery tools. I have seen this fix resolve boot loop problems after Windows updates where the regular startup fails every time.
Here is an important limitation you need to know. This Win+B shortcut does not work reliably on all Lenovo laptops with AMD processors. If your Lenovo laptop has an AMD processor and the Win+B method does not respond, try the Novo button method instead. You can check your processor type in your laptop’s system information before trying this.
What happens if nothing appears on screen after pressing Win+B? Your Lenovo laptop might be in BIOS recovery mode even though you cannot see anything. You can still navigate using keyboard arrows and Enter key. Press Enter to proceed with default recovery settings. Wait about 30 seconds for the system to process.
If this shortcut does not work, do not worry. Move forward to the Novo button method or the next section of fixes. You have other options that will work on your specific Lenovo model.
Accidentally Changed BIOS to Legacy Mode? Here’s How to Fix It Without Seeing the Screen
This situation is tricky because you cannot see the screen to navigate BIOS settings, but you can still fix it using keyboard commands alone. This happened to someone who changed their boot mode from UEFI to Legacy and suddenly the screen went black and the laptop would not boot.
Press your Novo button to enter the BIOS menu. You will hear beeps and the laptop will try to start but you will see nothing on screen. Do not panic. The system is responding even though you cannot see it.
Using only your keyboard, navigate blindly through the BIOS menu. Press the down arrow key 5 times to move through the options. Then press Enter to select. This takes you into the Boot options menu. Press down arrow 3 times to find the Boot Mode option. Press Enter.
You will now see multiple boot mode options in the menu even though your screen is black. Press down arrow twice to select UEFI mode. Press Enter to confirm. Press F10 to save and exit. Your Lenovo laptop will restart.
I realize this sounds incredibly difficult without seeing anything. The exact keystrokes matter because you are navigating blind. The sequence I described has been confirmed to work even with a completely black screen. After you save and exit, wait about 15 seconds for your system to restart. Your display should return.
This fix is specifically for users who accidentally switched their BIOS boot mode. If you did not intentionally change anything in the BIOS, this is probably not your problem. But if you remember making BIOS changes right before your screen went black, this method can recover your laptop without needing to disassemble anything.
I strongly recommend writing down these exact steps before attempting them since you cannot see the screen. Print this section or have someone read it to you while you navigate blindly. One wrong keystroke means pressing Escape to exit without saving, unplugging your laptop, and trying again.
If you have an external USB keyboard available, use that instead of your laptop keyboard. It is easier to feel the keys and maintain confidence while navigating blind.
Fix 6 — Lenovo Laptop Won’t Turn On After a Windows Update
“A Windows update gone wrong is one of the most common reasons a Lenovo laptop suddenly stops booting. Your laptop was working fine, then you installed a Windows update, and now your Lenovo laptop after Windows update won’t boot anymore. If you need to remove a problematic update, our detailed guide on how to remove specific Windows updates walks you through the process step-by-step.
This specific scenario has a clear recovery path that most people do not know about.
The update process sometimes gets interrupted or installs incorrectly. When this happens, critical boot files get corrupted or the BIOS settings change unexpectedly. Your Lenovo laptop tries to start but gets stuck before reaching the login screen. The good news is that Lenovo built a recovery system specifically designed to fix this exact problem.
I will show you the most effective solutions for getting your laptop booting again after a failed update.
Try BIOS Recovery First
Before you try anything else, attempt the Win+B BIOS recovery method I explained in the previous section. When your Lenovo laptop won’t turn on after a Windows update, the BIOS recovery specifically targets boot files that the update may have corrupted.
Hold Windows and B together, then press your power button while holding both keys for about 3 seconds. This forces your laptop into recovery mode. Select the default recovery option when prompted. Your system will restart and attempt to repair the corrupted boot files automatically.
BIOS recovery works because it bypasses the damaged Windows files and rebuilds the boot sequence from scratch. This resolves the majority of post-update boot failures without requiring any data recovery or system reinstalls.
If BIOS recovery does not work, move on to the next option.
Using Lenovo OneKey Recovery to Restore Windows
Lenovo OneKey Recovery is a built-in system restore tool exclusive to Lenovo laptops. This lenovo onekey recovery tool lets you roll back your system to before the update failed or reset Windows completely while keeping your personal files.
Press your Novo button to access the recovery menu. The Lenovo Novo button is a small pinhole button on your laptop that launches recovery without needing a working Windows installation. You can find the Novo button on the side of your laptop or sometimes on the bottom near the battery area.
Once you press the Novo button, your laptop will boot into the Lenovo OneKey Recovery environment. You will see a menu with several options.
System Restore option: This rolls back your Lenovo laptop to a restore point from before the update. You will keep all your personal files and programs that were installed before the update. This is the safest option because it preserves your data while removing the bad update.
Factory Reset option: This completely reinstalls Windows and removes all programs and files. Choose this only if System Restore does not work. Factory Reset erases everything and gives you a clean Windows installation from Lenovo’s recovery partition.
I recommend trying System Restore first because it brings your system back to a working state without data loss. Only use Factory Reset if System Restore fails to work.
What data does OneKey Recovery preserve? System Restore keeps your personal files like documents, photos, and videos. It removes programs and updates installed after the restore point. Factory Reset removes everything and starts completely fresh with Windows only.
The entire process takes about 15 to 30 minutes depending on your laptop speed. Let the recovery process run completely without interrupting it. Do not shut down your laptop or unplug the charger while OneKey Recovery is working.
After the process completes, your Lenovo laptop will restart and boot into Windows normally. You will be back to the state your system was in before the failed update.
Contact Lenovo Support if Nothing Works
If neither BIOS recovery nor OneKey Recovery solves the problem, your Lenovo laptop may have a more serious issue beyond a failed update. At this point, professional help is your best option.
Visit support.lenovo.com for model-specific recovery instructions and provide your laptop model number. Lenovo support can provide detailed assistance specific to your exact model. They can also help if you need to create a recovery USB drive or reinstall Windows using official Lenovo media.
Most Lenovo laptops can be recovered using these built in tools without losing your data. The update may have been inconvenient, but getting your laptop working again is usually straightforward once you know the right recovery steps.
Fix 7 — Model-Specific Fixes for IdeaPad, ThinkPad, and Yoga
Every Lenovo laptop model line has its own quirks and specific reset procedures. What works perfectly on a ThinkPad might not apply to a Yoga, and IdeaPad models have their own unique hardware design. Knowing your specific Lenovo model helps you use the exact reset method that was designed for your laptop.
I have noticed that most troubleshooting guides treat all Lenovo laptops the same way. That is a mistake. Your specific model has features and reset procedures built just for it. Using the right method for your model gets better results faster.
Lenovo IdeaPad Won’t Turn On
IdeaPad is Lenovo’s consumer line, and most IdeaPad models have a small emergency reset pinhole on the bottom panel. Flip your IdeaPad over and look near the battery area on the bottom cover. You will see a tiny hole, usually labeled Reset or with a small icon next to it.
Use a straightened paperclip to press into this pinhole firmly for about 10 seconds. You will feel a small button inside that you are pressing. Hold steady pressure on the button and do not worry about hurting anything. The IdeaPad is designed to handle this reset procedure.
After 10 seconds, remove the paperclip and plug in your charger. The charging light should turn on indicating that your IdeaPad has reset successfully. Press the power button to turn on your laptop.
Many older IdeaPad models also came with removable batteries. If your IdeaPad is several years old, you might actually be able to slide out the battery from the back. If you have a removable battery, that gives you the easiest reset option. Simply remove the battery, hold the power button for 30 seconds, then reconnect the battery. This accomplishes the same power reset as the pinhole method but without needing a paperclip.
Check your IdeaPad model number on the bottom sticker. You can look up your specific model on support.lenovo.com to see whether your particular IdeaPad has a removable battery or uses the reset pinhole method.
Lenovo ThinkPad Won’t Turn On
ThinkPad is Lenovo’s business line and these laptops are built with durability and easy repair in mind. Your ThinkPad has an emergency reset hole specifically designed for power failures. This reset hole requires a slightly longer hold than the IdeaPad method.
Flip your ThinkPad over and locate the reset hole on the bottom panel. It is usually near the battery compartment or sometimes along the side edge. The hole is small and might have a label next to it. On a ThinkPad X390, the reset hole is clearly marked on the bottom cover.
Insert a straightened paperclip into the reset hole and press the button inside. Hold steady pressure for a full 10 seconds. This timing matters on ThinkPad models. Shorter holds do not complete the reset process properly. Count to 10 slowly to make sure you hold long enough.
After 10 seconds, remove the paperclip. Plug your ThinkPad charger in and look for the charging light to appear. The charging indicator light will return once the reset completes successfully. This visual confirmation tells you the reset worked.
Press your power button to turn on the ThinkPad. The laptop should start normally. ThinkPad models respond very reliably to this reset procedure because the hardware was specifically designed to support it.
If you have a very old ThinkPad model, check whether it has a removable battery. Some professional grade ThinkPads from several years ago still use swappable batteries. If yours does, the battery removal method gives you an alternative to the reset pinhole.
Lenovo Yoga Won’t Turn On
Yoga is Lenovo’s convertible line where the screen flips back to use the laptop as a tablet. This unique design creates specific stress points that other Lenovo models do not experience. If you’re asking “why won’t my Lenovo Yoga laptop turn on,” the hinges on a Yoga laptop flex constantly as you fold the screen back and forth, which creates unique challenges.
This repeated flexing puts strain on the internal display cable that runs through the hinge area. I have seen situations where a Yoga laptop won’t turn on but actually has power and all systems running fine. The problem is the display cable has loosened inside the hinge from repeated use. The laptop is working but you cannot see anything because the internal display connection failed.
If your Lenovo Yoga won’t turn on, first try the basic reset methods using the Novo button or the pinhole reset if your Yoga model has one. Most Yoga models do not have an obvious reset pinhole like IdeaPad and ThinkPad do, so use the Novo button as your first choice.
Press the Novo button on your Yoga and see if the laptop responds at all. Listen for fan sounds or look for charging light changes. If you get any response from the Novo button but the screen stays black, your display cable might have loosened from the frequent folding.
To test this theory, connect your Yoga to an external monitor via HDMI. If the external monitor shows your desktop, your Yoga system is running perfectly. Only the internal display has lost its connection. This is fixable but requires opening the hinge area to reseat the display cable. A repair technician can do this relatively inexpensively.
Some Yoga models also have tablet mode that switches between laptop and tablet display modes. If your Yoga recently got knocked or dropped, the tablet mode sensor might have been triggered. Try pressing the tablet mode button or using a keyboard shortcut specific to your model to switch back to laptop mode. Check your Yoga manual for the exact tablet mode toggle for your model.
Yoga laptops are reliable machines but their convertible design does make the display connection more vulnerable to loosening over time with heavy use. If standard reset methods do not work, a loose display cable is the most likely culprit.
Fix 8 — RAM and CMOS Battery: The Two Internal Fixes You Can Do at Home
If you have tried everything so far and your Lenovo laptop still will not turn on, the problem might be inside the laptop itself. Before you call a repair technician, there are two internal fixes that solve the majority of remaining power issues at home. Both take less than 15 minutes and cost almost nothing if you already have the tools.
A repair technician told me that RAM cleaning and CMOS battery checks solve more laptop power problems than any other single fix. Most people never try these because they worry about opening their laptop. But once you see how simple these procedures are, you will wonder why you waited so long.
I will walk you through both fixes in a way that works even if you have never opened a laptop before. Take your time and do not rush.
How to Clean and Reseat Your Lenovo Laptop RAM
Your laptop’s RAM is the memory storing information while your system runs. RAM sits in a motherboard slot and can shift out of position over time. When RAM comes loose even slightly, your Lenovo laptop won’t boot.
Before you open anything, check whether the problem is actually RAM. Press your Caps Lock key several times and watch the LED light carefully. If the Caps Lock light blinks in a repeating pattern instead of toggling normally, you have a RAM problem. This diagnostic tells you that RAM cleaning is worth trying.
Turn off your laptop completely and unplug the charger. Wait a few minutes for any remaining power to drain. Open the bottom panel by removing the screws. Most Lenovo models have just a few screws holding the bottom cover in place. You do not need to remove very many screws to access the RAM. Check your specific model online if you are unsure which screws to remove.
Locate your RAM sticks inside the laptop. They look like small rectangular modules with gold connectors on the bottom. The RAM sits in one or two slots depending on your laptop model.
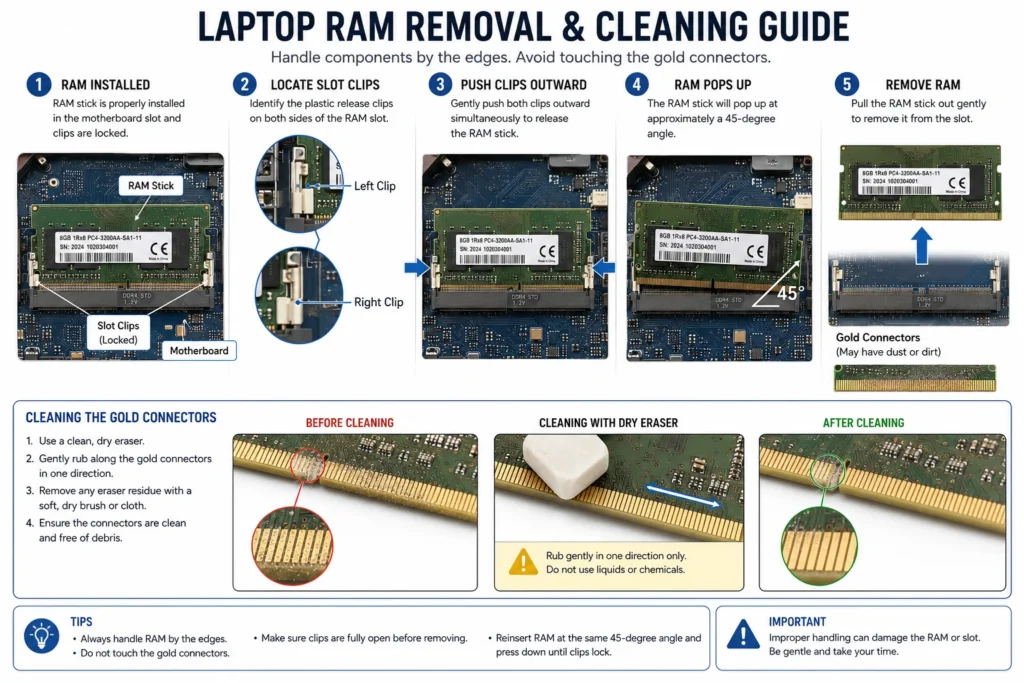
At each end of the RAM slot, you will see a small plastic clip. Push both clips outward and the RAM module will pop up at an angle. Gently pull the RAM stick straight out and set it aside.
Look at the gold connectors on the bottom of the RAM. Use a dry eraser, not a damp cloth or liquid cleaner. Gently rub the gold contacts with the eraser to remove any dust or oxidation. Do this lightly and carefully. The gold contacts are delicate.
Now here is a trick most guides miss. If your laptop has two RAM slots, try inserting this RAM stick into the other slot instead of the original one. Sometimes a RAM slot itself becomes faulty while the stick remains perfectly good. When you RAM reseat laptop memory by switching slots, you immediately reveal whether the problem is a bad stick or a bad slot. Push the RAM firmly into the alternate slot until you hear it click and the clips snap into place on both sides.
If your laptop only has one RAM slot, reinsert the RAM into the same slot where it came from. Push the module straight in until it sits flush in the slot. You will feel resistance and then a click when it sits correctly.
Close the bottom panel and reconnect your charger. Turn on your laptop and see if it boots. If the Caps Lock light now toggles normally instead of blinking, you have fixed your RAM issue.
If your laptop still does not respond, try swapping the RAM back to the original slot if you moved it. Maybe the alternate slot was the problem. Sometimes moving RAM back to its original position is the fix.
What the CMOS Battery Is and How to Fix It in 5 Minutes
Your laptop motherboard has a small coin shaped CMOS battery. This tiny CMOS battery maintains your BIOS clock and system settings even when your laptop is completely powered off. When the CMOS battery dies or becomes too weak, your laptop may refuse to boot entirely.
A dead CMOS battery is one of the most overlooked causes of laptop power failure. Yet the fix costs about five dollars and takes just minutes to complete.
With your laptop still open from the RAM procedure, look at the motherboard carefully. You are searching for a small coin shaped battery about the size of a watch battery. The CMOS battery sits in a small holder and is usually located near the center or edge of the motherboard.
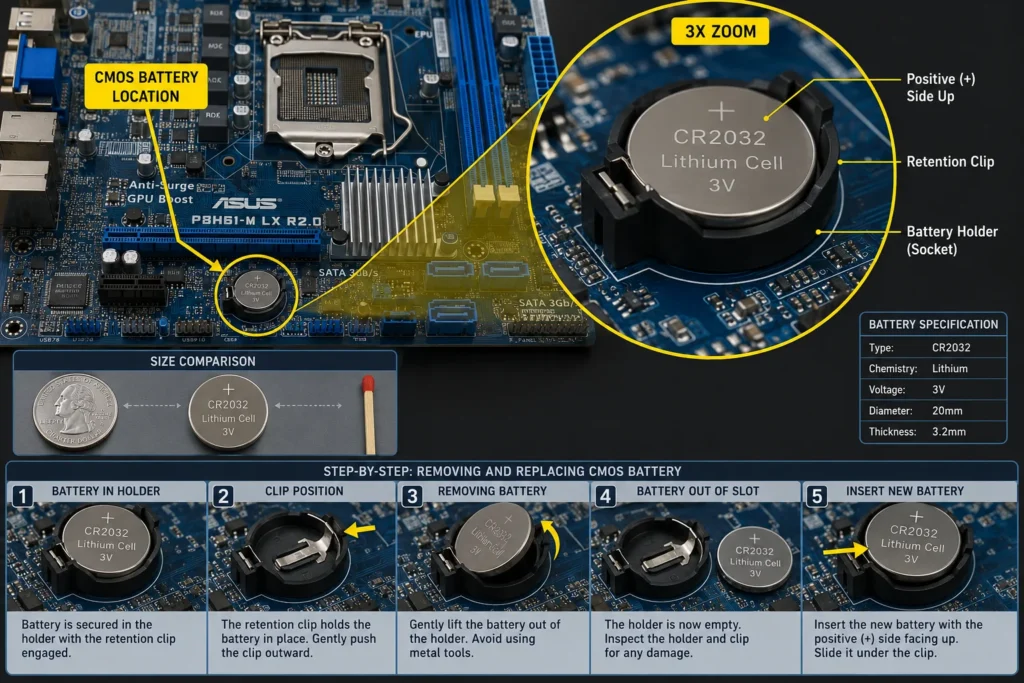
Gently press the edge of the battery holder and the battery will pop out. You can then lift it away. Note which side faces up because you need to reinstall it the same way.
If you have access to a multimeter, test the battery voltage. Hold the multimeter probes on the top and bottom of the battery. If the reading is below 3 volts, the battery is dead and needs replacing. If you do not have a multimeter, just replace the battery anyway since they cost so little.
Leave the battery out for about 30 seconds. This fully resets your BIOS settings to factory defaults. Then reinstall the battery in the same orientation. Make sure it sits fully in the holder.
Close the laptop back up and test whether it powers on. A new CMOS battery typically costs between three and eight dollars. You can order a replacement CR2032 battery online if you need one. Make sure the replacement is exactly the same model number as the one you removed.
After you install a new CMOS battery, your Lenovo laptop will restart with fresh BIOS settings. This fixes boot failures caused by a dead battery without requiring any expensive repairs.
If your laptop still will not power on after cleaning the RAM and checking the CMOS battery, the problem is likely deeper inside the motherboard itself. You have done everything you can safely do at home. Professional help is your next option. You may also want to check our guide on Windows display settings to rule out any software-level display issues before seeking repair.
When to Stop Fixing It Yourself — and Whether to Repair or Replace
You have now tried eight comprehensive fixes. If your Lenovo laptop still refuses to turn on, you need to make an important decision. Is it worth paying for professional repair or should you simply buy a new laptop?
This is not an easy decision and I want to help you think through it clearly. I have seen people spend more on repairs than a new laptop would have cost. I have also seen people throw away perfectly repairable laptops because they gave up too soon.
Let me help you figure out which situation you are actually in.
Signs Your Lenovo Laptop Has a Hardware Failure You Cannot Fix at Home
Some problems require opening internal components or specialized equipment that you should not attempt at home. Before you call a repair shop, make sure your laptop actually shows laptop hardware failure signs that indicate one of these serious problems
No response after trying all eight fixes. You have verified power delivery, done hard resets, tested external monitors, cleaned RAM, and checked the CMOS battery. Your Lenovo laptop shows zero signs of life. No lights, no sounds, nothing.
Burning smell or visible damage. If you smell burning plastic or see physical damage to the motherboard, charging port, or internal components, stop immediately. This indicates electrical failure that needs professional diagnosis.
Caps Lock blinks repeatedly even after RAM cleaning. After you clean and reseat the RAM, press Caps Lock again. If the light still blinks in a repetitive pattern instead of toggling normally, your RAM is faulty or the motherboard RAM slot has failed. This requires professional repair.
No image on external monitor after all software fixes. You have tried the Win+Ctrl+Shift+B graphics reset and connected to an external HDMI monitor. The monitor shows nothing. This indicates a deeper graphics card or motherboard failure.
Repeated failed attempts at BIOS recovery. The Win+B shortcut and OneKey Recovery both failed to restore Windows. This points to a serious motherboard issue beyond DIY repair.
If your Lenovo laptop shows any of these signs, you have eliminated the simple fixes. The remaining problems require specialized equipment or internal expertise. Before paying for repairs, you might also want to explore our other tech troubleshooting guides for additional solutions.
Repair or Replace? How to Make the Right Call
Now comes the hard decision. A professional repair costs money. A new laptop also costs money. When to repair vs replace laptop depends on your specific situation.
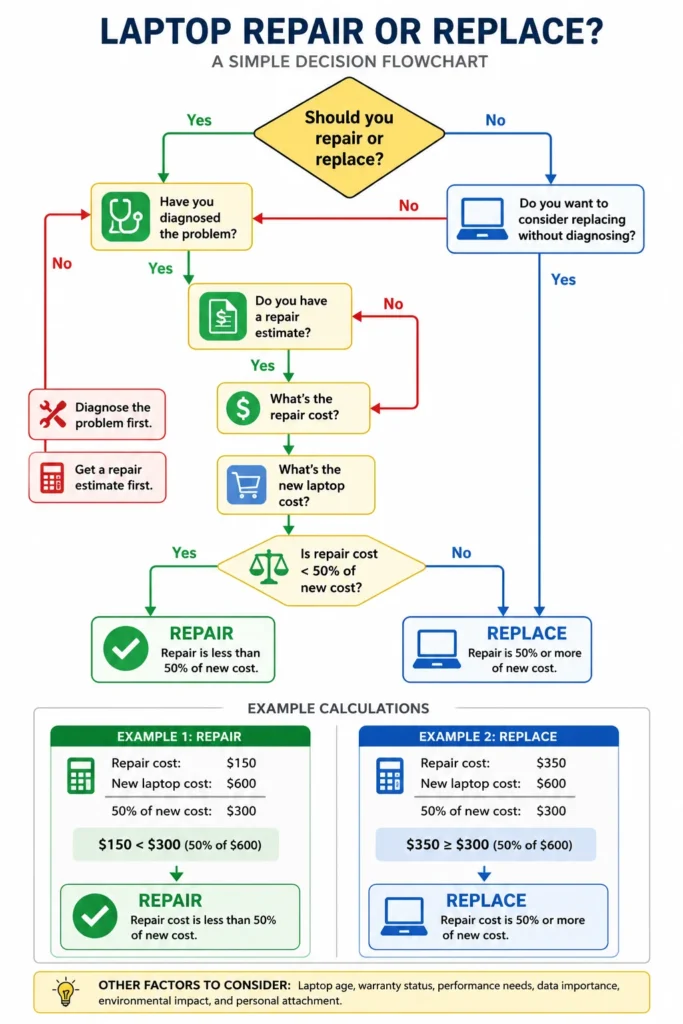
I use a simple rule of thumb. If the repair cost exceeds 50 percent of the price of a new comparable laptop, buy new. If the repair costs less than 50 percent, professional repair is worth doing.
For example, if a new basic Lenovo laptop costs 400 dollars, your repair threshold is 200 dollars. If the repair quote is 150 dollars, fix it. If the repair quote is 250 dollars, buy new.
Common repair costs for Lenovo laptops:
Power button replacement runs between 80 and 150 dollars. The technician removes the keyboard and accesses the button mechanism underneath. This is a mid-level repair.
Display or screen replacement costs between 120 and 250 dollars depending on your model. A cracked screen or failed backlight both require replacing the entire panel. This is one of the most common repairs.
Motherboard repair or replacement is the most expensive option at 250 to 450 dollars depending on complexity. Motherboard issues often require complete diagnosis to pinpoint the exact problem. This is rarely worth doing on older laptops.
Charging port replacement usually costs between 80 and 140 dollars. If your Lenovo won’t charge and the port is visibly damaged, this is worth fixing if it costs less than your 50 percent threshold.
Before you agree to any repair, ask the technician exactly what component is failing. Get a written quote that lists the exact part and labor cost. Then calculate whether the total falls below your 50 percent threshold.
One more thing before you pay for repair. If your laptop is still under warranty, check whether the issue is covered. Lenovo warranties cover manufacturing defects but not physical damage or accidental damage. Contact Lenovo support with your serial number and describe the problem. You might be surprised that repair is free.
If your laptop is out of warranty and the repair quote exceeds half the cost of a new laptop, buying new is the smarter financial move. Newer laptops are faster, have better battery life, and come with a fresh warranty. Sometimes starting fresh makes more sense than dumping money into an old machine.
Whatever you decide, know that you have done everything possible at home. You have tested power, drained capacitors, reset BIOS, checked displays, cleaned internal components, and diagnosed the exact problem. You made an informed decision based on facts, not panic. That is what matters
My Lenovo laptop has a power light on but the screen is completely black — what does that mean?
A power light on means electricity is reaching your motherboard, but a black screen means either the system failed to boot or your display has died. Run the Caps Lock test to see if your system is responding, then try an external HDMI monitor to confirm whether the laptop is working fine but the screen failed.
Does the Win+B shortcut work on all Lenovo laptops?
The Win+B BIOS recovery shortcut works on most Intel-based Lenovo laptops but may fail on certain AMD processor models. If nothing happens when you try Win+B, use the Novo button to access recovery mode instead.
What is the Novo button on a Lenovo laptop and where is it?
The Novo button is a small pinhole button on the side or bottom of your Lenovo laptop that boots into BIOS, recovery, and OneKey Recovery without needing the regular power button. It also helps diagnose whether your power button has mechanically failed.
Can I fix my Lenovo laptop RAM issue at home without going to a repair shop?
Yes, open the back panel, remove the RAM stick, clean the gold contacts with a dry eraser, try it in the alternate slot if your laptop has two slots, then reinsert firmly. If the Caps Lock light still blinks in a pattern after this, the problem is deeper than RAM.
How do I know if my Lenovo laptop screen is broken or if the whole laptop has failed?
Connect to an external HDMI monitor and if an image appears, your laptop works fine but the screen failed. Shine a flashlight on the screen and if you see faint images, only the backlight died. Press Caps Lock on a USB keyboard and if the LED responds, your system is running but the display is the problem.


Leave a Reply