
Your WiFi Might Be Slow Because Too Many Routers Are on the Same Channel
If your WiFi has been slow lately, the problem might not be your internet plan. It might be your neighbors.
Think of WiFi channels the way you think about walkie-talkies. If two people are on the same channel, their signals mix and neither conversation comes through clearly. WiFi works the same way. When your router and your neighbor’s router are both broadcasting on the same channel, their signals collide on the radio frequency spectrum and your internet connection speed drops as a result.
WiFi channel interference is actually one of the most overlooked causes of slow WiFi speed in homes, and most people spend weeks blaming their ISP when the real fix takes five minutes.”
Here is something most guides do not explain. There are actually two different types of interference, and they affect your network in very different ways.
The first type is same-channel interference. This happens when multiple routers share the exact same channel. The devices on that channel take turns communicating, which causes delays but is generally tolerable. Your connection slows down but stays functional.
The second type is overlapping channel interference. This happens when routers use channels that are close to each other but not identical. Instead of taking turns, these networks start competing. Each one broadcasts louder trying to overpower the other. The result is wifi channel congestion that gets progressively worse, leading to inconsistent speeds and frequent disconnections.
Overlapping channel interference is the problem you really need to address. Unlike same-channel congestion, this type of wifi interference does not just slow your connection down — it actively degrades every device on your network until the competing signals are separated.
The whole scanning process is free and takes under two minutes regardless of what device you are on. The method differs slightly by platform, so find yours below.
Before You Change Anything, Try This First
Before you log into your router and start adjusting settings, there is one thing worth trying first. Restart your router.
I know that sounds too simple, but here is why it actually works. Most modern routers use automatic channel selection every time they boot up. The router scans surrounding networks and picks the least congested channel available at that moment. A fresh restart is essentially a free manual channel scan that takes about 60 seconds
In many cases, restarting the router completely resolves the slow WiFi issue without any manual configuration needed.
That said, auto channel selection is not perfect. I have seen routers sitting on Channel 8 because that is what auto picked at the last reboot, even though Channel 11 would have been far less crowded by the time anyone checked. The auto setting only scans once on startup and does not adapt in real time as neighbors change their networks.
There is another limitation worth knowing. If you manually set your router to a specific channel and a new neighbor later moves in broadcasting on that same channel, your network suffers and nothing updates automatically. You would need to go back in and change it again yourself. Auto channel handles this for you every time you reboot, but only at reboot.
So here is my recommendation. Restart your router first and test your speeds. If performance improves and stays stable, you are done. If you are still dealing with slow or inconsistent WiFi after the restart, then it is time to take manual control, which is exactly what the next sections cover.
How to Find the Least Congested WiFi Channel Near You
Randomly picking a channel without scanning first is like guessing which lane moves fastest without looking at traffic. Taking two minutes to scan your WiFi environment tells you exactly which channel to switch to before you even open your router settings.
The good news is that scanning for the least congested channel is free and takes about two minutes on any device. Here is how to do it depending on what you are using.
Android and Windows — Use WiFi Analyzer or Acrylic WiFi
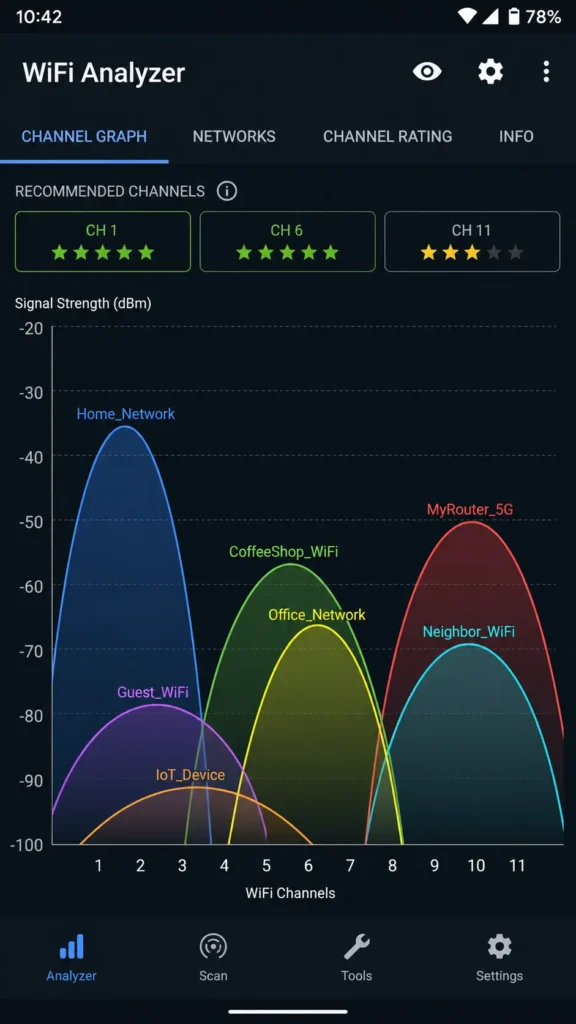
On Android, the easiest tool I recommend is the WiFi Analyzer app, available free on the Google Play Store. Once you open the WiFi Analyzer app, it displays a graph showing every nearby network alongside its signal strength and channel. Look for the channels with the fewest networks overlapping on them. The app also gives each channel a star rating so you can see the best option at a glance without having to interpret the graph yourself.
On Windows, Acrylic WiFi is the tool I use. It gives you a detailed view of every nearby network, including which channel each one is broadcasting on and how strong each signal is.
When reading wifi signal strength in either app, these dBm values are your guide:
When reading wifi signal strength in either app, use these dBm values as your guide:
Above -50 dBm: Excellent signal -50 to -60 dBm: Good signal -60 to -70 dBm: Fair signal Below -70 dBm: Weak signal
When you scan wifi channels, look for a channel where nearby networks are weak (below -70 dBm) or where very few networks appear at all. That is your least congested channel and the one you want to switch to.
Mac — Use Built-In Wireless Diagnostics (No App Needed)
Mac users do not need to download anything. Apple builds a surprisingly capable WiFi scanning tool right into macOS.
Here is how to access it. Hold the Option key on your keyboard and click the WiFi icon in the top menu bar. From the dropdown, select Open Wireless Diagnostics. When the setup wizard opens, ignore it and go directly to the Window menu at the top of your screen. Click Scan and then click Scan Now.
The Wireless Diagnostics tool will analyze all nearby networks and recommend the best 2.4 GHz and 5 GHz channels for your location based on current congestion. Write those numbers down before you close the window because you will need them when you log into your router.
This built-in Mac method is genuinely useful because the wifi signal strength analysis it provides is accurate and updated in real time.
iPhone — AirPort Utility WiFi Scanner
iPhone users can scan wifi channels using Apple’s free AirPort Utility app from the App Store. There is one small setup step that most people miss.
After you install the AirPort Utility app, go to your iPhone Settings and scroll down to find AirPort Utility in the app list. Tap it and toggle on WiFi Scanner. Without enabling this setting first the scanning feature will not appear inside the app.
Once WiFi Scanner is active, open the AirPort Utility app and tap WiFi Scan. The wifi analyzer function will show you every nearby network, the channel each network is using, and the wifi signal strength of each one. Look for channels that have fewer networks and weaker signals competing on them. That is where you want to move your router.
The Only 3 Channels You Should Ever Use on 2.4 GHz
Here is the most important thing I can tell you about picking a WiFi channel on the 2.4 GHz band: only channels 1, 6, and 11 are safe to use. Every other channel will make your WiFi worse, not better.
I know that sounds strict, but there is a real technical reason behind it. Let me explain it simply.
Channels 1, 6, and 11 — Why These Three and Nothing Else
The 2.4 GHz band is divided into channels, but those channels overlap with each other. Most of them share wireless frequency space with their neighboring channels. When two nearby routers use channels that partially overlap, their signals do not just ignore each other. They actively interfere and fight for the same radio space.
On the 2.4 GHz band, channels 1, 6, and 11 are the only three non-overlapping channels. These three channels sit far enough apart on the wireless frequency spectrum that they do not interfere with each other at all.
Now here is the warning that most guides skip entirely. If you pick channel 3, 4, or 5, you create what is called adjacent channel interference. Your router and a neighbor’s router end up competing in overlapping wireless frequency space, and both networks start broadcasting stronger signals trying to overpower each other. The result is worse performance than if you had just stayed on a congested channel 1 or 6 to begin with.
The rule is simple. For the best WiFi channel for 2.4 GHz, always choose channel 1, 6, or 11. Nothing in between. After you scan your environment with a WiFi analyzer, pick whichever of these three has the fewest and weakest competing networks on it.
Here is a quick reference:
Channel 1 covers the lower end of the 2.4 GHz band
Channel 6 covers the middle
Channel 11 covers the upper end
These three non-overlapping channels are spaced evenly across the entire 2.4 GHz channel range, which is why they coexist without interfering.
Choosing a Channel on 5 GHz — Much More Flexibility
The 5 GHz band is a completely different story. While the 2.4 GHz band gives you only 3 non-overlapping channels to work with, the 5 GHz band has 24 non-overlapping channels available.
That extra breathing room makes a real difference. With 24 non-overlapping channels available on the 5 GHz band, nearby routers rarely end up competing on the same one. Most of the time you can leave your 5 GHz channel on auto and experience very little interference.
If you do want to manually set a 5 GHz channel, any of the standard non-overlapping options will work well. The congestion problems that plague the 2.4 GHz band simply do not occur as often on 5 GHz, which is one of the main reasons I always recommend moving bandwidth-heavy devices like laptops and streaming TVs onto the 5 GHz band whenever possible.
For reference, WiFi 6 routers that support the 6 GHz band take this even further with 60 non-overlapping channels available, making interference on that band nearly a non-issue entirely.
How to Change Your WiFi Channel on Any Router (Step-by-Step)
To change your WiFi channel, you need to log into your router’s admin page through a web browser, navigate to the wireless settings, and select a new channel from the dropdown menu. The exact layout varies slightly between router brands, but the core process is the same on virtually every router I have worked with.
Here is the full walkthrough.
Step 1 — Find Your Router’s IP Address and Open the Login Page
The router login IP address is the web address you type into your browser to access the router configuration page. Most routers use one of two default addresses:
192.168.1.1 is the most common
192.168.0.1 is used by many TP-Link and D-Link routers
Not sure which one your router uses? Flip the router over and check the sticker on the bottom. The login address is usually printed there alongside the default username and password.
On Windows you can also find the address by opening Command Prompt and typing ipconfig. Look for the line that says Default Gateway. That number is your router’s IP address.
One important exception to know: Xfinity gateways do not use 192.168.1.1. Xfinity routers use 10.0.0.1 as the login address. If you type the standard address into a browser on an Xfinity connection and get an error, switch to 10.0.0.1 and it will load immediately.
Once you have the correct address, type it into any web browser and press Enter. The router admin page login screen will appear.
Step 2 — Log In With Your Admin Credentials
On the login screen you will be asked for a username and password. If you have never changed these from the factory defaults, try one of these common combinations:
If you have never changed the factory defaults, the admin username and password combination is usually one of these:
Username: admin / Password: admin Username: admin / Password: password Username: admin / Password: (leave blank)
If none of these work, the correct admin username and password will be on the sticker on the bottom of your router. Some ISPs also print login credentials on a card that came with the equipment.
One thing worth knowing for Xfinity users specifically: the first time you log into an Xfinity gateway, the system will immediately ask you to create a new password. Just follow the prompts to set a new one and log back in. This is a one-time security step Xfinity requires on first access.
Step 3 — Go to Wireless Settings and Find the Channel Option
Once you are inside the router configuration page, look for a tab or menu section labeled Wireless, WiFi, or Advanced. Some routers nest the wireless channel settings one level deeper under a menu called Wireless Settings or Wireless Setup.
When you find the wireless settings menu, look for a field labeled Channel or Wireless Channel. In most cases the current setting will show as Auto or Automatic. Click on that field and a dropdown list of channel numbers will appear.
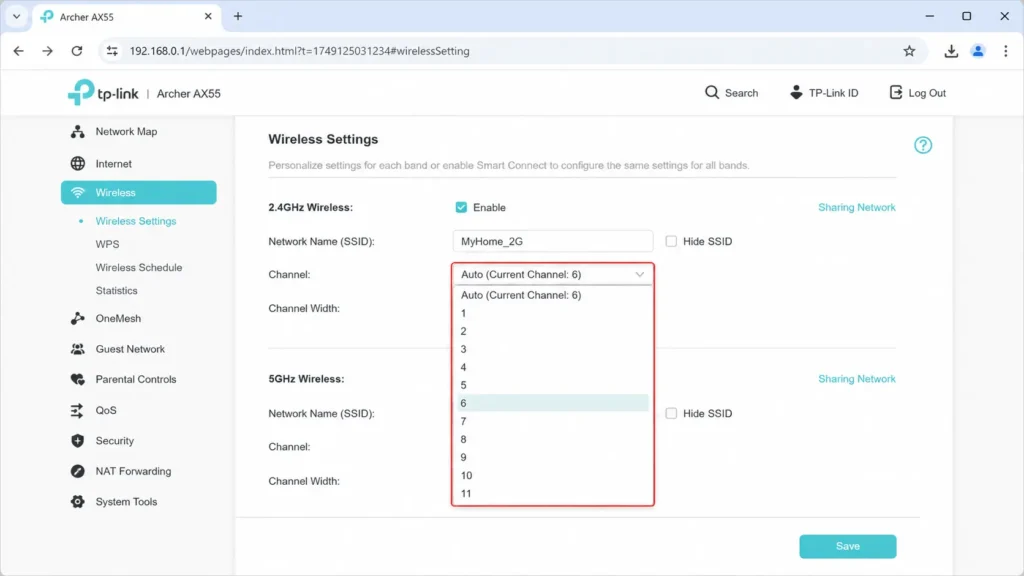
Here is something useful to know. When the channel is set to Auto, many routers display the actual channel number currently in use in brackets next to the word Auto. So you might see something like Auto (Current Channel: 8). This tells you what the router picked automatically, which helps you decide whether you actually need to override it.
Step 4 — Select Your Channel, Save, and Confirm
From the channel dropdown, select the channel number you identified during your WiFi scan. For the 2.4 GHz band, choose channel 1, 6, or 11 only. For the 5 GHz band, choose any available channel since congestion is rarely an issue there.
After selecting your channel, scroll down and click Save or Apply. Your WiFi will disconnect briefly while the router applies the new wireless channel settings. This is completely normal and usually takes less than 30 seconds.
Once the connection restores, I always recommend going back into the router and checking the Status page or Wireless Status section. The Status page will show the current channel your router is broadcasting on, confirming that the change actually applied. Skipping this step is a common mistake since sometimes routers revert to Auto if the save did not complete properly.
How to Change WiFi Channel on Specific Routers and ISPs
The general steps above work on any router, but the exact menu labels and login addresses differ between brands. Here is a quick brand-specific guide covering the most common routers people ask about.
Netgear Routers
To change the WiFi channel on a Netgear router, open a browser and go to 192.168.1.1 or type routerlogin.net directly into the address bar. Both will take you to the Netgear router admin page.
After logging in, click on Advanced at the top of the page. Then go to Wireless Setup from the left menu. You will see separate channel settings for the 2.4 GHz and 5 GHz bands. Change each one independently, select your preferred channel from the dropdown, and click Apply to save.
TP-Link Routers
For TP-Link routers, go to 192.168.0.1 in your browser or type tplinkwifi.net into the address bar. Log in with your admin credentials and look for the Wireless menu in the left sidebar.
Click Wireless Settings and you will find the channel dropdown for each band. Select your channel and click Save.
If you prefer to manage your TP-Link router from your phone, the Tether app by TP-Link lets you change wireless channel settings without using a browser at all. It is a convenient option if you find the web interface awkward. If you want to go further with router security read our complete guide to securing your home WiFi network to learn about password protection, encryption, and blocking unauthorized access.
ASUS Routers
On an ASUS router, go to 192.168.1.1 or type router.asus.com into your browser. After logging in, click on Wireless in the left sidebar and then select the General tab at the top.
You will see a Control Channel dropdown for both the 2.4 GHz and 5 GHz bands on the same page. ASUS keeps both bands accessible from a single view which I find easier than routers that hide them in separate menus. Select your channel for each band and click Apply.
Xfinity Gateway (Comcast)
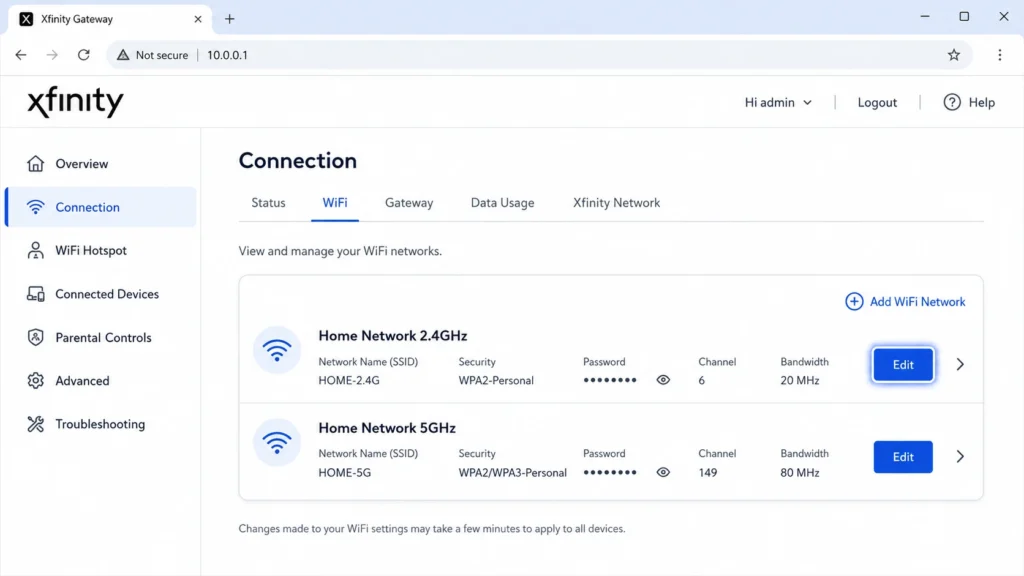
Xfinity gateways work differently from standard routers so it is worth walking through these steps carefully. Open a browser and go to http://10.0.0.1. Do not use 192.168.1.1 on an Xfinity gateway as that address will not work.
Log in with the username admin and the password password if you have not changed the defaults. If this is your first login, Xfinity will ask you to set a new password before continuing.
Once inside, click Connection in the left sidebar and then click WiFi. You will see your 2.4 GHz and 5 GHz networks listed separately. Click the Edit button next to the band you want to change. Find the Channel Selection field, switch it from Automatic to Manual, and choose your preferred channel from the dropdown. Scroll down and click Save Settings. Repeat the same process for the other band if needed.
Channel Width — the Setting Most People Miss Completely
Most people change their WiFi channel and stop there. But there is a second setting sitting right next to the channel dropdown that can quietly undermine everything you just fixed. That setting is channel width.
Channel width controls how much of the wireless frequency spectrum your router uses for each transmission. A wider channel means more data can move at once, but wider channels also grab more spectrum space and create more opportunities for interference with nearby networks.
Getting channel width wrong on the 2.4 GHz band is one of the most common reasons people change their WiFi channel and still end up with poor performance.
2.4 GHz — Always Keep This at 20 MHz
For the 2.4 GHz band, the rule is straightforward: always set channel width to 20 MHz and never change it.
The reason comes down to how little spectrum space the 2.4 GHz band actually has. The entire 2.4 GHz band only has three non-overlapping channels to work with. If you set your channel width to 40 MHz on the 2.4 GHz band, your router consumes bandwidth channel space that bleeds into neighboring channels. This creates the same overlapping interference problem you were trying to solve by changing channels in the first place.
A 20 MHz channel width on the 2.4 GHz band also gives you better range. The narrower bandwidth channel reaches further from the router, which is actually more useful for the types of devices that typically use 2.4 GHz like smart home gadgets, older laptops, and devices at the edge of your home.
Think of 20 MHz as the polite, efficient option for the 2.4 GHz band. It takes up less space, travels further, and does not interfere with your neighbors.
5 GHz — You Can Go Wider (40 MHz or 80 MHz)
The 5 GHz band is a completely different situation. The 5 GHz band has far more available spectrum and 24 non-overlapping channels, so there is plenty of room to use a wider channel width without causing interference problems.
I like to think of channel width on the 5 GHz band like lanes on a highway. A 20 MHz channel width is a single lane. A 40 MHz width gives you two lanes, and an 80 MHz width gives you four. More lanes means more data moves through at the same time, which translates to noticeably faster speeds for devices that are close to the router.
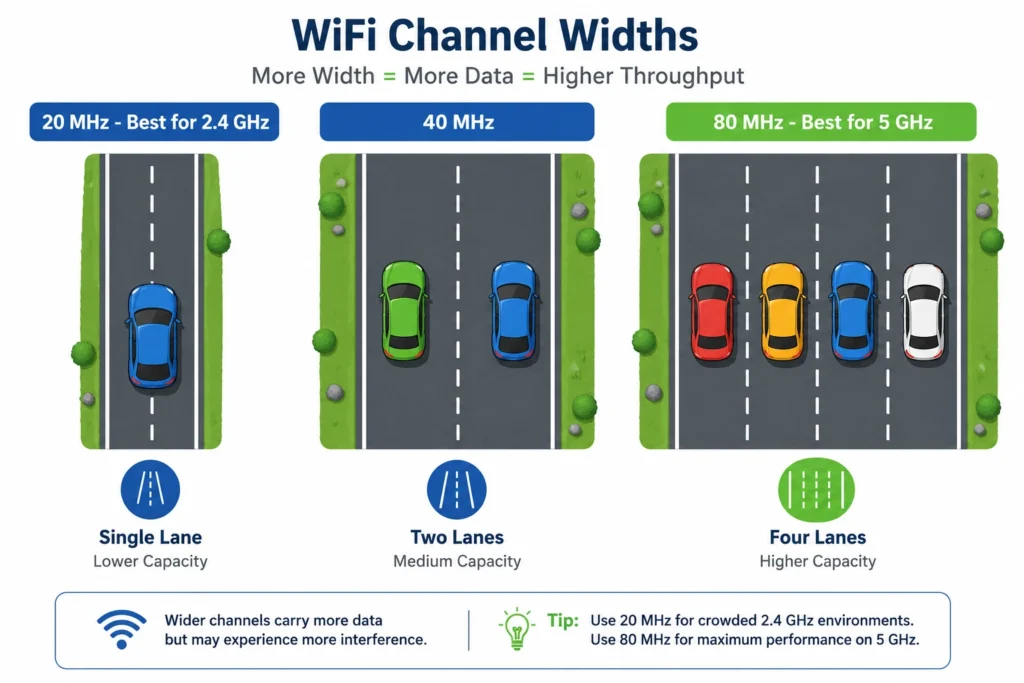
For a home environment, setting the 5 GHz channel width to 40 MHz gives a solid balance between speed and stability. If your router and connected devices support 80 MHz and your home is not in an extremely dense building with dozens of nearby networks, 80 MHz on the 5 GHz band is worth using for devices like streaming TVs, gaming consoles, and laptops.
The dual band router advantage becomes clear here. Use 20 MHz on 2.4 GHz for range and compatibility, and go wider on 5 GHz for speed.
Should You Set Your WiFi Channel to Auto or Pick One Manually?
This is a question I get asked a lot, and the honest answer is that both options have their place depending on your situation.
Auto channel selection means your router scans nearby networks at startup and picks the least congested channel available at that moment. For most people in average neighborhoods with a few nearby networks, auto channel works reasonably well. Every time you reboot your router, the auto channel selection process runs again and picks a fresh channel based on current conditions.
The limitation of auto channel is that the router only scans once at startup. If a neighbor later turns on a new router on the same channel your router selected, wifi interference builds up and your router does not adapt until the next reboot. The channel that was clean at 7am might be congested by 8pm, and auto channel will not fix that until you restart.
Manual channel selection gives you control and consistency, but it also requires occasional maintenance. If you set your router to channel 6 and neighborhood networks shift over time, you may need to rescan and update the setting every few months.
My own rule of thumb is pretty simple. If you are in a house with a handful of neighbors and rebooting the router keeps speeds stable, auto channel selection is doing its job. But if you are in an apartment building where you can see fifteen networks on your phone at any time, switching to manual and locking in channel 1, 6, or 11 will give you more consistent results between reboots.
One more option worth knowing: if the 2.4 GHz band stays congested no matter what you do, move your devices to the 5 GHz band on your dual band router instead. The 5 GHz band has far more channels available and rarely suffers the same congestion issues that plague 2.4 GHz in dense living environments.
Still Slow After Changing the Channel? Try These Fixes
Changing your WiFi channel solves the problem for most people, but not always. If your internet connection speed is still slow or unstable after switching channels, the issue might be something other than channel congestion. Here are the fixes I work through when a channel change alone does not help.
Check your channel width setting. If your 2.4 GHz band channel width is set to 40 MHz, change it to 20 MHz right now. An incorrect channel width setting creates wifi channel interference that no amount of channel switching will fix.
Move the problem device to the 5 GHz band. The 2.4 GHz band has only three usable channels and saturates quickly in busy areas. If a specific device is still slow on 2.4 GHz, connect it to the 5 GHz band instead. The 5 GHz band has 24 non-overlapping channels and dramatically lower congestion in most environments. However, smart home devices like Google Home typically perform better on 2.4 GHz see our Google Home WiFi connection guide for best setup practices.
Reboot your router and modem separately. Restart the router first, wait 30 seconds, then restart the modem. This clears both devices and lets auto channel selection run fresh. Many network congestion fix situations resolve completely after a proper two-device restart sequence.
Check router placement. Wifi signal strength drops significantly through walls and floors. If the device struggling with slow speeds is far from the router or separated by multiple walls, no channel change will fully compensate for a placement problem. Move the router to a more central location or consider a WiFi extender or access point for better coverage.
Contact your ISP if nothing helps. If you have tried every step above and speeds are still poor, the problem may be on your ISP’s end rather than your home network. Run a speed test using Speedtest.net while connected directly via ethernet cable. If wired speeds are also slow, the issue is upstream and your ISP needs to investigate.
Quick Summary — What to Do Right Now
If you have read through this guide, here is everything condensed into five clear steps you can act on today.
Step 1: Reboot your router first. Many slow WiFi problems resolve after a restart because modern routers re-scan and auto-select a cleaner channel on startup. Test your speeds after rebooting before changing anything manually.
Step 2: Scan your environment. Use WiFi Analyzer on Android, Acrylic WiFi on Windows, Wireless Diagnostics on Mac, or AirPort Utility on iPhone to identify the least congested channel near you.
Step 3: Pick the right channel. For the 2.4 GHz band, only use channel 1, 6, or 11. These are the only non-overlapping channels. Any other channel creates adjacent channel interference and makes performance worse. For 5 GHz, any standard channel works well.
Step 4: Set channel width correctly. Keep the 2.4 GHz band at 20 MHz always. For the 5 GHz band, 40 MHz or 80 MHz is fine and will improve speeds for nearby devices.
Step 5: Use the brand-specific steps for your router. The wireless channel settings location differs slightly by brand, but the process of logging in and selecting a channel is the same across all major routers. Follow the steps in this guide for your specific device.
Learning how to change your WiFi channel is one of the simplest ways to improve home network performance without spending any money. The best WiFi channel for your home is out there — you just need to find it and set it once.
Frequently Asked Questions
Does changing my WiFi channel really make my internet faster?
Yes, changing your WiFi channel can noticeably improve speeds if the root cause is channel congestion from nearby networks. However, if the issue is your ISP plan speed or router placement, changing the channel will not help, so scan with a WiFi analyzer first to confirm congestion is actually the problem.
Which WiFi channel is best for 2.4 GHz?
The best WiFi channels for the 2.4 GHz band are channels 1, 6, and 11 because these are the only three channels that do not overlap with each other. Any other channel on the 2.4 GHz band creates adjacent channel interference, which actively makes your WiFi performance worse rather than better.
Do I need to change channels on both 2.4 GHz and 5 GHz?
No, the 2.4 GHz band and the 5 GHz band are completely independent, so you only need to change the one causing issues. The 5 GHz band has 24 non-overlapping channels and rarely gets congested, so most people only ever need to adjust the 2.4 GHz channel.
What IP address do I use to log into my router?
Most routers use 192.168.1.1 or 192.168.0.1 as the login address, and you can confirm the exact address by checking the sticker on the bottom of your router. Xfinity and Comcast gateways are an exception and use 10.0.0.1 instead, so use that address if the standard ones do not load.
What is the difference between 20 MHz and 40 MHz channel width?
A 20 MHz channel width gives you better range and stability and is the correct setting for the 2.4 GHz band, while 40 MHz delivers faster speeds but covers a shorter distance and works well on the 5 GHz band. Never set the channel width to 40 MHz on the 2.4 GHz band because the limited spectrum space causes serious interference with nearby networks.