
When a Windows Update Breaks Something on Your PC
It is incredibly frustrating when your computer works perfectly one night and wakes up broken the next morning because of an automatic installation. I have seen this happen more times than I can count. One day your sound stops working entirely and the next your Wi-Fi keeps dropping every five minutes for no apparent reason. If these glitches are specifically affecting your monitor or visual clarity, you might also want to check my guide on diagnosing Lenovo laptop display issues to rule out hardware-specific failures. Usually, a bad windows update fix is the only way to get your stable system back.
Windows 10 frequently pushes out a cumulative update windows 10 or a security update windows 10 to keep your PC safe. While these patches are meant to help, they can occasionally conflict with your specific drivers or hardware. I have personally dealt with an update causing blue screen errors and sluggish performance right after a Tuesday night rollout. When a windows update causing problems windows 10 users face becomes too much to handle, the best move is to simply roll it back.
If a windows update broke my computer or made it unusable, I want you to know that removing that specific update is a safe and reversible process. You aren’t “breaking” Windows by doing this; you are simply returning it to a version that actually worked for you. My preferred strategy involves a simple two step process: first, we will identify the specific KB identification number of the culprit, and then we will use one of a few proven methods to wipe it from your system.
How to Find the KB Number of the Windows Update to Remove
To find the specific KB number windows update causing your system issues, check your Windows 10 settings history. A Knowledge Base (KB) number is a unique seven-digit identifier Microsoft assigns to every individual patch. I always recommend matching the installation date of an update with the exact day your computer started acting up.
. A Knowledge Base (KB) number is a unique seven-digit identifier that Microsoft assigns to every individual patch, fix, and software update. Identifying this code is the most important step because it ensures you remove the exact file causing the conflict rather than a harmless security patch.
I always recommend matching the installation date of an update with the exact day your computer started acting up. If your Wi-Fi stopped working on Tuesday afternoon, look for any software installed that same morning. You can find this information by looking at the installed updates list windows 10 provides in its history log.
How to View Your Windows 10 Update History
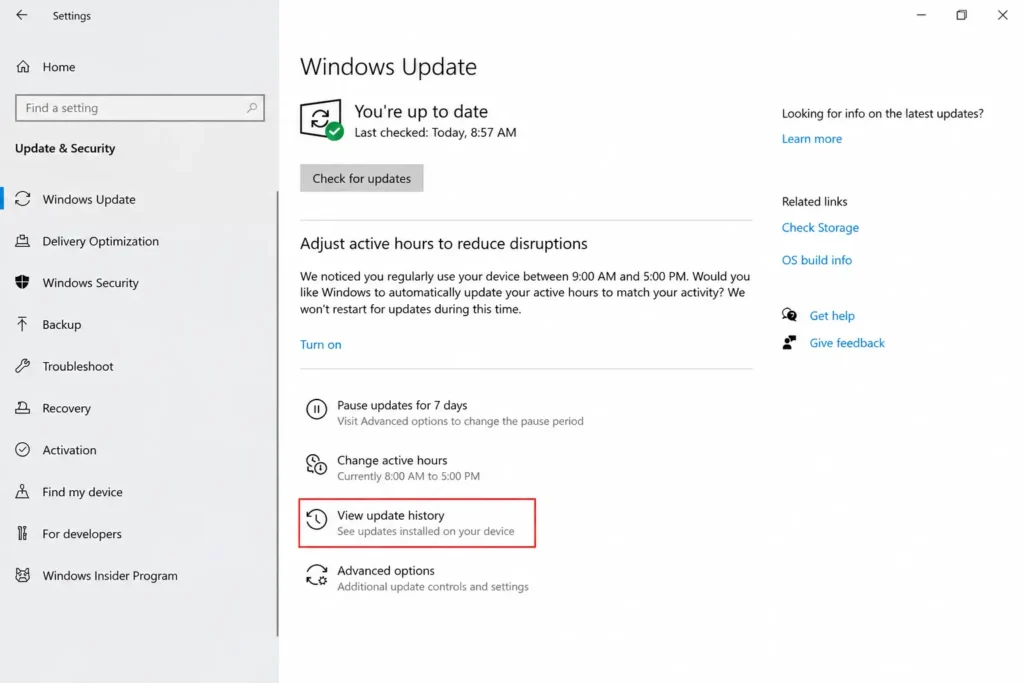
I find that the quickest way to view update history is to go to Settings, then click on Update & Security, and select Windows Update. From there, you will see a clear link titled “View update history.” Clicking this opens a detailed log of every windows 10 update history entry on your machine.
When you look at this list, pay close attention to the “Successfully installed on” column. Each entry will lead with a title like “Cumulative Update Windows 10” followed by the KB article number in parentheses, such as (KB5063878). I suggest writing this number down or taking a quick photo with your phone so you have it ready for the removal steps.
Quality Update vs. Feature Update vs. Driver Update
It is vital to understand what kind of update you are looking at so you target the right culprit. I categorize these into three main types based on how they affect your PC:
- Quality Updates: These are your typical security update windows 10 files and monthly patch tuesday update releases. They fix bugs but are the most common cause of sudden software glitches.
- Feature Updates: These are large version upgrades that change how Windows looks and feels.
- Driver Updates: These control your hardware. If your sound or camera died, you might need a driver update uninstall windows 10 procedure instead of a standard software rollback.
Sometimes you might even see an optional update windows 10 listed which you manually chose to install. Regardless of the type, once you have that KB number, you are ready to fix the problem.
Method 1 — How to Remove Specific Windows Update Windows 10
To remove windows update windows 10 files using the standard interface, you must navigate to the Update History section within your Settings and select the uninstall option. This is the most straightforward way to roll back a problematic patch because it uses the built-in Windows management tools to safely detach the software from your operating system. I recommend this method as your first choice because it is user-friendly and handles the technical cleanup automatically.
Once you initiate the process, Windows will typically ask for a final confirmation before it starts the removal. It is important to save any open work before you begin, as the system will likely need to restart to finish the job. In my experience, a standard uninstall windows update procedure takes about five to ten minutes depending on the size of the patch and your computer speed.
Step-by-Step: Uninstall from the Settings App
I find that using the settings app uninstall update feature is the most reliable path for daily users. Here is the exact path I follow to get the job done quickly:
- Open Settings: Click the Start button and select the gear icon.
- Navigate: Go to Update & Security and select the Windows Update tab.
- View History: Click on View update history to see your recent activity.
- Uninstall: At the top, click the Uninstall updates link.
- Locate KB: Find the specific KB number in the installed updates list windows 10 provides.
- Execute: Select the update and click Uninstall.
- Select the update and click the Uninstall button at the top of the list.
After you click uninstall, a progress bar will appear. Once it finishes, your PC will prompt you to restart. I have noticed that the system often goes through a brief “Getting Windows ready” screen during the reboot, which is a normal part of the cleanup process.
What If the Uninstall Button Is Greyed Out?
Sometimes you might find that the uninstall updates greyed out or missing entirely for certain entries. When you see this, it usually means that the specific update is a “permanent” security patch or a required system file that Microsoft has locked to prevent accidental system instability. It can also happen if your computer is managed by a workplace policy that restricts software changes.
If you are dealing with a windows update not uninstalling through the Settings menu, don’t worry. There are more advanced ways to force a removal using the Command Prompt or the Recovery Environment. If the simple button click doesn’t work for you, I recommend jumping down to Section 8 of this guide where I cover deeper troubleshooting steps.
Method 2 — Remove a Windows Update via Control Panel
You can delete windows update files using the classic Control Panel if the modern Settings app is freezing or not responding correctly. The Control Panel is a legacy management tool in Windows 10 that provides a detailed, spreadsheet-style view of every software modification made to your system. While the interface looks different from the modern menus, it accesses the exact same database of files, making it a reliable fallback for troubleshooting.
I personally find the Control Panel approach very helpful when I need to see more technical details at a glance, such as the specific installation date and version number of a patch. It remains one of the most effective ways to manage your installed updates list windows 10 without relying on the newer, sometimes glitchy, Windows 10 interface.
Accessing Installed Updates via Control Panel
To use the control panel uninstall updates feature, you need to navigate through the “Programs and Features” section. This area is also where you can find and remove the Windows Update Assistant if that tool is causing its own set of issues.
I follow these steps to reach the list:
- Type Control Panel into your Windows search bar and press Enter.
- Click on Programs and then select Programs and Features.
- On the left-hand sidebar, click the link that says View installed updates.
- Scroll through the list or use the search box at the top right to find your specific KB number.
- Right-click the update you want to remove and select Uninstall.
Once you confirm the choice, the system will begin the removal process. Just like the Settings method, you will likely be prompted to restart your computer to apply the changes. Using this classic method is a great way to ensure you have full control over your software environment.
Method 3 — Remove a Windows Update Using Command Prompt
To uninstall windows update using command prompt, you need to use the Windows Update Standalone Installer, commonly known as wusa.exe. This method is a lifesaver when the standard Settings menu freezes or simply refuses to load the update list. By using a direct command, you bypass the visual interface and tell the operating system exactly which patch to remove.
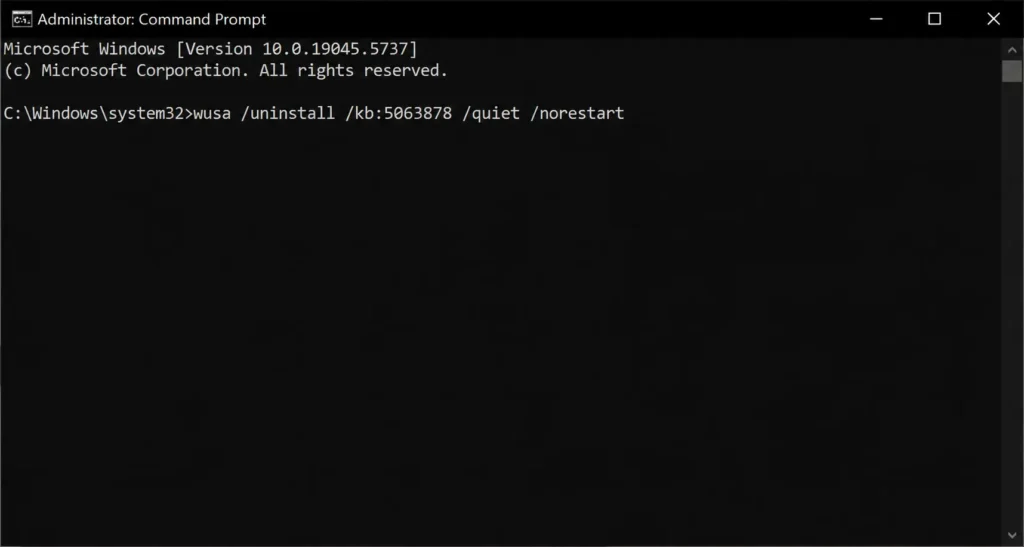
I rely on this approach when I am troubleshooting a PC that is barely hanging on due to a buggy update. To start, you must run the Command Prompt (CMD) as an administrator. To do this, type “cmd” into your search bar, right-click the result, and select “Run as administrator.” Without these elevated permissions, the system will block your attempt to modify core files.
The Exact WUSA Command and What Each Part Does
The specific string I use to target a patch is the wusa.exe command uninstall followed by the identifier of the update. It looks like this:
wusa /uninstall /kb:XXXXXXX /quiet /norestart
Here is exactly what those specific parameters mean in plain English:
- /uninstall: This tells the tool your goal is to remove, not install, a file.
- /kb:XXXXXXX: This is where you insert your specific KB number windows update (for example, /kb:5063878).
- /quiet: This runs the process in the background so you aren’t bombarded with pop-up windows.
- /norestart: This prevents the computer from rebooting instantly, giving you time to save your work.
If you see an error saying the update is required by your computer, it usually means the KB article number you entered is a permanent security fix that cannot be removed through standard commands.
Method 4 — Remove a Windows Update via PowerShell
Using PowerShell remove windows update commands is an excellent alternative if you prefer a more modern coding environment or if you are managing a computer remotely. PowerShell is more powerful than the standard CMD because it can handle complex scripts, but for our purposes, it uses a very similar wusa.exe command uninstall logic.
I find this method particularly useful when I need to verify if an update was successfully removed. You can simply type the wusa command into the blue PowerShell window (run as administrator) just as you would in CMD. Because PowerShell is more deeply integrated with the Windows 10 core, it sometimes succeeds in triggering a removal when the classic Command Prompt fails.
How to Stop That Update from Coming Back Automatically
The most important step in this entire process is learning how to prevent windows update from reinstalling once you have deleted it. If you skip this, Windows 10 will simply see the “missing” update during its next nightly scan and download it all over again, putting you right back where you started.
Microsoft used to make this easy, but they have since hidden the direct download link for the tool we need. I have found that the only reliable solution is to use the official Microsoft ‘Show or Hide Updates’ troubleshooter. This small utility allows you to hide windows update files so the system ignores them indefinitely.
Download and Run the Show or Hide Updates Tool
Because the link is often hidden, you may need to manually paste the download URL for “wushowhide.diagcab” into your browser address bar from the Microsoft Update Catalog or support archives. Once you have it, follow these steps:
- Right-click the tool and run it as an administrator.
- Click “Next” and then select the Hide updates option.
- The show or hide updates tool will scan your system for pending installs.
- Find the specific KB number that was causing your problems and check the box next to it.
- Click “Next” and wait for the confirmation that the update is now hidden.
How to Unhide an Update If You Change Your Mind Later
I always reassure people that this is a windows update rollback you can undo. If a future patch fixes the bug and you want that update back, just run the tool again. Select “Show hidden updates,” check the box for that specific KB, and Windows will treat it as a fresh update ready for install. This gives you total control over your system’s windows update delivery optimization settings.
What to Do When Windows Update Won’t Uninstall
If you are facing a situation where the windows update not uninstalling error keeps popping up, you need to use a deeper recovery method. This usually happens when the update files are corrupted or when an update causing blue screen loops has locked the system.
I have found that the most effective way to force a removal is by entering the Windows Recovery Environment (also known as Windows RE). This is a dedicated repair mode that runs before the main operating system loads, allowing you to bypass software blocks.
Try Uninstalling in Safe Mode First
If your uninstall updates greyed out, try a safe mode uninstall update. Safe Mode starts Windows with only the most basic drivers, which often disables the third-party software that might be interfering with the uninstallation. Once in Safe Mode, you can usually go through the Control Panel method I described earlier and find the “Uninstall” button magically working again.
Use Windows Recovery Environment (Shift + Restart Method)
When the desktop interface won’t let me do anything, I use the “Shift + Restart” trick. This is a reliable way to access Windows RE:
- Hold down the Shift key on your keyboard.
- While holding it, click the Power icon and select Restart.
- Your PC will reboot into a blue “Choose an option” menu. Select Troubleshoot > Advanced Options.
- Click on Uninstall Updates.
- Choose whether you want to remove a “Quality Update” (monthly patch) or a “Feature Update.”
What Does “Ran Into a Problem” Actually Mean?
If you try to uninstall and see a message saying Windows “ran into a problem and couldn’t uninstall,” don’t panic. In my experience, this usually means the windows update stuck in a way that there is no longer a recent “restore point” for that specific file. If this happens, your next best step is to try a system restore windows 10 to a date before the update was installed.
A Quick Fix Most People Don’t Know About — The Metered Connection Method
This is a fantastic bad windows update fix for users who want to stop an update cycle without digging into deep system settings. By telling Windows your Wi-Fi is a “Metered Connection,” you essentially lie to the computer and tell it that you have a limited data plan.
To do this, go to Settings > Network & Internet, click on your network’s Properties, and toggle Set as metered connection to On. This triggers a change in the windows update delivery optimization settings that prevents Windows from downloading large, non-essential updates automatically over that specific connection. It is the fastest way to buy yourself some time.
Bonus: Clear Out Stuck Update Files from Your PC
Sometimes the problem isn’t the update itself, but the fact that the download got corrupted. If your Wi-Fi is malfunctioning or you are in a loop, you can manually delete windows update installation files that are sitting in your storage.
Navigate to C:\Windows\SoftwareDistribution\Download. It is perfectly safe to select everything inside this folder and delete it. I have done this hundreds of times to fix stuck updates; it won’t damage your OS because these are just temporary setup files. Once the folder is empty, restart your PC, and Windows will start a fresh, clean download of the latest patches.
Will Windows automatically reinstall the update I just removed?
Yes, Windows 10 will reinstall the same update on its next scan unless you use the “Show or Hide Updates” tool. I recommend removing the update first and then immediately using that utility to hide the specific KB number.
What does it mean when Windows says it ran into a problem during uninstall?
This message usually isn’t a real system error; it simply means there are no recent updates of that specific type available for removal. I suggest checking your update history to confirm the KB is still active or trying the removal in Safe Mode.
Is it safe to delete files in the SoftwareDistribution folder?
It is completely safe to delete these files because they are just temporary installation downloads and not core system components. Your operating system will simply re-download any necessary files the next time you check for updates.
Can I use System Restore instead of manually uninstalling an update?
You can use System Restore as a last resort, but keep in mind it rolls back all system changes, not just the update. I always advise trying a targeted update removal first so you don’t lose other recent settings or driver changes.
How do I know which Windows update broke my computer?
I suggest matching the date your technical issues started with the “Successfully installed on” dates in your Windows Update History. The KB number listed next to the matching date is almost certainly the culprit behind your PC problems.