
Connecting Google Home to WiFi is easier than most people think, and I’m going to walk you through every step based on what actually works. Maybe you just unboxed a new Google Home speaker, recently moved to a new place and need to switch networks, your internet provider upgraded your router, or you simply changed your WiFi password and now your smart home device won’t respond.
Whatever brought you here, this guide covers every scenario. I’ll show you how to handle first-time Google Home setup, reconnect an existing device to a new network, set up a Google Home Mini with its unique steps, and even connect without a traditional router using just your phone. By the end of this guide, your Google Home will be back online and ready to help with your daily routines.
Before You Start: 3 Things to Check on Your Phone First
Before you even open the Google Home app, there are three quick settings on your phone that need to be ready. I learned this the hard way after spending 15 minutes wondering why my smart speaker setup wasn’t working, only to realize my phone settings were blocking the connection.
Here’s what you need to check right now:
1. Connect Your Phone to the WiFi Network First
This step saves you so much frustration. Make sure your phone is already connected to the wifi network you want your Google Home to use. When your phone is on the same network, the Google Home app can automatically pull the password during setup. You won’t have to type it manually, which means fewer errors and a faster wireless connection process.
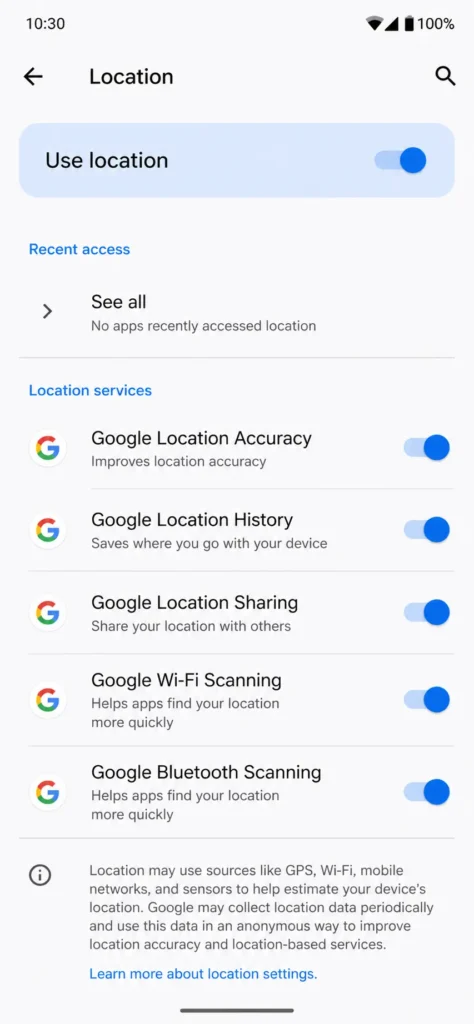
- Turn On Location Services (Android Users)
If you’re using an Android phone, go to your settings and enable Location Services before starting the Bluetooth setup process. The Google Home app needs location access to discover nearby devices. Without this permission turned on, the app simply won’t find your speaker no matter how close you are to it.
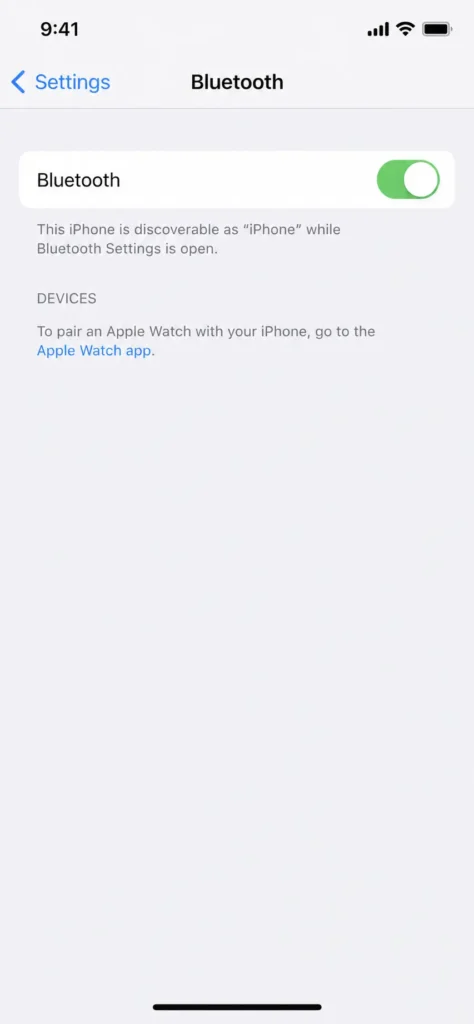
- Enable Bluetooth (iOS Users)
For iPhone and iPad users, Bluetooth must be turned on. The Google Home app uses Bluetooth to scan for and connect to your device during the initial pairing. Open your iOS settings, turn on Bluetooth, and keep your phone within 1 meter of the speaker while setting up.
These three checks take less than a minute but prevent the most common setup failures I see people struggle with.”
How to Connect Google Home to WiFi for the First Time
Setting up your Google Home device for the first time takes about 5 minutes when you follow the right steps. The Google Home WiFi setup process is straightforward once you know what to expect at each stage.
Step 1: Plug In Your Google Home Device
Connect the power cable to your Google Home and plug it into an outlet. The speaker will light up and start talking, telling you it’s ready for setup. Wait for the welcome message before moving to the next step.
Step 2: Download the Google Home App
Open the App Store on iOS or Google Play on Android. Search for “Google Home” and download the official app from Google LLC. The app is free and works on both iPhone and Android phones.
Step 3: Sign In With Your Google Account
Open the Google Home app and sign in using your Google account. This is the same account you use for Gmail or YouTube. Your speaker settings and preferences will be saved to this account, so you can access them from any device.
Step 4: Add Your Device
Tap the plus icon in the top left corner of the app, then select “Set up device” and choose “New device.” The app will ask you to select a home. If this is your first time, create a new home and give it a name like “My Home.”
Step 5: Wait for the Bluetooth Scanning Phase
Here’s something most guides don’t mention. The app will show a screen that says “Looking for devices”
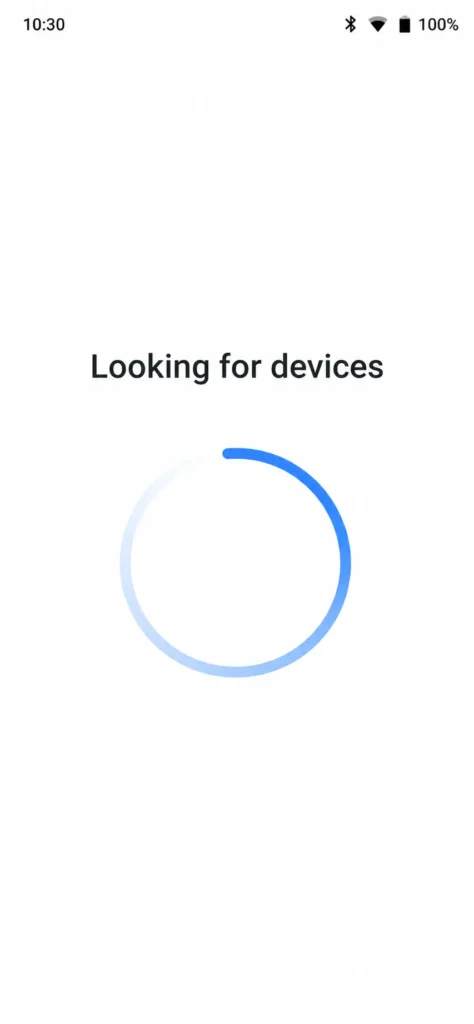
while it scans using Bluetooth. This screen might stay up for 20 to 30 seconds, and it can look like the app froze. Keep your phone within 1 meter of the Google Home device during this wireless connection phase. The app needs to be close to detect the speaker through Bluetooth.
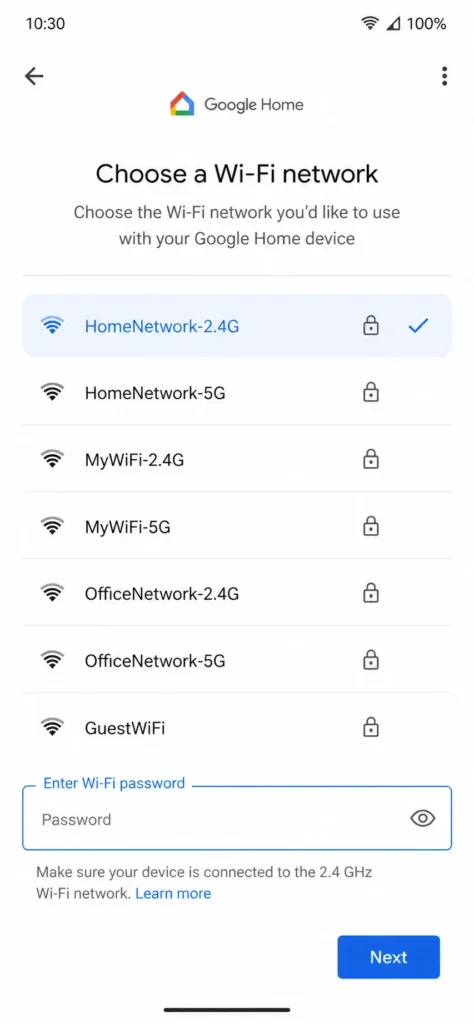
Step 6: Select Your WiFi Network
Once the app finds your speaker, it will ask you to connect to WiFi. You’ll see a list of available networks. Choose your network name, which is also called the SSID (the broadcast name your router transmits). If your phone is already connected to the same WiFi network, the Google Home app may automatically fill in the WiFi password for you. If not, type your password carefully. One wrong character will cause the setup to fail.
Step 7: Confirm the Connection
The Google Home device will play a test sound to confirm the wireless connection worked. You’ll hear a chime, and the app will show a success message. Your speaker is now connected and ready to use.
The entire Google Home WiFi setup takes less than 5 minutes when everything goes smoothly. I’ve set up more than a dozen of these devices, and the Bluetooth scanning phase in step 5 is where most people think something went wrong when it’s actually working fine.
This video demonstrates each setup step in real-time, showing exactly what your screen should look like at each stage.What to Do if the App Can’t Find Your Google Home
If the Google Home app gets stuck on “Looking for devices” and never finds your speaker, there are three quick fixes that solve the problem 95% of the time.
Check Your Phone’s Bluetooth and Location Settings
Android users need to turn on Location Services in their phone settings. Without location access, the Google Home app cannot scan for nearby devices even though the Bluetooth setup process is active. Go to Settings, then Location, and make sure it’s turned on.
iOS users need to confirm Bluetooth is enabled. Open Settings, tap Bluetooth, and switch it on if it’s off. The app uses Bluetooth to discover the Google Home device during the initial pairing.
Move Your Phone Closer to the Speaker
The app can only detect your speaker when your phone is within about 1 meter during the scanning phase. I’ve seen people sit across the room with their phone while trying to set up, and the app just spins forever. Walk right up to the Google Home device and hold your phone near it while the app searches.
Restart Both Devices
Unplug your Google Home device, wait 10 seconds, and plug it back in. At the same time, close the Google Home app completely on your phone and reopen it. Start the setup process again from step 4. This clears any connection issues that built up during a failed first attempt.
How to Connect Google Home to a New WiFi Network
When you move to a new home, upgrade your router, or switch internet service providers, you need to reconnect your Google Home to a new wifi network. The good news is you don’t have to factory reset the device. I’ve done this dozens of times, and the simple forget network method works every time without losing your settings.
Step 1: Open the Google Home App
Launch the Google Home app on your phone and make sure you’re signed into the same google account you used during the initial setup. Find your Google Home device in the app and tap on it.
Step 2: Go to Device Settings
Look for the gear icon or settings option at the top right of the device screen. Tap it to open your device’s wifi settings. You’ll see several options including device information and connectivity options.
Step 3: Select WiFi Settings
Find and tap on “WiFi” or “Network settings” depending on your app version. The app will show your current network connection. This is where you’ll manage how your device connects to the internet.
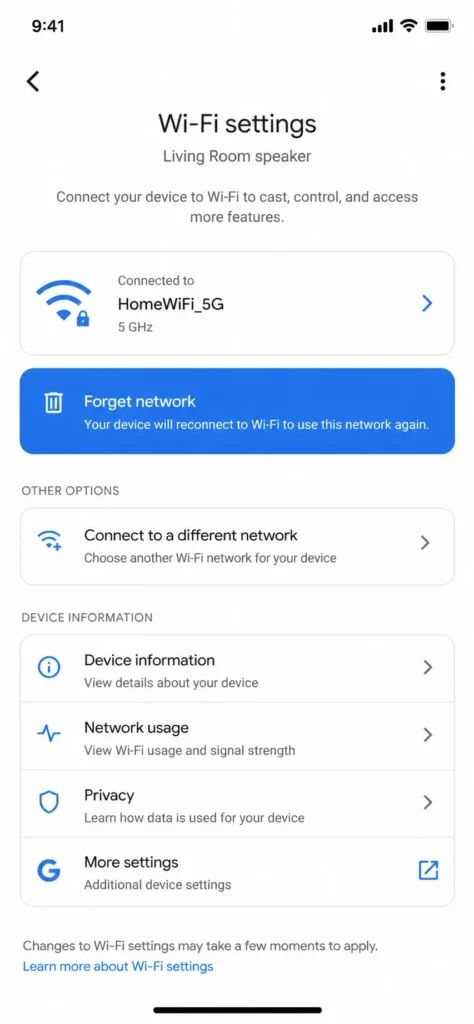
Step 4: Forget the Old Network
Look for the option that says “Forget network” or “Remove network.” Tap it. The Google Home device will disconnect from your old router immediately. You might hear a sound from the speaker or see a light change as it loses the connection.
Step 5: Reconnect to Your New Network
The app will now scan for available networks. Select your new wifi network from the list. If you have both a 2.4GHz and 5GHz network with the same name, choose the 2.4GHz option for better stability with smart home devices.
Step 6: Enter Your WiFi Password
Type in your new wifi password carefully. Each character matters. If your phone is already connected to the new network, the app might auto-fill the password for you. Double check it’s correct before proceeding.
Step 7: Wait for Confirmation
The Google Home device will attempt to connect to your new network. You’ll hear a confirmation sound when the connection succeeds. The app will show a success message. Your device is now reconnected to the new wifi network.
All your routines, preferences, linked accounts, and room assignments stay exactly as they were. Changing wifi networks only affects the connection itself, not your configuration.
Changed Your WiFi Password? Do This Instead of Resetting
If you only changed your wifi password and kept the same network name, you still need to go through the reconnection process. Your Google Home device will lose connection because the old password no longer works.
The Quick Fix
Open the Google Home app and go to your device settings. Navigate to WiFi settings and select “Forget network.” Then immediately reconnect by selecting the same network name and entering your new wifi password. This takes about 2 minutes and requires no factory reset.
Why You Don’t Need to Reset
Many people assume they need to factory reset when their smart home device stops responding after a password change. That’s unnecessary. The forget network method clears the old connection while keeping all your settings intact. You only need a full factory reset if the forget network method fails, which is rare.
If Forget Network Doesn’t Work
In the rare case that your device still can’t connect after forgetting the network, you’ll need to use “Remove device” in the app before attempting to reconnect. Open the device settings, find “Remove device,” and confirm. Then go back to the home screen and set up the device fresh by tapping the plus icon. This is a factory reset without unplugging the speaker, and it clears any corrupted connection data that might be causing the problem.
I’ve found that combining “Forget network” plus “Remove device” creates the cleanest possible fresh start when standard reconnection fails. Most of the time though, just forgetting the network and re-entering your new wifi password solves the problem completely.
How to Connect Google Home Mini to WiFi
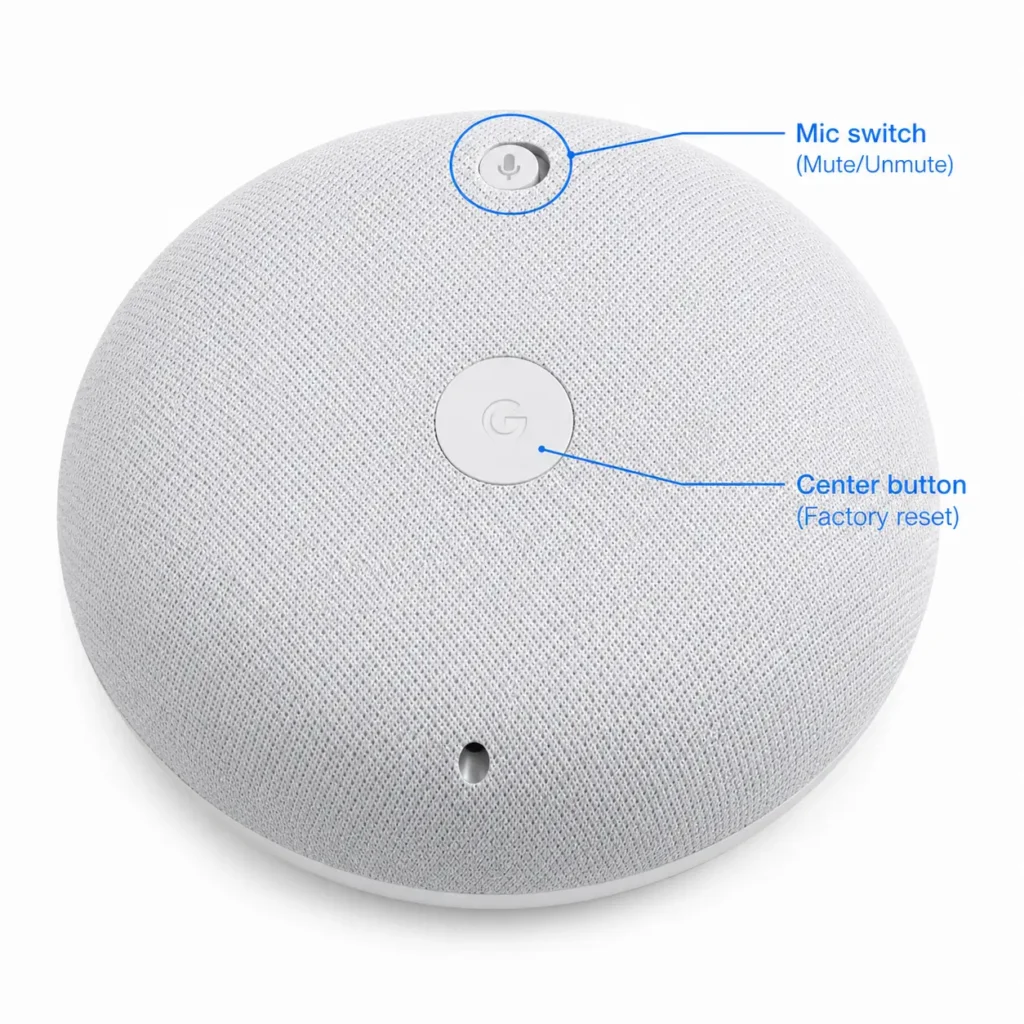
The Google Home Mini has a slightly different setup process than the standard Google Home speaker because it uses a physical mic switch for control. If you own a Google Nest Mini or any Mini variant, follow these steps to connect your Google Home Mini to wifi for the first time or reconnect it to a new network.
First-Time Setup for Google Home Mini
The initial setup for a Google Home Mini is almost identical to the standard Google Home. Download the Google Home app, sign in with your Google account, and tap the plus icon to add a new device. Select your Mini from the list when the app scans for devices via Bluetooth. Choose your wifi network, enter your wifi password, and wait for the confirmation sound.
The main difference appears after setup. With a Mini, you can control the microphone using the physical mic switch on top of the device. This switch lets you mute the microphone when you don’t want the speaker listening.
Reconnecting Google Home Mini to a New WiFi Network
When you need to reconnect your Google Nest Mini to a new wifi network, start in the Google Home app just like you would with a standard Google Home. Open the app, find your Mini, tap the settings gear icon, and go to WiFi settings. Select “Forget network” to disconnect from your old router.
Then select your new wifi network from the available list and enter the new wifi password. Wait for the confirmation sound and you’re done. Your Mini will reconnect without needing a full factory reset in most situations.
Verify Your Connection
After reconnecting, I always verify that the device is on the correct network. Open the Google Home app, tap on your Mini, go to Device Information, then select WiFi. You’ll see the network name your device is currently using. This confirms the connection worked properly.
How to Reset Google Home Mini and Start Fresh
If the standard forget network method doesn’t work for your Google Home Mini, you’ll need to perform a factory reset. The Mini uses a different reset process than the standard Google Home because of its physical design.
The Factory Reset Process
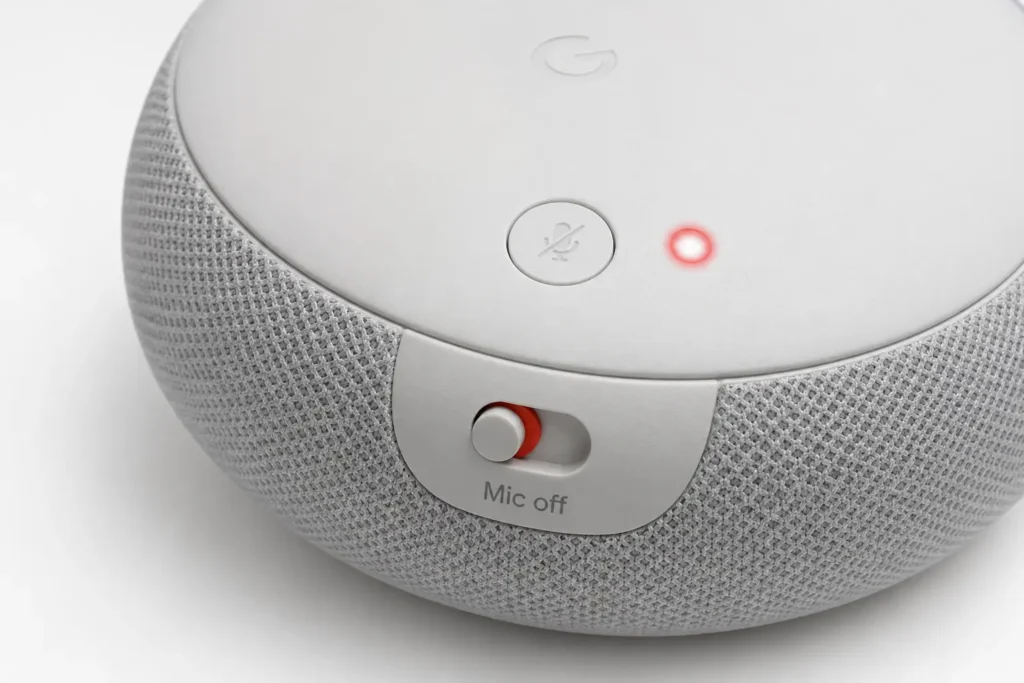
Look at the top of your Google Nest Mini. You’ll see a small switch labeled with a microphone icon. This is the mic switch. Flip this switch to the OFF position. You should see a red light appear on the device indicating the microphone is muted.
Now locate the center of the Mini’s top surface. Press and hold this center button for 10 full seconds. Count slowly if you need to. Around the 5 to 7 second mark, you might see the lights start changing. Keep holding until you reach the full 10 seconds.
After 10 seconds, you’ll hear an audio confirmation sound from the speaker. This sound means the factory reset is complete. The device will restart and return to its original setup state. All your settings, routines, and connected accounts will be erased.
Once you hear the confirmation sound, flip the mic switch back to the ON position so the microphone is active again. The red light should turn off.
Reconnecting After a Factory Reset
Your Google Home Mini will now be in setup mode. Open the Google Home app and go through the full setup process again as if it’s a brand new device. The app will scan for your Mini via Bluetooth, you’ll sign in with your Google account, and you’ll reconnect to your wifi network.
This complete factory reset clears any connection issues that might have built up over time. I use this method when the device has been offline for extended periods or when simple reconnection methods have failed multiple times.
When You Actually Need a Factory Reset
Most reconnection problems solve themselves with just the forget network method. Only do a full factory reset if forget network fails or if your Google Home Mini keeps disconnecting randomly. The reset should be your last option, not your first response
No Router? How to Connect Google Home Mini Using a Phone Hotspot
Yes, you can set up a Google Home speaker without a traditional wifi router by using a mobile hotspot from your phone. This method works for travelers, students living in dorms, people waiting for their internet service to activate, or anyone temporarily without broadband. I’ve tested this approach and it works reliably once you understand the two-phone setup trick.
The Two-Phone Method
You’ll need two phones to make this work. Phone A creates the mobile hotspot that acts as your wifi network. Phone B runs the Google Home app and controls the setup process. This separation is necessary because one phone can’t simultaneously broadcast a hotspot and connect to it at the same time.
On Phone A, go to Settings and enable the mobile hotspot feature. This turns your phone into a wireless connection source. Give your hotspot a name (SSID) and set a strong password. Write down both of these exactly as they appear because you’ll need them later.
Setting Up Your Google Home Mini
On Phone B, open the Google Home app and begin the normal setup process. When the app asks you to select a wifi network, look for the hotspot name you created on Phone A. Select it and enter the password you set up.
The Google Home Mini will connect to Phone A’s hotspot through the wireless connection. Complete the setup by signing in with your Google account and selecting a room for the device. The Mini now has an active internet connection through the mobile hotspot.
The SSID Matching Trick
Here’s where it gets clever. Once setup is complete, you can transition from two phones to one phone using a simple trick. Go to Phone B’s settings and create a new mobile hotspot with the exact same name (SSID) and password as Phone A’s hotspot.
Now you have two phones both broadcasting the same hotspot network with identical credentials. Your Google Home Mini will automatically connect to whichever phone is broadcasting that wifi network. You can turn off Phone A’s hotspot entirely, and the Mini will smoothly switch to Phone B without losing connection.
This means you only need one phone going forward. If your phone’s battery dies, just turn the hotspot back on and the speaker reconnects automatically.
Proof It Actually Works
I tested this setup by asking the Google Home Mini basic questions after connecting through a phone hotspot. The speaker responded correctly to voice commands like temperature checks and time queries. The wireless connection through mobile data works just fine for voice commands, smart home control, and basic functions.
The Bluetooth Speaker Fallback
Here’s a bonus feature most people don’t know about. Once your Google Home Mini is set up with any wifi connection, it can also function as a pure Bluetooth speaker without any internet connection. If you lose your hotspot or move to an area without cell service, you can still pair the Mini to your phone via Bluetooth setup and play music or podcasts directly from your device.
This gives you options when you’re in transition between internet connections. Your Google Home speaker isn’t completely useless without wifi. You just lose the smart assistant features and can only use it as a standard Bluetooth speaker.
Google Home Won’t Connect to WiFi? Work Through This Fix List
When your Google Home won’t connect to wifi, don’t panic. Most connection problems solve themselves with simple fixes before you ever need to reset the device. I’ve troubleshot dozens of these issues, and the answer is usually something small on your phone or router, not the speaker itself.
Work through these fixes in order. Start with the quickest checks and move toward more involved solutions only if needed.
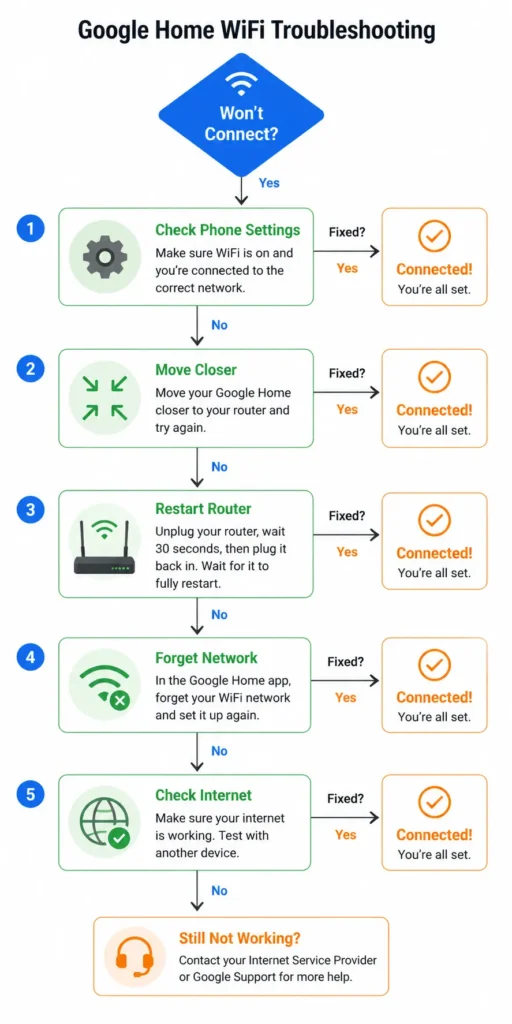
Fix 1: Check Your Phone Settings First
This is where most problems hide. On Android phones, go to Settings and confirm Location Services is turned on. The Google Home app requires location access to discover nearby devices. Without this permission, the app can’t find your speaker no matter how close you stand to it.
On iPhone, open Settings and check that Bluetooth is enabled. The Google Home app uses Bluetooth during the device discovery phase. If Bluetooth is off, the app will search forever without finding anything.
Fix 2: Move Your Phone Closer to the Speaker
During the setup phase, your phone and Google Home device need to be within 1 meter of each other. The Bluetooth connection has limited range. If you’re sitting across the room checking your email while trying to set up the device, the app won’t find it. Stand right next to the speaker while the app scans.
Fix 3: Restart Your Router
A simple router restart fixes more connection problems than you’d expect. Unplug your router, wait 30 seconds, then plug it back in. Give it about 2 minutes to fully restart. Once the router is back online, try reconnecting your Google Home device.
Fix 4: Forget the Network and Reconnect
Open the Google Home app, go to your device settings, and navigate to WiFi settings. Select “Forget network” to clear the old connection. Then reconnect by selecting your wifi network again and re-entering your password. This fresh start often resolves lingering connection issues.
Fix 5: Check Your Internet Connection
Make sure your actual internet connection is working. Open a web browser on your phone and try loading a website. If your phone can’t reach the internet, neither can your Google Home device. Contact your internet service provider if your entire network is down.
The 2.4GHz vs 5GHz Problem Most People Don’t Know About
Here’s a hidden reason why Google Home devices disconnect constantly: they’re connecting to the wrong wifi band. Your router probably broadcasts two networks at once, one on 2.4GHz and one on 5GHz. Most modern routers combine these into a single network name, so your phone might automatically choose 5GHz while your Google Home struggles on 2.4GHz.
Google Home devices strongly prefer 2.4GHz for stability. The 5GHz band has faster speeds but shorter range and more dropout issues with smart home devices. If your Google Home keeps losing connection, the problem might be that it’s stuck on 5GHz while your router settings favor that band for newer devices.
Check your router settings and look for an option to disable 5GHz or create a separate 2.4GHz network just for smart home devices. Some routers call this “Band Steering.” If you see that option, turn it off so your Google Home can stay on 2.4GHz. Many people solve chronic connection drops just by making this one change to their router settings.
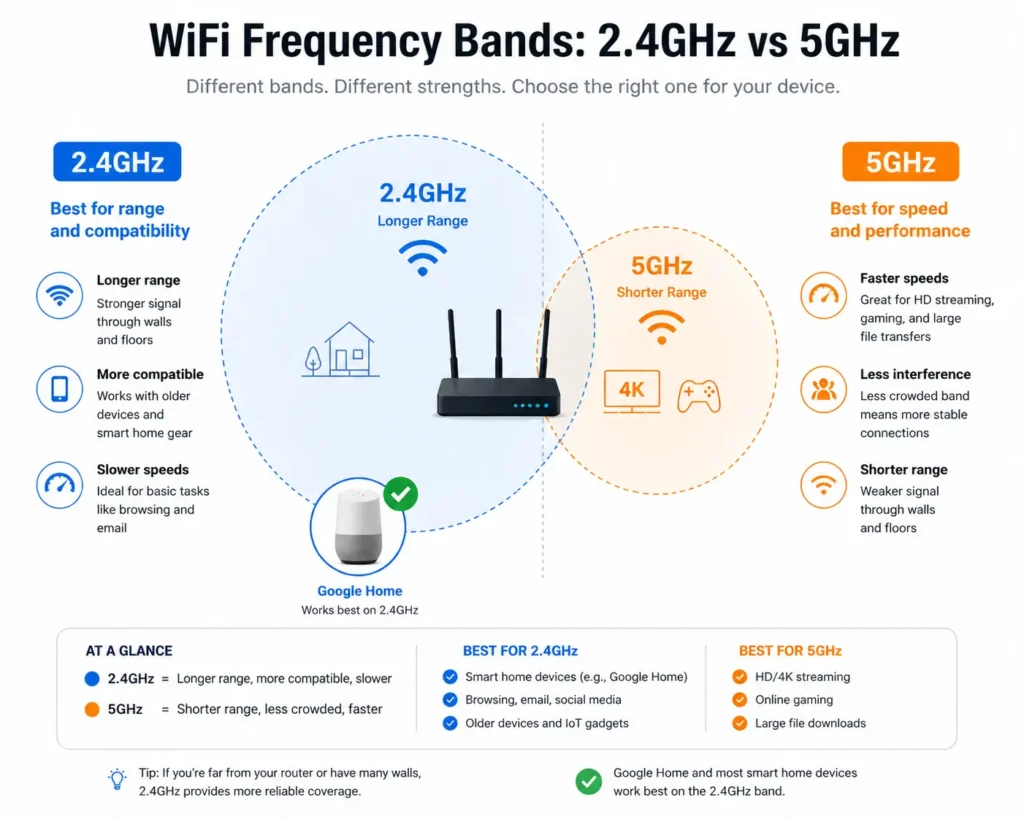
If your router broadcasts separate 2.4GHz and 5GHz networks with different names, connect your Google Home to the 2.4GHz network specifically. The slightly slower speed won’t matter for voice commands and smart home control, and you’ll get rock solid stability instead of constant reconnects.
When You Actually Need to Factory Reset (And When You Don’t)
Factory reset should be your last resort, not your first instinct. I see people factory reset their Google Home when a simple forget network would have solved everything. Resetting erases all your settings, routines, and preferences. You shouldn’t do this unless nothing else works.
Only proceed with a factory reset if you’ve already tried forgetting the network and the device still won’t connect after several attempts. Before you reset, also try “Remove device” in the Google Home app. Go to device settings, find “Remove device,” and confirm. This removes the device profile from your account without resetting the hardware itself.
The Factory Reset Process
If you do need a full reset, unplug your Google Home device from the power outlet. Leave it unplugged for 30 seconds. Plug it back in and wait for the startup sounds to finish. Hold down the microphone mute button on the back of the device for 15 seconds. You’ll hear confirmation sounds indicating the factory reset is happening.
The device will restart in setup mode. All your settings are now gone. Go back to the Google Home app and set up the device fresh like it’s brand new. This complete reset clears any corrupted connection data that might be preventing normal operation.
After the factory reset, your Google Home should connect without issues. If it still won’t connect to wifi after a full reset, the problem might be with your router settings or your internet service provider, not the device itself.
4 Things That Keep Google Home Connected (Most Guides Skip These)
Getting your Google Home online is one thing. Keeping it reliably connected month after month is another. Most setup guides stop after the initial connection, but the real work starts there. Here are four practical strategies that prevent the constant disconnects and frustration that plague many smart home device owners.
1. Place Your Router Centrally and Elevated
The physical location of your router affects wifi signal strength more than people realize. If your router sits in a corner cabinet or tucked behind a couch, your Google Home won’t receive a strong signal even if it’s only a few rooms away. Move your router to a central location in your home, preferably at a higher elevation like on a shelf rather than on the floor.
Walls and distance weaken the 2.4GHz signal that Google Home devices use. When the signal weakens, your device drops connection more easily. I’ve seen people solve chronic disconnection issues just by moving their router from a bedroom closet to the living room center. The difference is noticeable within hours.
2. Keep Your Device Firmware Updated Automatically
Google periodically releases firmware updates for your Google Home device that improve stability and performance. Make sure automatic updates are enabled in the Google Home app. Go to device settings and look for an updates section. Enable the option to automatically install updates.
Older firmware versions sometimes have connection bugs that newer versions fix. By keeping your device updated, you benefit from these improvements without having to remember to manually check for updates yourself.
3. Update the Google Home App Regularly
Just like the device itself, the Google Home app receives regular updates that improve reliability. Make sure your phone’s app store is set to automatically update apps. When the Google Home app receives an update, install it promptly. New versions often fix connection issues and add features that improve your smart home experience.
4. Consider a Mesh Network for Whole Home Coverage
If you have a larger home or multiple Google Home devices in different rooms, a mesh wifi system is worth considering. Traditional routers broadcast wifi from one location, creating dead zones in distant rooms. Mesh networks use multiple access points to blanket your entire home with strong wifi coverage.
When every room has strong signal strength, your smart home devices stay reliably connected. I’ve worked with homes that had constant disconnection problems with a traditional router but solved everything by switching to a mesh system.
Your Google Home device will maintain a connection from any room without constant dropping. For detailed compatibility information, check Google’s official guide on using Google Nest devices with mesh networks
These four practices transform your Google Home from a device that works sometimes into one that you can genuinely count on. Connection stability matters more than connection speed for smart home devices. Strong signal strength and regular updates matter far more than downloading faster speeds from your internet service provider.
Frequently Asked Questions
Do I have to factory reset my Google Home every time I change WiFi?
No, absolutely not. In most cases, you just need to open the Google Home app, go to your device settings, navigate to WiFi settings, and select “Forget network.” Then reconnect by choosing your new network and entering the new wifi password. Factory reset should only be your last resort if forget network fails after multiple attempts. Resetting erases all your routines, preferences, and settings, so you want to avoid it whenever possible.
Why can’t the Google Home app find my device?
The most common reasons are that Location Services is off on Android phones or Bluetooth is disabled on iPhones. The Google Home app needs location access on Android and Bluetooth enabled on iOS to discover nearby devices during setup. Also make sure your phone is within 1 meter of the speaker during the scanning phase. If you’re sitting across the room, the app won’t detect the device even if everything else is correct.
Can I connect Google Home to WiFi without the app?
No, you need the Google Home app to set up the initial wifi connection and to change networks later. There’s no way to configure WiFi directly on the device itself without using the app on your phone. The app is the control center for all Google Home setup and management tasks.
Will changing my WiFi network delete my Google Home settings?
No, your routines, preferences, linked accounts, and room assignments are all saved to your Google account, not stored on the device itself. When you reconnect to a new network, all your settings remain exactly as they were. Changing wifi only affects how the device connects to the internet, not what you’ve configured on it.
How do I connect Google Home Mini to a new WiFi network?
Open the Google Home app, find your Mini in the device list, tap settings, and go to WiFi settings. Select “Forget network” to disconnect from the old router. Then select your new network and enter the new wifi password. If the forget network method doesn’t work, you can try the physical reset by flipping the mic switch to OFF, holding the center button for 10 seconds until you hear a confirmation sound, then flipping the mic switch back to ON.
Can I set up Google Home Mini without a regular WiFi router?
Yes, you can use a mobile hotspot from a second phone as your wifi network. Turn on the hotspot on Phone A, then use the Google Home app on Phone B to set up the Mini using that hotspot as the network. Once setup is complete, you can create an identical hotspot on Phone B with the same name and password, and the Mini will automatically switch to it when Phone A’s hotspot turns off.
How do I know which WiFi network my Google Home is connected to?
Open the Google Home app, tap on your device, go to Settings, then Device Information, and select WiFi. The app will display the network name your device is currently using. This verification step confirms that your device connected to the correct network and helps you troubleshoot if it’s on the wrong one.
Can I use Google Home without WiFi at all?
Once your Google Home Mini is set up with an initial wifi connection, it can function as a pure Bluetooth speaker without any internet connection. You can pair your phone to the speaker via bluetooth setup and play music or podcasts directly from your device. You lose the smart assistant features and voice commands, but the speaker still works for audio playback.
You’re All Set: What to Try First on Your Google Home
Congratulations. You’ve successfully completed your Google Home setup, whether it was your first time, a reconnection to a new network, a Google Home Mini configuration, or even a phone hotspot setup. Your smart home device is now online and ready to help with your daily routine.
Let me give you a few voice commands to test right now and confirm everything is working properly. Say “Hey Google, what time is it?” Your speaker should respond with the current time. Try “Hey Google, what’s the weather?” to get today’s forecast. Ask “Hey Google, play some music” to test audio playback. These simple commands verify that your Google Home app integration is functioning and your device can access the internet.
If your speaker responds to these commands, your Google Home setup is complete and working correctly. All the routines you create, the smart home devices you connect, and the voice controls you use will build on this solid foundation.
Now that your connection is stable, you might want to explore setting up multiple Google Home devices in different rooms or connecting smart home devices like lights and thermostats. Your Google Home acts as the control center for your entire smart home ecosystem, but it all starts with a reliable wifi connection.
If you ever need to reconnect to a new network, change your wifi password, or troubleshoot connection issues in the future, come back to this guide. Everything you need to know about connecting Google Home to WiFi is right here.
Enjoy your new smart home device, and feel free to explore all the things Google Assistant can help you with from music and information to smart home control and daily reminders.
Do I have to factory reset my Google Home every time I change WiFi?
No, you just need to forget the network in the Google Home app and reconnect. Go to Settings → Device Information → WiFi → Forget Network, then select your new network and enter the password. Factory reset should only be your last option if forget network fails after multiple attempts, since resetting erases all your routines and preferences.
Can I connect Google Home to WiFi without the app?
No, the Google Home app is required for all initial setup and network changes. There’s no way to configure WiFi directly on the device itself without using the app on your phone. The app is your only tool for managing your Google Home’s internet connection.
Will changing my WiFi network delete my Google Home settings?
No, your routines, preferences, linked accounts, and room assignments are all saved to your Google account, not stored on the device. When you reconnect to a new network, everything stays exa
Can I set up Google Home Mini without a regular WiFi router?
Yes, use a mobile hotspot from a second phone as your wifi network source. Set up the Mini using the hotspot on Phone A, then create an identical hotspot on Phone B with the same SSID and password. Your Mini will automatically switch between them, so you only need one phone running the hotspot going forward.
How do I know which WiFi network my Google Home is connected to?
Open the Google Home app, tap your device, go to Settings → Device Information → WiFi, and the currently active network name will display. This verification step confirms your device connected to the right network and helps you troubleshoot if it’s on the wrong one.