
Why You Need to Secure Home WiFi (And What Happens If You Don’t)
I learned the hard way that leaving your home WiFi unsecured is like leaving your front door wide open while you’re on vacation. A few months ago, my internet suddenly started crawling at odd hours. Videos would freeze mid-stream, my online games would lag unbearably, and I couldn’t figure out why. Turns out, my neighbor had been quietly leeching off my network for weeks, streaming HD movies every night while I paid the bill.
Securing your home WiFi means protecting your network from unauthorized access by setting strong passwords, encryption, and access controls to prevent hackers, neighbors, or strangers from stealing your bandwidth or personal data. It’s not just about speed anymore—unsecured WiFi opens the door to serious privacy and security threats that can affect your entire household.
When I dug deeper into the issue, I discovered something even more disturbing. An unsecured network doesn’t just slow down your internet connection. Criminals can actually commit fraud in your name by hijacking it to download illegal content, send spam emails, or access banking information while you browse online.
If someone gains access to your WiFi, they’re essentially sitting in your digital living room, watching everything you do. The Federal Trade Commission (FTC) warns that hackers can use your network to commit fraud, steal your personal information, or even launch attacks on other websites in your name.
The risks multiply when you have smart home devices. I have an Alexa, a couple of smart cameras, and WiFi-connected thermostats throughout my house. Without proper network security, anyone who connects to my WiFi could potentially access these devices. That means a stranger could listen through my smart speaker, watch my security cameras, or even unlock smart door locks if I had them installed.
Home WiFi network security protects not just your internet speed, but your personal information, financial data, and even your physical safety when smart devices are involved. The good news is that you don’t need to be a tech expert to lock down your network properly.
In this guide, I’ll walk you through 12 practical steps I’ve personally tested to secure my home WiFi from hackers and freeloaders. These aren’t complicated IT procedures that require special equipment. They’re straightforward actions you can complete in one afternoon, and they’ll give you peace of mind knowing your network is protected from unauthorized access.
Whether you’re worried about data theft, bandwidth leeches, or cybersecurity threats targeting your smart home ecosystem, these steps will help you build a secure foundation for your entire household’s internet usage. I wish I had known how to secure home WiFi properly from the start—it would have saved me weeks of frustration and awkward conversations with neighbors about unauthorized network access.
Is Your WiFi Already Compromised? How to Check Right Now
Before I started changing passwords and updating settings, I first needed to know if someone was already sneaking onto my network. Checking if your home WiFi is secure starts with identifying any unauthorized devices currently connected to your router. This simple diagnostic step takes about five minutes and can reveal if you’re already dealing with network intrusion.
The first time I checked my connected devices list, I was shocked to find three gadgets I didn’t recognize. One was labeled “Samsung Galaxy,” but nobody in my house owned a Samsung phone. That’s when I realized my neighbor had been using my internet for who knows how long.
Finding Your Router’s Login Page
I started by opening a web browser on my laptop and typing my router’s IP address into the address bar. Most home routers use either 192.168.1.1 or 192.168.0.1 as their default address. If neither of these works for you, flip your router over and look for a small sticker on the bottom or back panel. The sticker usually lists the router IP address and default login credentials along with the default username and password.
When I entered the IP address and pressed Enter, a login screen appeared asking for admin credentials. I found mine printed right on that same sticker. The default login is often something simple like “admin” for both username and password, though some manufacturers use variations.
Checking Who’s Connected to Your Network
Once I logged into the router’s admin panel, I looked for a section called “Connected Devices,” “Client List,” or “WiFi Clients.” Different router brands use different names, but the section is usually found under a “Status” or “Wireless” menu. This page shows every single device currently using your WiFi network.
Each connected device displays a unique name, IP address, and MAC address—a unique hardware identifier. I saw my laptop, my phone, my smart TV, and my wife’s tablet all listed with names I recognized. But those three mystery devices? Those were unauthorized access points I needed to kick off immediately.

Devices list, someone is on your network without permission.
Warning Signs Your Network Is Already Hacked
Even before checking the device list, I noticed some telltale symptoms. My internet speed had dropped noticeably during evening hours. Videos on streaming services would freeze and buffer constantly, even though I was paying for high-speed internet. Online games became nearly unplayable with constant lag spikes.
These performance issues happen because unauthorized users steal your bandwidth. When someone streams movies or downloads large files on your network without permission, your own devices have to compete for the available speed. One neighbor streaming in 4K can easily ruin your entire household’s internet experience.
I also started seeing strange activity on my smart home devices. My Alexa would occasionally respond to commands I never gave, and my security camera footage showed brief connection drops that shouldn’t have happened. These weren’t major red flags on their own, but combined with the slow speeds, they pointed to a bigger security problem.
Network intrusion through unsecured WiFi can allow strangers to access not just your internet connection, but potentially your personal files, smart devices, and browsing activity. The moment I saw those unknown devices in my router’s connected devices list, I knew I had to take immediate action to secure my home network properly
If you find devices you don’t recognize, don’t panic. The steps I’m about to share will help you remove those intruders and lock down your network so they can’t get back in.
What to Do If You Find an Unknown Device
Finding an unauthorized device on your connected devices list is concerning, but it’s completely recoverable. My first instinct was to panic, but I realized I had the power to kick that device off right then and there.
Most routers let you disconnect a device directly from the connected devices list. I simply found the unknown device, clicked “Remove” or “Block,” and watched it disappear from the network. Immediately after removing the unwanted device, I changed my WiFi password to something completely new and strong.
Once you disconnect an unauthorized device, change your WiFi password right away to prevent that same device from reconnecting using the old credentials. This one-two punch effectively boots the intruder off your network and keeps them from sneaking back in using information they already have.
From this point forward, follow all the security steps outlined in this guide. Each step builds on the last to create multiple layers of protection so unauthorized WiFi access becomes nearly impossible. You’re not just locking the door after someone got in, you’re installing a brand new security system that prevents future break-ins.
The good news is that once you’ve removed the unauthorized device and changed your password, your network is already safer than it was. But to truly secure your home WiFi, you’ll want to implement the remaining steps so you never have this problem again.
How WiFi Hacking Actually Works (And Why Strong Passwords Save You)
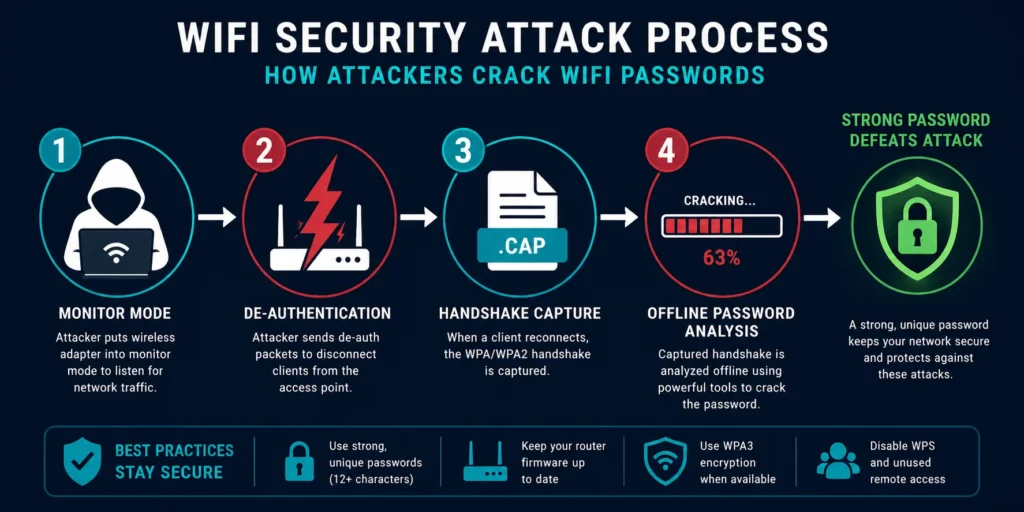
Understanding how WiFi hacking actually happens changed the way I think about password security forever. WiFi password security works by encrypting the connection between your device and router, but hackers can capture the handshake data during login and crack weak passwords offline using specialized tools. Once I learned how these attacks work, I realized why my simple eight character password wasn’t nearly good enough.
Most people assume that hackers sit in a car outside your house trying to guess your password over and over. That’s not how it works at all. The real attack is much more technical but also something I can defend against with the right knowledge.
The Handshake Capture Attack Explained Simply
Here’s what happens when someone tries to break into your WiFi. Your devices store an encrypted version of your WiFi password so they can reconnect automatically without you typing it in every time. When your phone or laptop connects to your router, the device and router exchange data to verify the password matches. This exchange is called the handshake, and it’s basically a secret conversation between your device and your router confirming everything is legitimate.
A hacker uses a specialized WiFi adapter that supports something called monitor mode. This allows them to listen to and capture the wireless data packets flying through the air around your home. They don’t need to be super close either. Depending on the strength of the adapter, they can pick up these signals from a reasonable distance.
But here’s where it gets clever. Instead of waiting hours for someone to naturally log in and create a handshake, attackers send what are called de-authentication packets. These are fake disconnect signals that force your connected devices to suddenly drop from the network. When your phone or laptop automatically tries to reconnect, the attacker is standing by ready to capture the handshake file that proves you know the correct password.
The captured handshake file contains encrypted password data that the attacker can take home and crack on their own computer without anyone knowing they were there. This is why the handshake capture method is so dangerous. You could be completely unaware that someone collected this information.
completely impractical even if hackers capture the file.
Why Password Complexity Matters More Than You Think
This is where password strength becomes absolutely critical. Once an attacker has the handshake file, they use software tools to guess the password over and over. The tool tries thousands of combinations every second, working through common words, number patterns, and symbol combinations.
A weak password like “password123” or “welcome2024” can be cracked in hours. I know this sounds scary, but the flipside is empowering. A complex password with a mix of uppercase letters, lowercase letters, numbers, and special characters exponentially increases the cracking time. A truly strong password can take years or even decades to crack using brute force methods, making the attempt completely impractical for most attackers.
Password complexity matters because each additional character type and length multiplies the computing power and time required to guess your WiFi password. When I changed my password from an eight character simple phrase to a sixteen character passphrase mixing symbols and numbers, I went from crackable in hours to essentially unbreakable.
The key insight that changed my security approach was this: a hacker doesn’t need to be particularly skilled to capture a handshake. But cracking it still requires either a strong enough password to make the effort worthless or, better yet, preventing the capture in the first place by keeping your network hidden and firmware updated.
Why Firmware Updates Block These Attacks
When my router manufacturer released a firmware update, I almost skipped it because it seemed like just another routine maintenance task. I learned later that router firmware updates patch critical security holes that attackers use to send those de-authentication packets I mentioned earlier.
Router firmware updates fix vulnerabilities that allow hackers to force disconnections and capture password handshakes. By keeping my firmware current, I closed the door on a major attack vector that most people don’t even realize exists.
I set my router to update automatically from that point forward. Most modern routers offer this option in their admin settings. Without waiting for me to manually apply patches, the router receives security fixes as soon as the manufacturer releases them. This means any newly discovered vulnerabilities get patched before attackers can weaponize them against my home network.
Step 1: Secure Your Router’s Admin Panel First
I made a critical mistake when I first tried to secure my home WiFi. I jumped straight to changing my WiFi password without realizing there was something even more important I should have done first. Your router’s admin password controls access to all your network settings, and changing it from the default is the first line of defense against unauthorized access to your router itself. This distinction between admin credentials and WiFi access changed everything about how I approached security.
Here’s what I didn’t understand initially: there are two completely different passwords protecting your network. The WiFi password is what guests use to connect their phones and laptops. The admin password is what controls the actual router settings. Most people never change the admin password because they don’t realize it exists or think it’s not important. That’s a dangerous oversight.
Why Default Router Credentials Are a Major Problem
When I bought my router, I just plugged it in and connected to it using the default WiFi name and password printed on a sticker. I never gave a second thought to the admin credentials also on that sticker. Routers from the same manufacturer often share identical usernames and passwords like admin/admin or admin/password. These default combinations are extremely easy for anyone to find online because manufacturers use the same credentials on thousands of devices.
I later learned this creates a vulnerability that goes beyond just someone stealing my WiFi bandwidth. Hackers actively search for routers with unchanged default credentials. Once they access a router’s admin panel, they can do something terrifying called turning your router into a botnet zombie. They hijack your router’s computing power to participate in massive DDoS attacks targeting other websites or systems without you ever knowing about it.
The scariest part is that your internet bill would go up from the increased traffic while hackers use your equipment for their attacks. You’d be technically responsible for the damage even though you didn’t know it was happening.
The Two Passwords You Need to Know
I finally understood the importance of separating these two passwords. Your WiFi password lets people connect to your internet. Your admin password lets people change your router settings. If someone knows your WiFi password but not your admin password, they can use your internet but can’t mess with your security settings. If someone knows your admin password, they essentially own your entire network.
The smartest approach is to use completely different passwords for each. I use one strong password for WiFi connections and an entirely different strong password for the admin panel. This way, if a guest or neighbor somehow figures out my WiFi password, they still can’t access my router settings.
How to Find and Access Your Router Admin Panel
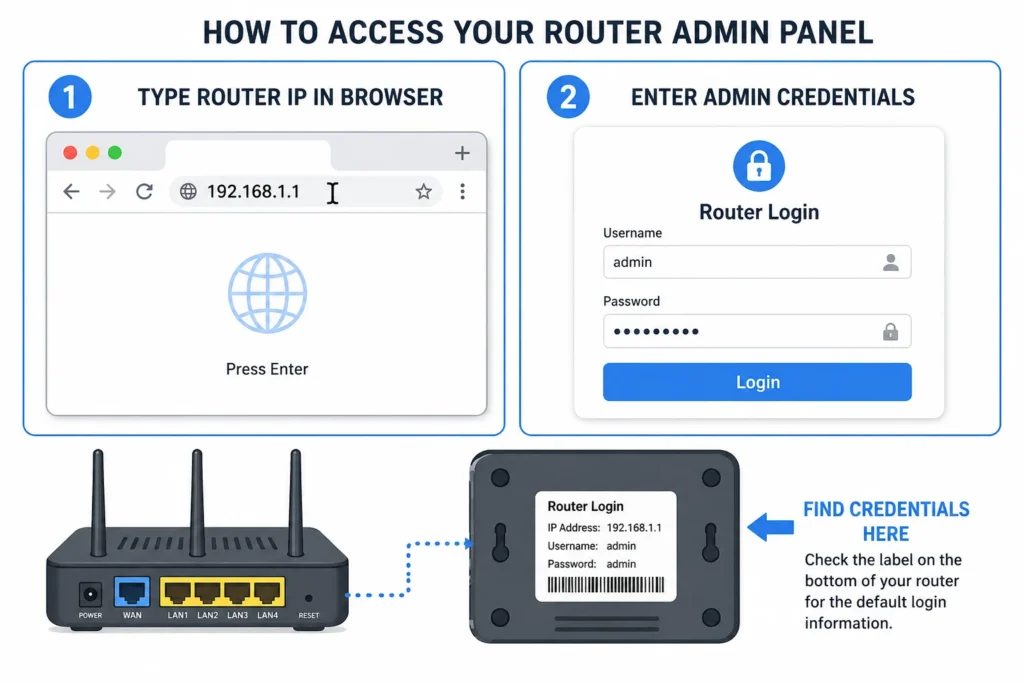
Before I could change the admin password, I needed to actually log into my router’s administration interface. I learned that the process starts with finding your router’s IP address.
How to Find Your Router’s IP Address (Windows, Mac, Mobile)
Finding your router’s IP address is easier than I expected once someone explained it to me. Most home routers use either 192.168.1.1 or 192.168.0.1 as their default address, but your specific router might use something different.
On Windows computers, I opened the Network and Sharing Center by right-clicking the WiFi icon in my system tray. I clicked “View network status and tasks” then looked for “IPv4 Default Gateway” which shows my router’s IP address. If that seems complicated, I can also open Command Prompt and type ipconfig to see the Gateway listed in the results.
On a Mac, I went to System Preferences then Network Settings. I selected WiFi and clicked “Advanced.” Under the TCP/IP tab, the router IP appears as “Router.” This took me about thirty seconds once I knew where to look.
On my phone or tablet, I simply flipped my router over and checked the sticker on the bottom or back. The sticker usually lists the IP address, default username, and default password all in one place. I took a photo of that sticker with my phone so I could reference it later.
Once I had the IP address, I opened a web browser and typed it into the address bar just like a normal website URL. Within seconds, my router’s login screen appeared asking for the admin username and password.
login screen credentials are on the sticker on your router.
Changing Your Router Admin Password
Logging in with the default credentials from the sticker felt wrong, but I needed access to change them. Once inside the router’s admin panel, I navigated to a section labeled Administration, System, or Management depending on my router brand.
I found the option to change the admin password and created something completely new and complex. I made sure this password was different from my WiFi password. I also changed the username from the default if the router allowed it. Some routers let you change just the password, others let you modify both. Either way, anything is better than leaving the manufacturer defaults in place.
The moment I saved those new admin credentials, I felt a genuine sense of relief. My router was no longer an easy target for automated attacks scanning the internet for default passwords. That single step eliminated one of the most common ways hackers compromise home networks.
Step 2: Create a Fort Knox WiFi Password (Not “Password123”)
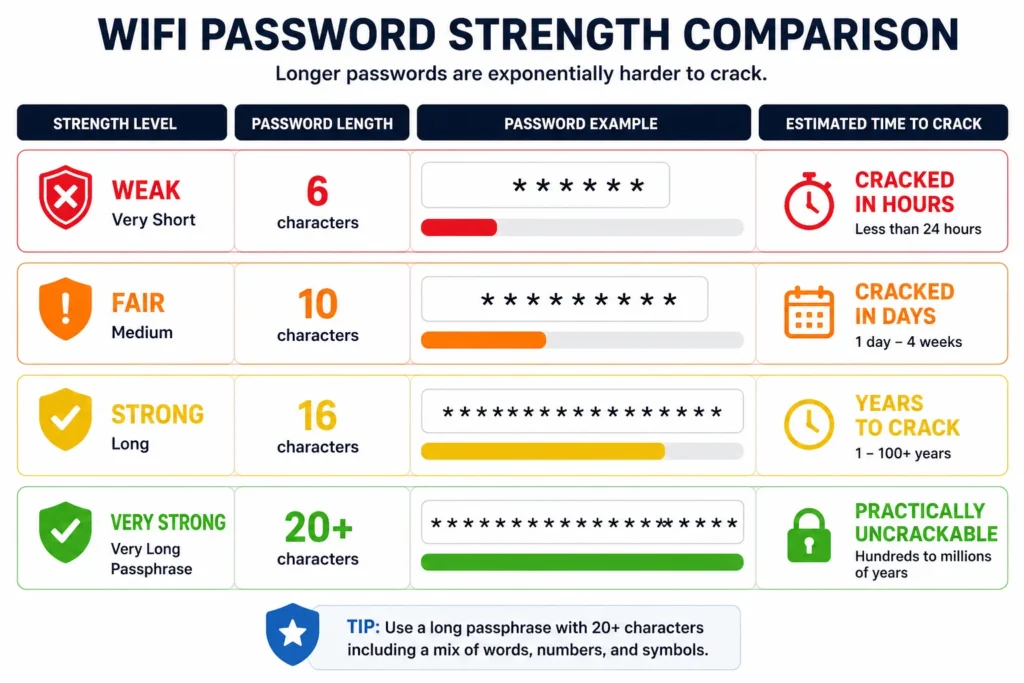
When I finally decided to change my WiFi password, I realized I had no idea what makes a password actually secure. A strong WiFi password should be at least 16 characters long and include a mix of uppercase letters, lowercase letters, numbers, and special symbols to resist cracking attempts. I thought my old eight character password was fine until I learned how quickly modern computers could crack it.
I had been using something like “MyWiFi2024” for years without realizing it was embarrassingly weak. That password could be cracked in a matter of hours using tools designed to test thousands of combinations per second. The moment I understood that simple fact, I committed to creating something genuinely difficult to break.
Building a Password That Actually Protects You
The first mistake I made was trying to create a complex password that I could memorize. I kept making passwords that mixed numbers and symbols but stayed short enough to remember. Then I realized that approach was backwards. My password doesn’t need to be something I remember at all. It needs to be something that’s nearly impossible to crack.
I started using a password generator tool to create something random like “7K#mPq2$vLxR9nF@4wB”. These randomly generated combinations are exponentially harder to crack than anything I could come up with based on words or dates I know. A random sixteen character password with mixed character types could take months or years to crack through brute force methods.
The difference between a weak password and a strong password is the time it takes to crack them through automated attempts. Weak passwords fall in hours. Strong passwords take years. And truly complex passwords with sufficient length might never crack within a reasonable timeframe.
But I discovered there’s an even better approach than random characters: the passphrase method. Instead of a jumble of random symbols, I could create a sentence or phrase up to 63 characters that mixed different character types. Something like “ILoveMyDog$7&CoffeeAt6AM!” is both memorable and incredibly strong because of its length and character variety. The sheer number of possibilities makes it practically uncrackable.
Why Length Matters More Than Complexity
I learned something surprising during my research: length actually matters more than having every possible character type. A long passphrase of simple words with a few numbers and symbols can be stronger than a short jumble of random special characters. This completely changed how I approach password creation.
A sixteen character password is significantly more secure than an eight character password. A thirty character passphrase is even more secure. Every additional character exponentially increases the computing power and time required to guess the password. I switched from trying to remember short complex passwords to using longer passphrases that actually make more sense to my brain.
your WiFi password length matters more than complexity.
Password Manager vs. Written Note: Which Is Safer?
Once I created a genuinely strong password, the next problem became clear: I couldn’t remember it, and I wasn’t about to write it down where someone might find it.
I had two reasonable options. A password manager like 1Password or Bitwarden securely stores my WiFi password behind a master password that only I know. This approach works perfectly if I’m comfortable using technology. Every device I own can access the password through the password manager app, so I never have to type it manually.
The alternative is writing the password down and keeping it somewhere secure like a locked drawer or safe at home. Many people worry this sounds unsafe, but Google’s security team confirmed that writing your WiFi password down and keeping it physically secure in your own home is actually acceptable. The key word is “secure.” A sticky note on your monitor defeats the purpose, but a password written in a notebook inside a locked desk drawer is genuinely protected.
Both password managers and written notes stored securely in your home are safer than using a weak password you can memorize. The worst option is what most people do: create a password simple enough to remember and easy enough to crack. I chose a password manager because it works across all my devices and I don’t have to worry about losing the paper.
Whichever approach you choose, the important part is that your actual WiFi password is strong and unique. Whether a password manager or a written note stores it, your network is protected by something attackers cannot easily guess or crack.
Step 3: Change Your Network Name (And Stop Broadcasting Your Router Model)
I never thought much about my WiFi network name until I realized it was basically advertising my router’s exact model to everyone in my neighborhood. Your network name, called an SSID, is the WiFi label you see when searching for available networks, and changing it from the default prevents hackers from identifying your specific router model and exploiting known vulnerabilities. That simple fact completely changed how I viewed that seemingly innocent network name broadcast.
When I first checked my WiFi settings, my network was labeled “NETGEAR73” because that’s what came from the factory. This default name immediately told anyone scanning for WiFi networks that I owned a NETGEAR router. Hackers maintain databases of security vulnerabilities for specific router models. The moment they see “NETGEAR73,” they know exactly which exploits might work against my device. I was basically putting up a neon sign advertising what security holes I might have.
Why Your Default Network Name Is a Privacy Problem
The privacy angle hit me just as hard as the security angle. Some people customize their SSID to something like “The Johnson Family WiFi” or “Bob’s Network.” This seems harmless until you realize that anyone driving through the neighborhood can see that name. A stranger now knows your family name and your address because they can literally stand outside your house and see your network name on their phone.
I changed my network name to something generic like “HomeNet2024” that doesn’t reveal anything about my household. It’s not clever or personal, but it doesn’t advertise my family name to everyone within WiFi range either. A secure wireless network starts with not giving away information about who lives there or what equipment you’re using.
How to Change Your SSID in Router Settings
Changing the network name is one of the easiest security steps I’ve done. I logged back into my router’s admin panel using the credentials I had changed in Step 1. I navigated to the Wireless settings section, which most routers label as “Wireless,” “WiFi,” or “2.4GHz/5GHz Settings.”
I found the field labeled “Network Name” or “SSID” and typed in my new name. I made sure the new name was something generic and didn’t include my family name or anything that revealed personal information. Then I saved the changes and my router rebooted with the new network name.
The network name change takes effect immediately after saving, and all your connected devices will briefly disconnect and then automatically reconnect to the new network name. The first time this happened, I thought something was wrong, but it’s completely normal. My devices found the new network name and reconnected without any issues.
One thing I learned is that changing your SSID doesn’t affect your WiFi password. The password stays the same unless you specifically change it as well. I could have updated both at the same time, but I chose to change them separately just to be thorough about each step.
The Balance Between Security and Convenience
I considered hiding my SSID completely so the network wouldn’t show up in WiFi lists at all. But I realized that creates inconvenience for my own devices. They have to manually connect to a hidden network, which is annoying every time I add a new device. I decided that changing the name to something generic gives me most of the security benefits without the daily frustration.
The goal with changing your network name is to remove easy information about your equipment from public view. You’re not trying to make your network invisible. You’re just making it so that casual scanning doesn’t instantly reveal what router model you own or what’s inside your house. Combined with a strong password and the other security measures in this guide, a generic SSID is perfectly adequate protection.
Step 4: Enable the Strongest Encryption Your Router Supports
The moment I understood what encryption actually does, I realized it was one of my most important defenses against hackers. Encryption scrambles all the data traveling between your devices and router into a code that only authorized devices can read, making it useless to anyone intercepting your WiFi signal. Without encryption, someone sitting in a car outside my house could literally see everything I do online. With it, my data becomes gibberish to outsiders.
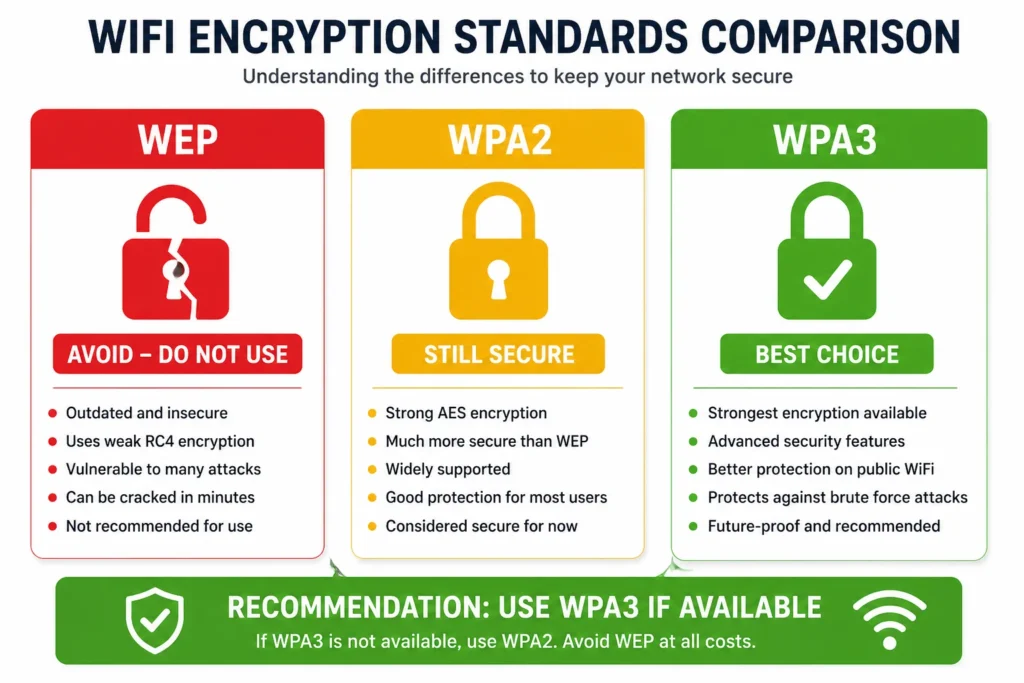
My router came with three encryption options, and I had no idea what the differences meant. One was called WEP, another WPA2, and the newest option was WPA3. I had to research which one would actually protect my network.
Understanding WiFi Encryption Standards
WEP is the oldest encryption standard, and I learned it’s basically useless now. Hackers cracked WEP so thoroughly that it’s considered broken security. Modern hacking tools can defeat WEP protection in minutes. I made sure my router wasn’t set to WEP because using outdated encryption is almost like having no encryption at all.
WPA2 became the standard that every WiFi device sold since 2006 is required to support. This means any reasonably modern phone, laptop, or smart device you own already supports WPA2. It’s significantly stronger than WEP and has held up well against attacks for nearly two decades. WPA2 uses something called AES encryption, which is the same military-grade algorithm the government uses to protect classified information. That gives you an idea of how serious this encryption is.
WPA3 is the newest standard, released more recently to address emerging security threats. It improves on WPA2 by protecting against brute force password guessing attacks and making captured handshake files much harder to crack. If my router and all my devices support WPA3, it’s clearly the better choice.
WPA2 encryption is mandatory for all WiFi devices sold since 2006, while WPA3 is a newer standard that provides better protection against modern hacking techniques. The difference between these two encryption methods is like comparing a solid steel door to a reinforced steel door. Both will stop most threats, but one is objectively stronger.
Always choose WPA3 if your router supports it — WEP is broken
and should never be used on a home network.
How to Enable Strong Encryption
Enabling encryption in my router settings was straightforward. I logged into my admin panel and found the wireless security settings section. Most routers label this as “Security,” “Encryption,” or “WiFi Security.” I looked for a dropdown menu showing encryption options.
My router displayed WEP, WPA2, and WPA3 as choices. I selected WPA3 and saved the changes. The router rebooted, and suddenly all my devices temporarily lost connection as they reconnected using the new encryption standard.
If my router didn’t support WPA3, I would have selected WPA2. This would still provide strong protection. The key is to never leave your router set to WEP or to leave encryption disabled entirely. Even WPA2 from 2006 beats no encryption by an enormous margin.
WPA2 vs WPA3: Which Should You Choose?
The choice between WPA2 and WPA3 depends mainly on what devices you’re connecting to your network. If all your devices support WPA3, enable it exclusively for maximum security. If you have older devices that don’t support WPA3, you’ll need to consider your options.
Many modern routers offer a hybrid mode that broadcasts both WPA2 and WPA3 simultaneously. This allows new devices to connect with the stronger WPA3 protection while older devices can still connect using WPA2. It’s a practical compromise between security and compatibility.
I use hybrid mode because I have a smart home speaker from several years ago that only supports WPA2. The newer devices in my house connect with WPA3 protection while the older device uses WPA2. Both are secure, and I don’t have to choose between protecting new devices or supporting legacy equipment.
If you have very old devices that won’t work with either WPA2 or WPA3, honestly consider upgrading those devices. Technology from ten or fifteen years ago presents security risks beyond just WiFi encryption. But if upgrading isn’t possible, WPA2 is still a solid temporary solution until you can modernize your equipment.
Step 5: Disable WPS (The “Easy Connect” Button Hackers Love)
When I first looked at my router, I noticed a small button labeled WPS on the back. I had no idea what it was for, and my instinct was to just leave it alone. WPS (WiFi Protected Setup) is a feature that lets you connect devices by pressing a button or entering an 8-digit PIN instead of typing a password, but the PIN is vulnerable to brute force attacks that can crack it in just a few hours. Once I learned how easily this feature could be exploited, I immediately disabled it.
WPS was designed with good intentions. The idea was to make connecting new devices to your network faster and easier, especially for people who found typing long passwords frustrating. You could just press the WPS button on your router, then press a button on your device, and they would automatically connect. For some people, this genuinely made setup simpler.
The Critical WPS Security Vulnerability
The problem is that the WPS PIN system has a fatal flaw. Hackers use software tools to guess the 8 digit PIN through what’s called a brute force attack. The software simply tries PIN combinations over and over, thousands per second, until it finds the right one. What should theoretically take forever actually takes just hours because of how the WPS system validates PINs.
A hacker can use automated software to crack a WPS PIN in just a few hours, giving them full access to your WiFi network and router settings. This is exponentially faster than trying to crack your actual WiFi password, which could take years. The WPS feature essentially creates a backdoor around all the password security I had just set up.
I realized that keeping WPS enabled was like installing a brand new front door lock and then leaving a window open next to it. All my careful password security became irrelevant if someone could bypass it through WPS in a few hours.
How to Disable WPS in Your Router Settings
Disabling WPS is one of the quickest security steps I completed. I logged back into my router’s admin panel and found the WPS setting in the wireless security section. Different router brands label it differently, sometimes under “Advanced Wireless Settings” or “WiFi Settings,” but it’s usually easy to find if you search for “WPS.”
I found a toggle or checkbox labeled “WPS” or “WiFi Protected Setup” and simply turned it off. After saving the changes, WPS was completely disabled on my network.
One thing I worried about was whether the physical WPS button on the back of my router would cause problems if someone pressed it. I learned that when WPS is disabled in the settings, the button simply stops working. It won’t do anything even if someone manually pushes it. The button becomes harmless once the feature is disabled in software.
Why This Step Matters for Router Security Tips
From a broader perspective, disabling WPS is about removing unnecessary features that create security risks. Most people never use the WPS button anyway. Modern devices all have keyboard support for entering passwords, and the convenience of WPS doesn’t justify the hours it saves for installation.
Security experts universally recommend disabling WPS because the convenience it offers is far outweighed by the security vulnerability it creates. I’d rather spend thirty seconds typing a strong password when connecting a new device than leave a backdoor open that could be cracked in hours.
If I ever need to add a new device to my network, I just type the WiFi password. Yes, it takes a bit longer than pushing a button, but my network is genuinely protected rather than protected in theory with a backdoor built in.
Step 6: Turn On Your Router’s Firewall (And Keep Firmware Updated)
I used to think a firewall was something only big companies needed to worry about. Then I realized my router had one built in the whole time, and it was actually one of my most important defenses. A router firewall blocks unwanted incoming traffic from the internet and prevents unauthorized access attempts from reaching your connected devices. It’s like having a security guard who checks every visitor before letting them through the front door.
Most modern routers come with the firewall turned on by default, but I made the mistake of assuming mine was protected without ever verifying it. When I finally checked my router settings, I discovered the firewall was indeed enabled, but I felt more confident knowing I had actually confirmed it rather than just hoping it was working.
Understanding How Your Router’s Firewall Works
A firewall works by examining data packets coming into your home network and comparing them against security rules. Data packets that match known attack patterns or come from suspicious sources get blocked before they ever reach your devices. Data packets that look legitimate are allowed through. It’s an automated security checkpoint running twenty four seven.
The firewall doesn’t prevent all problems. It doesn’t stop you from visiting dangerous websites or protect against malware you accidentally download. But it does prevent hackers from directly attacking your router or devices from the outside internet. It closes the door to a whole category of automated attacks that scan the internet looking for routers they can break into.
A router firewall stops external attackers from initiating connections to your devices and prevents many automated hacking attempts before they can even reach your network. This is why even with a strong password, having the firewall enabled adds another critical layer of protection.
Verifying Your Firewall Is Actually Enabled
I logged into my router’s admin panel and navigated to the security or firewall section. Different router brands organize settings differently, but most have a section specifically for firewall configuration. I looked for a toggle or checkbox labeled “Firewall,” “SPI Firewall,” or “Security.”
My firewall was already enabled, which was reassuring. But the important part was that I didn’t just assume it. I verified the setting with my own eyes. If I had discovered the firewall was disabled, I would have immediately turned it on.
If you find that your firewall is disabled, the fix is simple. Just find the firewall toggle in your router settings and turn it on. Save the changes and you’re protected. For older routers, the firewall might not be available at all, which is another sign that upgrading to a newer model might be worth considering.
Why Router Firmware Updates Are Critical Security Maintenance
The other half of this step is something most people completely ignore: keeping your router firmware updated. Firmware is the software that runs your router. Just like your phone or computer gets security updates, your router receives firmware updates that patch security vulnerabilities as they’re discovered.
When I first checked my router for available updates, I was shocked to find three pending updates that had been waiting to install for months. I had never thought to look. The router had been vulnerable to known exploits the entire time because I hadn’t kept the software current.
Router firmware updates contain security patches for newly discovered vulnerabilities that hackers actively exploit to gain access to home networks. These aren’t optional improvements. They’re critical fixes for holes in security that could let attackers in.
I also learned that firmware updates sometimes patch the specific vulnerabilities that enable those de-authentication attacks I mentioned earlier. By keeping firmware current, I was directly preventing the handshake capture attack method. Updated firmware closes the door on attack techniques that older versions were vulnerable to.
How to Enable Auto-Update (If Your Router Supports It)
The best approach is to set your router to update automatically so you never have to think about it again. I found the firmware update section in my router’s system settings and looked for an option labeled “Auto-Update,” “Automatic Updates,” or “Update Schedule.”
My router supported automatic updates, so I enabled the feature. I set it to check for updates once a week during late night hours when I wasn’t likely to be using the internet heavily. The router now downloads and installs security patches automatically without any action required from me.
If your router doesn’t support automatic updates, set a calendar reminder to manually check for updates every three to six months. It only takes a few minutes to check. Log into your router admin panel, navigate to System or Administration section, look for Firmware Update, and check if newer versions are available. If one is available, download and install it. The router will reboot during the installation, which is normal.
Setting up automatic firmware updates ensures your router receives security patches as soon as they’re released, closing newly discovered vulnerabilities before attackers can exploit them against your network. This ongoing maintenance transforms your firewall and security settings from a one-time setup into continuous protection.
Step 7: Set Up a Guest Network (The Right Way)
The moment I had friends over and gave them my main WiFi password, I realized I had made a serious mistake. A guest network is a separate WiFi connection that allows visitors internet access while preventing them from seeing or accessing your personal devices, files, and private network settings. It’s one of the most underrated security features most routers offer, and I had been ignoring it completely.
When a guest connects to your main WiFi using the same password as your family devices, their phone or laptop becomes a trusted device on your network. If that guest’s device has malware or security issues, that malware could potentially access your personal computer, your printer, or worse, your smart home devices like cameras and voice assistants. Even a well meaning friend with a compromised device could inadvertently give hackers access to your entire household.
I used to change my main WiFi password every time someone visited and then change it back again. It was inconvenient and provided almost no real protection. A guest network solves this problem elegantly.
Creating a Separate Guest WiFi Network
Setting up a guest network took me about five minutes. I logged into my router’s admin panel and found the Guest Network section, usually under Wireless or Advanced Settings. Most modern routers have this feature built in.
I enabled the guest network feature and gave it a name like “Guest WiFi” or “Visitors.” I created a separate password for the guest network, different from my main network password. This guest network now appears as a separate WiFi option that people can select and connect to.
The beauty of this approach is that guests never know my main WiFi password. They connect to the guest network instead. If I need to change something about visitor access later, I can modify the guest network password without touching my main network security.
The Critical Isolation Settings Most People Miss
Here’s where most guides stop, and where I almost made a critical mistake. Many routers have guest networks enabled, but the isolation settings aren’t configured properly. I had to dig into the advanced wireless settings to find two crucial options.
Under Advanced Wireless Settings for the guest network, I found checkboxes for “Allow guests to see each other” and “Allow guests to access your local network.” Both of these were initially enabled, which meant guests could theoretically see what other guests were connected and potentially access devices on my main network.
I unchecked both of these options to ensure guests could only access the internet and could not see other connected devices or interact with my private network resources. This isolation setting is the difference between a guest network that looks secure and one that actually is secure.
With these settings disabled, a guest’s device can access the internet through your router, but it cannot see your computer, your printer, your NAS storage, or any of your smart home devices. The guest network exists in its own isolated bubble.
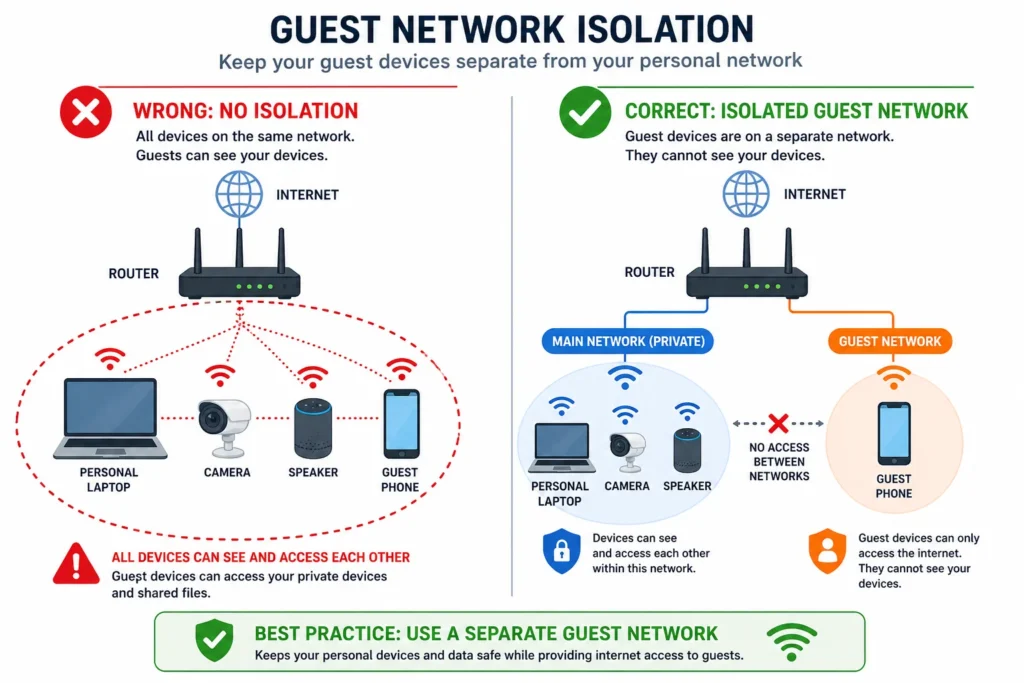
while keeping all your personal devices completely hidden from them.
Temporary Guest Networks for Parties
I also discovered that I can delete and recreate guest accounts entirely. If I host a party with lots of visitors, I can create a temporary guest network just for that event. When everyone leaves, I delete that guest network completely. This prevents permanent access and removes the temptation for guests to save the password for future use.
For recurring visitors like family members or regular friends, I keep a permanent guest network they can use consistently. This is cleaner and more secure than giving them my main password.
Should You Put Your Smart Home Devices on the Guest Network?
This is an advanced question I didn’t even think about initially. The answer depends on the device and how much you trust it.
Cheap or lesser known smart home devices with poor security reputations can be isolated on the guest network to prevent them from accessing other devices if they’re compromised. A budget smart plug from an unknown manufacturer that requires internet access but doesn’t need to communicate with your other devices can safely sit on the guest network.
However, devices you interact with frequently and trust more, like your main Alexa speaker or smart TV, should stay on your primary network. They often need to communicate with your other devices to function properly. Moving them to the guest network would break functionality and defeat the purpose.
I use a practical approach: essential smart home devices I control regularly stay on my main network with all the isolation benefits I’ve configured. Less critical or less trusted smart devices use the guest network. This provides defense in depth. If a suspicious device gets compromised, it’s isolated from my important network resources.
Step 8: Disable Remote Management (Lock the Back Door)
When I discovered that my router had a feature allowing me to access and change its settings from anywhere in the world, my first thought was that this seemed convenient. Remote management allows you to log into your router’s admin panel from outside your home network, but disabling this feature prevents hackers from accessing your router settings from the internet and eliminates a major attack vector. My second thought was that this convenience created a security hole I didn’t need.
Think of remote management like leaving a back door to your house unlocked so you can get in from anywhere. Sure, it’s convenient if you’re away and need to change something, but it also gives anyone else a way in if they know the lock exists. For most home users, the convenience isn’t worth the risk.
Why Remote Management Is an Open Invitation
Remote management works by making your router accessible through the internet. If someone knows your router’s IP address and your admin credentials, they can connect to it from anywhere on the planet and change your security settings. They could disable your firewall, change your WiFi password, or reconfigure everything you’ve just spent time securing.
Hackers actively scan the internet looking for routers with remote management enabled and default credentials still in place. Your router could be targeted by automated attacks searching for any device with remote access enabled and a weak admin password. Disabling remote management removes your router from the list of potential targets because access becomes impossible from outside your home network.
Disabling remote management ensures that only devices physically connected to your home network through WiFi or ethernet can access your router settings. This creates a natural firewall around your router administration. An attacker would have to already be inside your network to change your router configuration, and if they’re already inside, you have bigger problems.
Finding and Disabling Remote Management
I logged back into my router’s admin panel and navigated to the System or Administration section. Different router brands organize this differently, but I looked for an option labeled “Remote Management,” “Remote Access,” or “Remote Administration.”
I found the setting and confirmed it was enabled by default. I immediately disabled it by unchecking the box or toggling the switch off. After saving the changes, remote management was completely turned off.
This single step took less than one minute, but it closed off an entire category of potential attacks. My router could no longer be accessed from outside my home network.
You Can Still Manage Your Router From Anywhere in Your Home
I had one concern when disabling remote management: would I lose the ability to adjust router settings if I needed to? The answer is no. You can still access your router’s admin panel from any device connected to your home network, whether that connection is WiFi or a wired ethernet cable. Remote management specifically refers to access from outside your home network.
If I’m sitting in my living room and need to change a WiFi setting, I can still open a browser and log into my router admin panel. If I’m in my bedroom, same thing. As long as I’m connected to my home network either by WiFi or ethernet, I have full access to the router settings.
The only time remote management would be useful is if I wanted to change router settings while away from home. For the average user, this is a rare scenario that doesn’t justify keeping a security hole open. If you travel frequently and truly need to manage your router remotely, you can re-enable this feature when needed and disable it again when you return home. But for most households, keeping remote management disabled is the safer choice.
Advanced Security: MAC Address Filtering (Stop Password Sharing Cold)
I didn’t realize how vulnerable my network was to password sharing until a friend showed me something that made me uncomfortable. She pulled up her phone, opened my WiFi settings, and showed me how she could instantly share my network password via QR code with anyone she wanted. One tap and someone I’d never met could connect to my network without asking permission. MAC address filtering creates a whitelist of approved devices by their unique physical hardware addresses, ensuring that even if someone shares your WiFi password, their unapproved device cannot connect to your network.
This was the security gap I didn’t even know existed. My strong password became almost meaningless if someone could just share it as a QR code and bypass it entirely through a different route.
Understanding MAC Addresses and Device Whitelisting
Every device that connects to the internet has a unique identifier called a MAC address. MAC stands for Media Access Control, and it’s a physical hardware address burned into your device’s WiFi adapter. Your phone has one. Your laptop has one. Your smart TV has one. Your router can see these addresses and use them to make connection decisions.
MAC filtering lets your router say “I will only allow devices with these specific MAC addresses to connect, regardless of whether they know the correct password.” It’s like having a bouncer at a club who checks ID and also checks a guest list. Even if someone has the password to get in, they won’t be admitted unless their device is on the list.
With MAC filtering enabled, a device with the correct WiFi password but an unapproved MAC address will be rejected at the connection stage. This solves the QR code problem completely. Someone can share your password with their entire friend group, and none of those devices will be able to connect because their MAC addresses aren’t whitelisted.
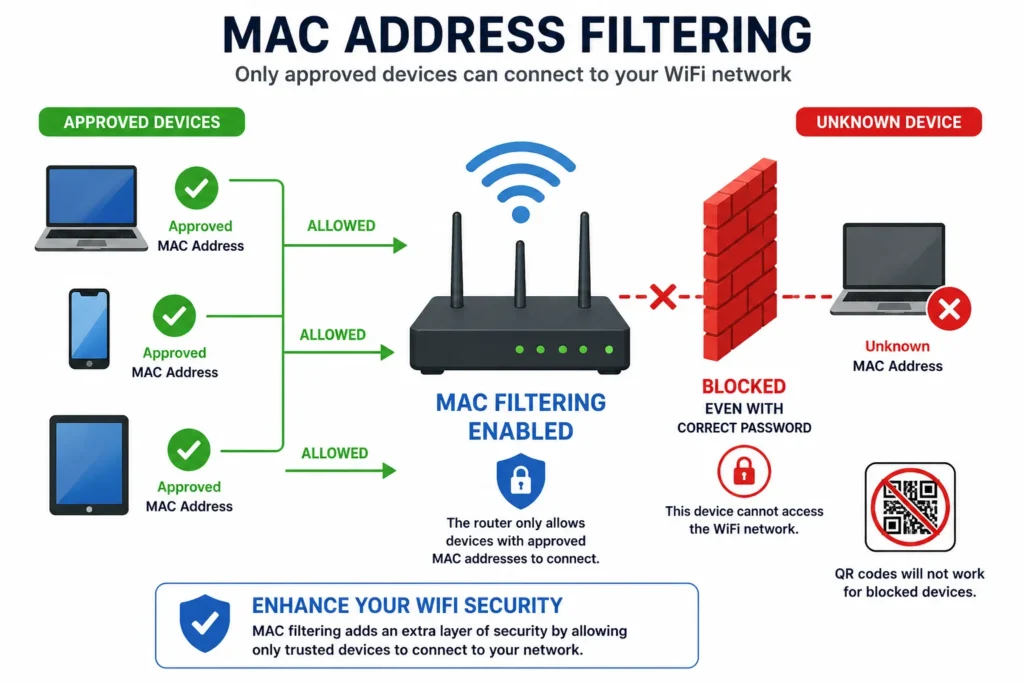
even neighbors who scanned your WiFi password via QR code.
How to Set Up MAC Address Filtering
Setting up MAC filtering requires some careful planning because there’s one critical gotcha. Once you enable MAC filtering and save changes, every device not on the whitelist gets kicked off immediately. If you haven’t added your own devices to the whitelist first, you’ll lock yourself out of your own network.
I learned this the hard way when I almost enabled filtering on my main laptop without first connecting via ethernet cable. The safest approach is to connect at least one device to your router using a physical ethernet cable before enabling MAC filtering. This way, you maintain access while you add devices to the whitelist one by one.
Alternatively, add all your devices’ MAC addresses to the whitelist before you enable the filtering feature. Once everything is configured and saved, only those devices will be able to connect.
I accessed my router’s admin panel and found the MAC Filtering section under Wireless or Advanced Settings. Most routers have two modes: Allow (whitelist) or Block (blacklist). I selected Allow mode, which means only devices on my approved list can connect.
How to Find Your Device’s MAC Address (All Platforms)
Finding MAC addresses was easier than I expected once I knew where to look. Every device displays this information in its settings.
On Windows computers, I right-clicked the WiFi icon in my system tray and selected “Open Network and Internet settings.” Then I clicked “Advanced network options” and found “Hardware properties.” Under this section, I located the “Physical address,” which is the MAC address. It looks like a series of letters and numbers separated by hyphens or colons, like “AB-12-CD-34-EF-56.”
On a Mac, I went to System Preferences, clicked Network, selected WiFi, and then clicked Advanced. In the WiFi tab, I found the address field displaying my MAC address in the same format.
On my iPhone, I opened Settings, went to General, then About. I scrolled down and found “WiFi Address,” which displays the device’s MAC address in the same alphanumeric format.
On Android phones, the location varies slightly by manufacturer. Generally I went to Settings, then About Phone, and looked for Status or Device Status. Under this section, I found the WiFi MAC Address or just “MAC address.”
The TP-Link Format Warning You Need to Know
When I started adding MAC addresses to my whitelist, I ran into an unexpected problem. My router is a TP-Link model, and it required MAC addresses in a specific format. Instead of the usual colons between pairs of numbers (like AB:12:CD:34:EF:56), TP-Link routers require dashes (AB-12-CD-34-EF-56).
Some router brands like TP-Link require MAC addresses to be formatted with dashes instead of colons, so check your router’s MAC filtering page to see which format it requires. I had to reformat each address before it would accept them. If your router uses a different brand, check the help documentation to confirm the correct format before spending time entering addresses.
Adding Devices One by One
Once I had enabled MAC filtering in Allow mode, I started adding devices to the whitelist. The router provided an “Add New” button where I entered each device’s MAC address. Some routers let me add a device name or description so I could remember which device was which.
I added my laptop first, then my phone, then my wife’s devices, then our smart TV. For each addition, I entered the MAC address in the correct format and saved. Within minutes, I had created a complete whitelist of all our household devices.
The moment you add all your devices to the whitelist and enable MAC filtering, any device trying to connect even with the correct password—will be rejected unless it’s on your approved list. I tested this by trying to connect a guest’s phone. Even when I gave them the correct WiFi password, their device couldn’t connect because their MAC address wasn’t whitelisted.
More Ways to Harden Your Network (For the Security-Conscious)
After completing the first eleven steps, I thought I had covered everything. Then I discovered several additional hardening techniques that most people never implement but significantly strengthen an already solid security foundation. These aren’t mandatory for the average home user, but they add layers of protection that make your network substantially harder to penetrate.
Hide Your SSID: Does It Actually Help?
I’ve heard conflicting advice about hiding your WiFi network name. Some experts say it’s pointless security through obscurity. Others swear by it. The truth is somewhere in the middle.
Hiding your SSID prevents your network from appearing in the list of available WiFi networks that casual scanners see, but determined attackers with specialized tools can still find hidden networks. The benefit isn’t that it makes your network unbreakable. The benefit is that it deters casual neighbors and curious people from even trying to connect.
When your network isn’t visible in the list of available networks, someone would have to know it exists and manually type in the network name to connect. This creates a barrier against opportunistic attacks. Someone driving through your neighborhood won’t see your hidden network in their available options and won’t even attempt to connect.
To hide your SSID, I logged into my router settings and found the SSID broadcast option in the wireless settings. Most routers have a checkbox labeled “Enable SSID Broadcast” or similar. I unchecked it. My network disappeared from visible lists.
The trade-off is minor inconvenience. Every time I add a new device to my network, I have to manually type in the network name and password instead of selecting it from a visible list. For the extra security layer of deterring casual attacks, I consider this worthwhile.
Disable UPnP (Universal Plug and Play)
UPnP is a convenience feature that most people don’t even know exists. It allows devices on your network to automatically open ports in your firewall without asking permission. This sounds helpful but creates significant security risks.
UPnP enables devices to bypass your firewall by automatically creating port forwarding rules, potentially exposing your network to attack from devices on your local network. If a guest’s compromised device connects to your network, it could potentially use UPnP to open ports that give it access to your computer or other networked devices.
I found the UPnP setting in my router’s Advanced settings, usually under NAT Forwarding or UPnP. I disabled it completely. For a standard home user who doesn’t run game servers or other applications requiring port forwarding, UPnP is unnecessary.
The only situation where you might need UPnP is if you play certain online games with friends or use smart home hubs that require automatic port management. Even then, you should weigh whether the convenience is worth the security risk.
Close Unused Port Forwarding Rules
Port forwarding creates intentional holes in your firewall. Each open port is a potential entry point for attackers. I checked my port forwarding settings and discovered rules from years ago that I completely forgot about.
Unused port forwarding rules create unnecessary vulnerabilities in your firewall, so close any ports you don’t actively use for specific services or applications. I had port forwarding rules open for a gaming server I hadn’t used in three years. Closing that port eliminated an unnecessary attack vector.
To review port forwarding, I logged into my router admin panel and looked for Advanced Setup or Port Forwarding. I listed all active rules and closed anything I wasn’t actively using. If I ever need port forwarding again in the future, I can reopen specific ports as needed.
Disable Ping Response on WAN Interface
This is a more technical option that most routers offer. Ping is a utility that tests whether a device is online and responding. By disabling your router’s ping response from the internet side, your network becomes invisible to network scanning tools.
Disabling WAN ping response prevents your router from responding to connection discovery attempts from the internet, making your network harder to find in automated network scans. It’s a minor barrier against casual reconnaissance, but it adds another layer of obscurity.
I found this setting under WAN Setup or Internet Settings. There was a checkbox labeled “Respond to Ping from the Internet” or similar. I unchecked it. My router now ignores ping requests from the internet while still functioning normally.
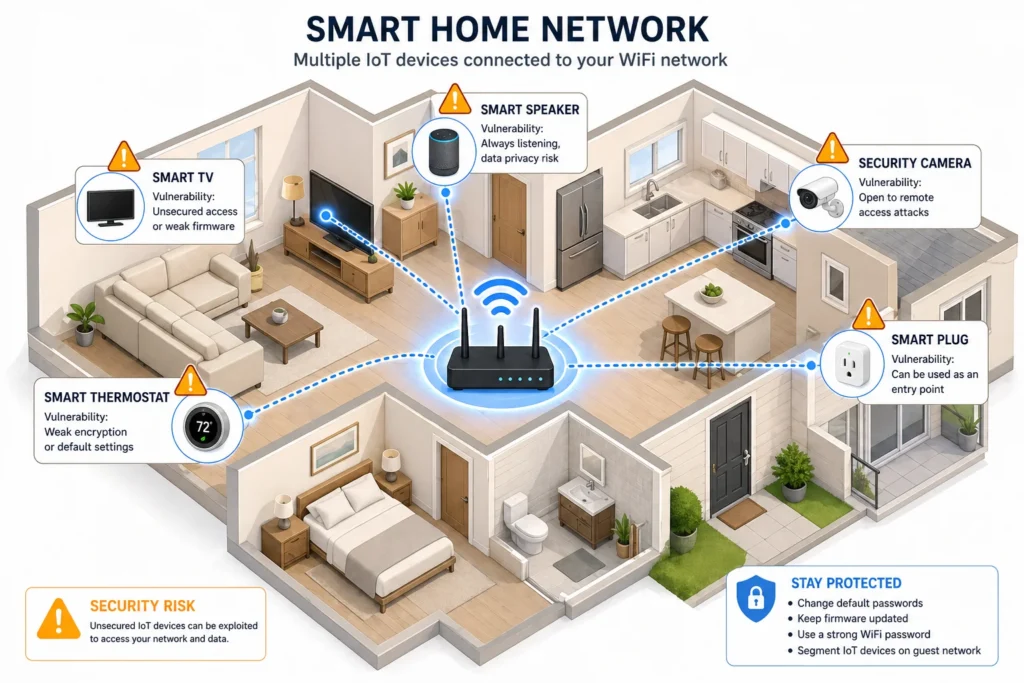
Securing Smart Home Devices (Your Alexa Might Be the Weak Link)
I spent so much time securing my router and WiFi network that I almost forgot about the devices connecting to it. Then I realized that my smart speakers, security cameras, and WiFi connected thermostat were potentially the weakest links in my entire security chain. Smart home devices like Alexa speakers and security cameras often have minimal security compared to your router, making them vulnerable entry points if they’re compromised on an unsecured network.
IoT stands for Internet of Things, which basically means any device that connects to the internet and isn’t a traditional computer or phone. Smart home devices fall into this category. Most of them are manufactured with convenience as the priority and security as an afterthought.
IoT security is an essential part of protecting your WiFi network.
The IoT Device Security Problem
Smart home devices typically have default usernames and passwords. Many of them store minimal security configurations. If someone gains access to your network, they could potentially access these devices. A hacked camera could give someone a live video feed of your home. A compromised smart speaker could listen to conversations happening in your house.
I realized I had never changed the default password on my smart camera. It was still using the same username and password that came from the factory. Anyone who could access my network and figure out the camera’s address could potentially access those feeds.
Many IoT devices come with default credentials that manufacturers publish online, making them trivial to compromise if an attacker gains access to your network. This is why isolating these devices and securing them individually matters.
Strategies for Securing Smart Home Devices
The first step is to isolate untrusted devices on your guest network. I moved several inexpensive smart plugs and devices I was less confident about to the guest network. These devices can still function and access the internet, but they can’t see my personal computer or access other devices on my main network. If one of these devices becomes compromised, the damage is contained.
For essential smart home devices that I interact with frequently, like my Alexa speaker, I kept them on the main network because they need to communicate with other devices. But I immediately changed their default passwords to strong unique credentials.
I also made a point to check for firmware updates on my smart home devices. Just like routers, smart devices receive security patches. My camera manufacturer had released three firmware updates since I bought it. I installed all of them.
Changing default passwords on smart home devices, isolating untrusted devices to guest networks, and regularly updating device firmware significantly reduces the security risks from compromised IoT devices. These steps transformed my smart home from a potential liability into an extension of my secure network.
What to Do If Your WiFi Has Been Hacked (Recovery Steps)
If you’ve already checked your connected devices list and found intruders, or if you suspect someone has been accessing your network, the situation is recoverable but requires immediate action. I created this recovery plan after I discovered those unauthorized devices on my network for the first time.
Immediate Action: Disconnect the Intruders
The first thing I did was kick every unknown device off my network immediately. In my router’s connected devices list, I found each suspicious device and clicked remove or disconnect. They were booted off within seconds.
This stops the current breach but doesn’t prevent them from reconnecting if they still have your WiFi password. It’s a temporary measure that buys you time to implement permanent fixes.
Change Your Passwords Immediately
After disconnecting intruders, I changed my WiFi password to something completely new and strong. I used a 16 character passphrase with mixed character types. This prevents devices they’ve already compromised from automatically reconnecting.
I also changed my router admin password at the same time. If someone had access to my WiFi, they might have tried accessing the router’s admin panel. Changing the admin credentials locked them out of the control panel.
Changing both your WiFi password and router admin password immediately after discovering a breach prevents disconnected devices from automatically reconnecting and blocks potential access to your router settings. These two password changes are your most critical immediate actions.
Check Your Own Devices for Malware
The second part of recovery is scanning your own devices for malware. If an intruder had access to your network, they might have infected your computer or phone with malicious software.
I ran a full malware scan on my laptop and my phone using reputable security software. I was looking for anything out of the ordinary. Fortunately, my devices came back clean, but it’s essential to check. A device infected with malware can be manipulated remotely or used to spread the malware further.
Enable MAC Filtering to Prevent Re-Access
With my passwords changed and my devices checked, I wanted to prevent the specific devices that had breached my network from ever connecting again. I enabled MAC address filtering and added only my approved devices to the whitelist.
This created a situation where even if someone still had my WiFi password, their unapproved device couldn’t connect. MAC filtering became an extra security layer that prevented re-entry.
Consider a Factory Reset for Deep Compromises
If you discover evidence that an intruder accessed your router’s admin panel and changed settings, a factory reset might be necessary. This wipes everything back to default and removes any changes the intruder made.
I didn’t need a factory reset in my situation, but I had the option available. After a factory reset, you would need to reconfigure all your security settings from scratch using the steps in this guide.
Implement All Security Steps Going Forward
Finally, I made sure to implement every security step in this guide if I hadn’t already. A breach is a sign that your current security wasn’t sufficient. Following the twelve steps plus the advanced hardening techniques eliminates the vulnerabilities that allowed the breach to happen.
Optional Extras: VPN and Router Placement
After securing my router and network, I explored two additional security considerations that fall into the nice-to-have category rather than must-have.
Do You Really Need a VPN at Home?
A VPN encrypts all data traveling from your devices to the VPN provider’s servers before it goes to the internet. I considered adding one to my home network security setup.
The honest answer is that for most home users, a VPN isn’t necessary if your router and network are already secured. A VPN’s value is primarily for public WiFi situations or hiding your internet activity from your ISP. At home on your secure network, your traffic is already protected.
That said, a VPN adds an extra layer of privacy. If you work from home and want to ensure your work traffic is extra encrypted, a VPN provides additional protection. If you want to hide your browsing activity from your Internet Service Provider, a VPN does that.
A home network VPN is optional for most users but valuable for remote workers, people concerned about ISP monitoring, or anyone wanting additional privacy layers beyond standard network security. It’s not a replacement for router security, but it complements it.
I decided to set up a VPN for remote work days when I access sensitive client information. The extra encryption gives me peace of mind that my work traffic is protected even on my home network.
When traveling and using public WiFi at coffee shops or airports, I enable my VPN on my phone for additional protection beyond the unsecured public network.
Router Placement: Why Location Matters
I also reconsidered where my router was physically positioned. I had it sitting on a shelf near a window, which meant my WiFi signal extended well beyond my house.
Placing your router centrally within your home and away from windows reduces signal bleed beyond your property boundaries, preventing neighbors from easily connecting to your network from outside. It’s a small factor compared to password security, but it reduces the attack surface.
I moved my router to a more central location in my home. My WiFi signal now reaches my entire house but doesn’t extend as far into neighboring properties. This simple physical repositioning made casual unauthorized access less likely for someone sitting outside.
Troubleshooting: WiFi Still Slow After Securing?
After I finished securing my home WiFi, I expected my internet speeds to improve since I’d eliminated unauthorized users. Then I discovered that my internet was still slower than my ISP’s advertised speeds.
I initially panicked, thinking something was wrong with my security implementation. Then I realized that not all slow WiFi results from security breaches or unauthorized usage.
Physical Obstructions and Signal Issues
My WiFi router is now centrally located, but I still have thick walls between the router and some rooms in my house. These walls attenuate the WiFi signal, reducing both speed and range. In those rooms, my speeds are noticeably slower than near the router.
Thick walls, metal objects, and distance from your router significantly impact WiFi speed independently of security settings. This is a physics problem, not a security problem. Even with perfect security, the signal still has to travel through physical obstructions.
I tested my WiFi speeds in different rooms. Near the router, I got full speeds. Two rooms away with a wall in between, speeds dropped noticeably. This was normal behavior, not a sign that something was wrong with my security.
Too Many Devices Competing for Bandwidth
I also realized I had many devices connected to my network simultaneously. My laptop, my phone, my wife’s devices, the smart TV, multiple smart home devices, and our guest network traffic all competed for bandwidth at the same time.
Having too many devices actively using bandwidth simultaneously slows speeds for all devices, regardless of how secure your network is. This is a capacity issue, not a security issue.
When only my laptop was connected and actively using the network, I got excellent speeds. When my laptop, phone, smart TV, and guest network visitor were all using bandwidth simultaneously, speeds dropped significantly.
ISP Throttling and Network Congestion
I also discovered that my ISP throttles speeds during peak hours. Between 7 and 9 PM, everyone in my neighborhood is streaming videos and using bandwidth, so ISP speeds slow down across the board.
Your router security doesn’t affect your ISP’s speed, capacity, or throttling policies. These are external factors beyond your network control.
I tested my speeds at different times of day and found significant variations. This was ISP congestion, not a security problem.
When You’ve Actually Improved Things
The real security improvement showed up in my network stability and reliability. After securing my network, I didn’t have mysterious disconnections or unauthorized devices draining bandwidth anymore. My WiFi connection remained stable and consistent.
If you’ve been dealing with slow speeds, frequent disconnections, or mysterious network issues, securing your network might fix those problems. But if you were already experiencing slow speeds from ISP limitations or physical obstructions, security improvements won’t address those underlying causes.
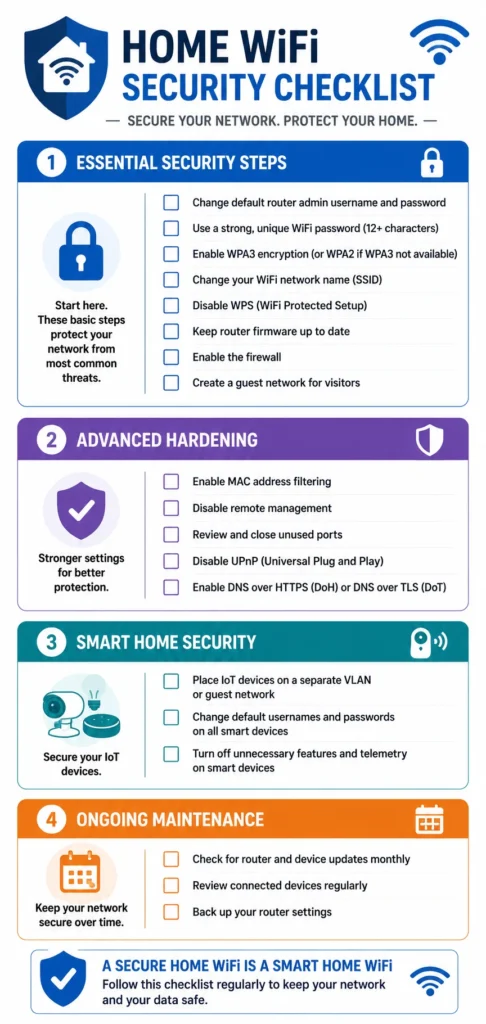
Your Home WiFi Security Checklist: You’re Now Protected
I started this journey thinking my home WiFi security was fine. I ended it realizing how many vulnerabilities I had left unaddressed. Now that I’ve walked you through all twelve steps plus advanced hardening techniques, you’ve transformed your network from potentially open to genuinely secure.
The security journey doesn’t end with this guide. WiFi security is ongoing maintenance, not a one-time setup. But you’ve built a solid foundation that protects against the most common attack vectors and keeps your home network secure.
Ongoing Security Maintenance
I set a calendar reminder to check for router firmware updates every three months. Most of the time there’s nothing new, but when critical security patches are released, I install them immediately. This ongoing maintenance closes newly discovered vulnerabilities before attackers can exploit them.
I also check my connected devices list monthly. It takes two minutes, but I want to catch any unauthorized devices immediately if they somehow slip through my security layers. Early detection prevents extended breaches.
Finally, I remember that cybersecurity is a continuous process, not a destination. New threats emerge, new vulnerabilities are discovered, and new hacking techniques are developed. But by following these steps and maintaining your security settings, you stay ahead of most casual and opportunistic attacks.
to track your home WiFi security progress.
Quick Security Checklist (Save This!)
Here’s your complete checklist. You can screenshot this, print it, or bookmark it for future reference:
Essential Security Steps:
- Secure your router admin panel with a strong unique password
- Create a strong WiFi password using 16 characters minimum
- Change your network name from the default
- Enable WPA2 or WPA3 encryption
- Disable WPS (WiFi Protected Setup)
- Turn on your router’s firewall and enable auto-updates
- Set up a guest network with isolation enabled
- Disable remote management on your router
Advanced Hardening (Recommended):
- Enable MAC address filtering with a device whitelist
- Hide your SSID broadcast
- Disable UPnP in advanced settings
- Close unused port forwarding rules
- Disable ping response from the internet
Smart Home Security:
- Change default passwords on all IoT devices
- Update smart device firmware
- Isolate untrusted devices on guest network
Ongoing Maintenance:
- Check firmware updates quarterly
- Review connected devices list monthly
- Check for new threats or vulnerabilities
Congratulations on taking control of your home WiFi security. By implementing these steps, you’ve secured your network against the vast majority of common attacks and unauthorized access attempts. Your data is protected, your devices are isolated from intruders, and your family’s online activity remains private within your own home network.
The fact that you took time to learn how to secure home WiFi properly puts you ahead of most people who never think about network security at all. Your home network is now genuinely secure, and you can use it with confidence knowing that you’ve eliminated the easy vulnerabilities that most hackers exploit.
How do I know if someone is stealing my WiFi right now?
Log into your router (192.168.1.1), find “Connected Devices,” and look for unknown device names or MAC addresses you don’t recognize. If you see unfamiliar devices, your internet will also feel noticeably slower due to bandwidth theft, especially during evening hours when hackers are most active.
What’s the difference between my WiFi password and my router password?
Your WiFi password lets devices connect to the internet, while your router admin password controls the router’s settings and security configuration. They must be two different strong passwords so that even if someone knows your WiFi password, they can’t change your security settings.
Is WPA2 encryption still safe in 2025?
Yes, WPA2 remains secure for home networks when paired with a strong 16+ character password, though WPA3 is newer and stronger. If all your devices support WPA3, use it exclusively; otherwise use hybrid WPA2/WPA3 mode for compatibility without sacrificing security.
Should I hide my WiFi network name (SSID)?
Hiding your SSID prevents casual neighbors from seeing your network in available WiFi lists, but determined hackers with tools can still find hidden networks. It’s worth doing as an extra obscurity layer, though it’s not foolproof and requires manually typing your network name when connecting new devices.
How long does it take a hacker to crack a WiFi password?
A weak 8-character password cracks in hours, while a strong 16+ character password with mixed characters takes years or decades using brute force tools. This dramatic difference is why password length matters more than complexity alone.