
How to Remove Apps from Android (Every Method)
If your Android phone feels sluggish, keeps flashing storage full warnings, or you have a pile of apps collecting dust that you never open, you are in the right place.
And If you have tried tapping Uninstall only to find the button is greyed out, or even tried to force stop the app on Android first and still cannot remove it, the solution usually comes down to one of two causes.
This guide covers every removal method — from a one-tap uninstall to full bloatware removal without rooting so you can pick the right approach for your exact situation.
- How to delete regular apps using three different methods, including a batch deletion trick most people never discover
- How to handle preinstalled apps and bloatware that do not show a normal uninstall option
- What to do when an app simply refuses to uninstall, and how to fix it step by step
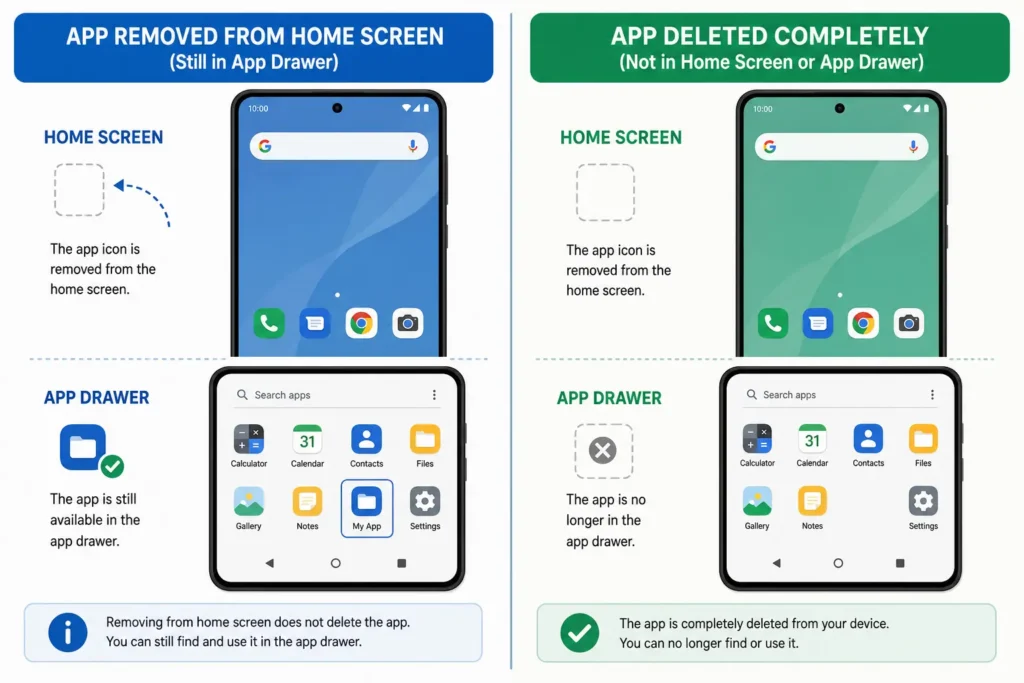
Removing an App from Your Home Screen Is NOT the Same as Deleting It
This is the mistake I see most often, and it confused me too when I first started using Android. When you long press an app icon on your home screen and tap Remove, the icon disappears. Your home screen looks cleaner. It feels like the app is gone.
But the app is still on your phone.
Removing an app from your Android home screen only deletes the shortcut that points to the app. The actual app stays fully installed on your device. It is still using storage space, it may still run in the background, and it will still appear when you scroll through your app drawer. Nothing was actually uninstalled.
Think of it like removing a sticky note from your desk. The item the note was pointing to is still sitting right there. You just removed the label.
This distinction matters a lot, especially when you are trying to free up storage on your Android phone. If you remove app shortcuts expecting your storage to improve and nothing changes, this is exactly why.
How to Remove an App Shortcut from Your Home Screen (Without Uninstalling)
If you just want a cleaner home screen without fully deleting an app, here is how to remove the shortcut only:
- Long press the app icon until a context menu appears around it
- Tap Remove from Home Screen or drag the icon upward to the Remove option that appears at the top
- The shortcut disappears from your home screen but the app stays fully installed on your device — removing an app from the home screen without deleting it is exactly what this step does
This is useful when you want a tidier home screen but still need the app. The app remains fully accessible through your Android app drawer, which is the full list of every app installed on your phone.
How to Tell If an App Is Still Installed After Removing the Icon
Not sure if an app is still on your phone after removing its icon? Both of these checks take under ten seconds.
First, swipe up on your home screen to open the app drawer and scroll through the list. If the app appears there, it is still installed.
Second, open your phone’s Settings and tap Apps or Application Manager. Every app currently installed on your Android device appears in this list regardless of whether a home screen shortcut exists.
If you want to actually uninstall the app and free up the storage space it is taking, the next sections will walk you through exactly how to do that.
How to Remove Apps from Android Using Settings (Works on Every Phone)
The Settings method is the most reliable way to remove apps from Android, and it is the first one I recommend when someone is unsure where to start. It works on virtually every Android phone regardless of brand or Android version. If you have tried another method and it did not work, the Settings path almost always will. Google also covers the basics on their official Android Help page if you want a quick reference alongside this guide.
There are two quick ways to get to the uninstall option, and I will walk you through both.
Method 1: Long Press the App Icon (Fastest Way)
This is the quickest way to delete an app on Android and works on most phones running modern Android versions.
Follow these steps:
- Find the app you want to remove either on your home screen or in your app drawer
- Long press the app icon and hold for about one second until a menu appears
- Tap Uninstall from the menu that shows up
- A confirmation popup will appear asking if you want to uninstall the app
- Tap OK to confirm and the app will be removed from your device
On some Android phones the long press brings up a small floating menu with icons at the top. Look for the trash icon or the Uninstall label and tap it. Confirming your choice is the final step to fully delete the app from your Android device.
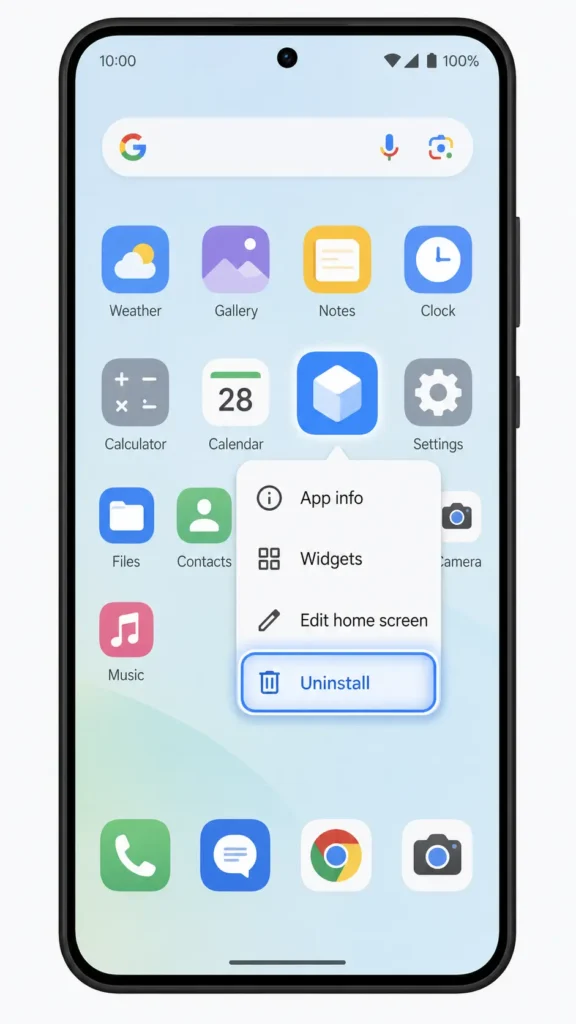
One thing worth knowing: if you long press an app and only see Remove instead of Uninstall, that means you are on the home screen and the option is only removing the shortcut. In that case, try the same long press from inside your app drawer, or use Method 2 below.
Method 2: Through Settings and App Manager
This method works in every situation. Even if the long press does not show an uninstall option, the Android Settings menu always will.
Follow these steps:
- Open your phone’s Settings app
- Scroll down and tap Apps or in some phones it appears as Application Manager
- You will see a full list of every app installed on your device
- Find and tap the app you want to delete
- On the app info screen tap Uninstall
- Confirm by tapping OK
The Android app manager inside Settings shows you every installed app in one place, which also makes it easy to check storage usage and permissions before deciding to remove something.
Steps for Samsung Galaxy (One UI Is Slightly Different)
If you use a Samsung Galaxy phone, the path is almost the same but the Samsung One UI interface looks a little different from stock Android.
Here is the Samsung-specific path:
- Open Settings on your Samsung Galaxy phone
- Tap Apps (you may see it listed as Apps or Applications depending on your One UI version)
- Tap the app you want to remove
- Tap Uninstall at the bottom of the screen
- Confirm when prompted
For the long press method on Samsung, hold the app icon on your home screen and a small menu will appear above the icon. Tap Uninstall directly from that menu.
One thing I have noticed specifically with Samsung One UI apps is that some manufacturer-installed apps show a Disable button instead of an Uninstall option. That happens because Samsung treats certain apps as protected system components. I cover exactly what to do in that situation in the bloatware section coming up next.
How to Delete Apps Using the Google Play Store (Plus Batch Deletion Trick)
Most people default to Settings when removing apps, but the Google Play Store offers its own removal path that is just as reliable. The Play Store includes a built-in batch deletion feature inside the Manage Apps tab one that most Android users never find.
You can select and uninstall multiple apps at once on Android without any third-party tool. I find this method especially useful when doing a big phone cleanup.
How to Uninstall One App from the Play Store
You can do this directly from the app’s own Play Store page in just a few taps.
- Open the Google Play Store on your Android phone
- Tap your profile picture in the top right corner
- Tap Manage apps and device
- Tap the Manage tab at the top
- Find the app you want to remove and tap on it
- Tap Uninstall and confirm
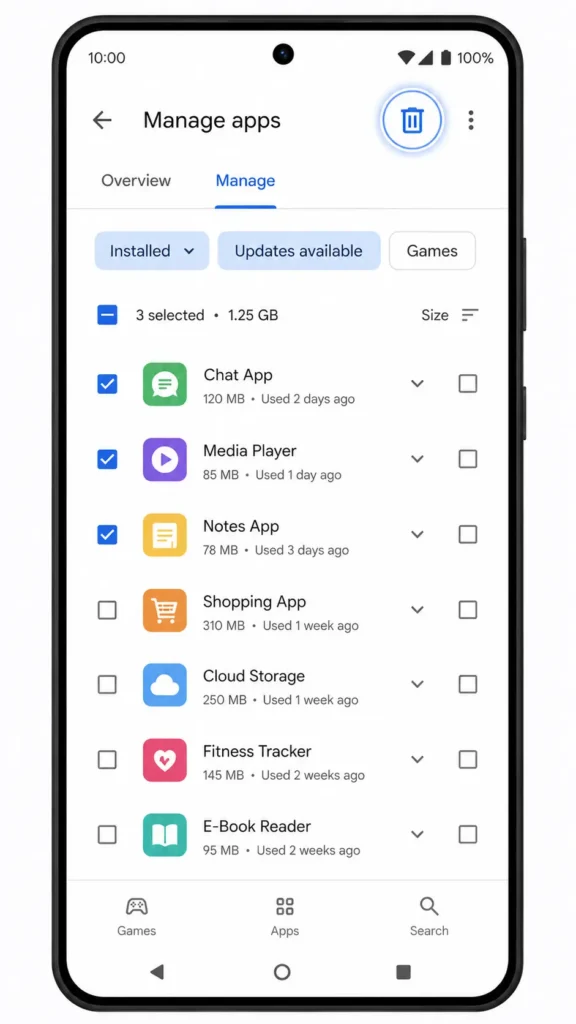
How to Delete Multiple Apps at Once (The Batch Deletion Method)
This is the tip most people miss completely, and it saves a lot of time when you want to clean up several apps at once.
Here is how to use the Google Play Store batch deletion method:
- Open Google Play Store and tap your profile picture
- Tap Manage apps and device
- Tap the Manage tab
- You will see a list of all apps installed under your Google account
- Tap the small checkbox next to any app you want to delete
- Keep selecting as many apps as you want to remove
- Tap the trash icon at the top right of the screen
- Tap Uninstall to confirm and all selected apps will be removed together
This is the only built-in way to delete multiple Android apps at the same time without downloading anything extra. I use it every time I set up a new phone and want to remove everything I do not need in one clean session.
Bonus tip: The Manage tab also shows apps linked to your Google account that you installed in the past but are not currently on your device. You can remove these from your purchase history too,which keeps your Play Store library clean and organized.
How to Remove Preinstalled Apps from Android (The Bloatware Problem)
Preinstalled apps, commonly called bloatware, are apps that manufacturers and carriers load onto Android phones at the factory before the device ever reaches a store shelf. When I first tried to remove some of these apps, I could not find an Uninstall button anywhere. Many people hit the same wall and assume they are just stuck with these apps permanently.
You are not entirely stuck. You just need a different approach.
Bloatware apps consume storage space, send notifications you never asked for, and run in the background even when you never open them. Removing or disabling this type of app can make a real difference to your phone’s performance and available storage.
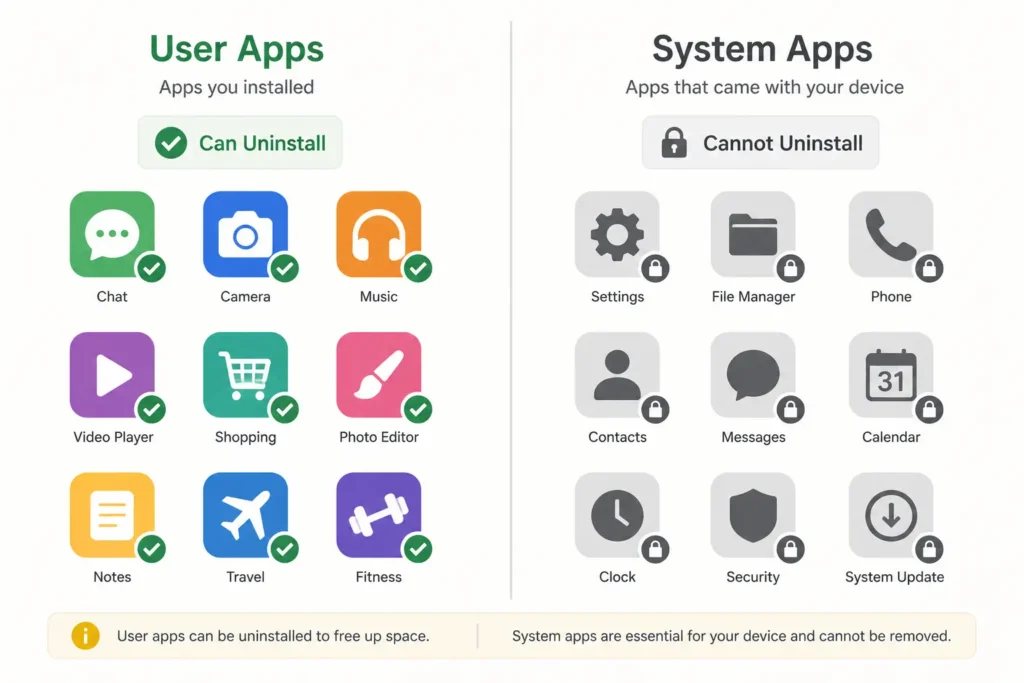
Why You Can’t Delete Some Apps (System App Explained)
A system app is any app that came pre-loaded on your Android device as part of the operating system or manufacturer software. Android treats system apps differently from apps you install yourself. The operating system protects these apps from standard uninstallation because some of them support core phone functions.
The difference is simple. Apps you download from the Play Store are user apps and can always be uninstalled normally. Apps that shipped with the phone from the factory are system apps and require either the disable method or an advanced ADB-based approach to remove.
Brands like Samsung Galaxy and Oppo tend to ship with a larger number of preinstalled apps compared to more stock Android devices.
How to Disable a Preinstalled App (The Safe Alternative)
Disabling a preinstalled app on Android is not a full deletion, but for the vast majority of situations it achieves the same practical result. When you disable an app, Android removes it from your app drawer, stops it from running in the background, prevents it from sending notifications, and clears its updates to recover some storage space.
The process looks like this:
- Open Settings on your Android phone
- Tap Apps or Application Manager
- Find the preinstalled app you want to disable
- Tap on the app to open its info page
- Tap Disable
- Confirm when prompted
After disabling, the app disappears from your home screen and app drawer as if it were never there.
Which Preinstalled Apps Are Safe to Disable?
This is the question I get asked most often when people start exploring bloatware removal, and it is a fair one. Disabling the wrong app can cause unexpected issues, so it helps to know what is generally safe.
Apps that are generally safe to disable:
- Duplicate browsers that you never use
- Manufacturer app stores you do not need
- Carrier apps installed by your network provider
- Unused Google apps like Google One or Google TV if you do not use those services
- Pre-installed social media apps like Facebook if they came built into the phone
Apps you should never disable:
- Phone and Contacts
- Messages
- Settings
- System UI
- Google Play Services
- Google Play Store
The safest approach, as confirmed through real-world testing across multiple devices, is to only disable apps you clearly recognise as unnecessary. If you are not sure what an app does, leave it alone.
How to Re-Enable a Disabled App
Changed your mind or disabled the wrong app by accident? Re-enabling a disabled Android app is just as straightforward as disabling it, and the whole process takes about thirty seconds.
- Open Settings and go to Apps
- Tap the filter or sort option and look for Disabled apps or All apps
- Find the app you disabled
- Tap Enable to restore it
The app will reappear in your app drawer immediately and return to its normal state. This safety net means you can try disabling apps without worrying about permanently breaking anything.
How Much Storage Do You Actually Get Back? (Real Numbers from Real Phones)
One of the questions people ask before attempting bloatware removal is whether it is actually worth the effort.
Based on hands-on testing of bloatware removal conducted across five Android devices from five different manufacturers, including Samsung, Realme, Oppo, iQOO, and Xiaomi, the answer is yes and the results can be significant.
If your Android phone is constantly showing storage full warnings or running out of room, here is how much storage other users recovered just by removing unused and preinstalled apps from their devices:
| Device | Storage Recovered |
|---|---|
| Realme 9 5G | approximately 2.8 GB |
| Oppo K10 | approximately 1.9 GB |
| iQOO 9 SE | approximately 1.7 GB |
| Samsung Galaxy F23 | approximately 1 GB |
| Redmi Note 11 | least bloatware overall |
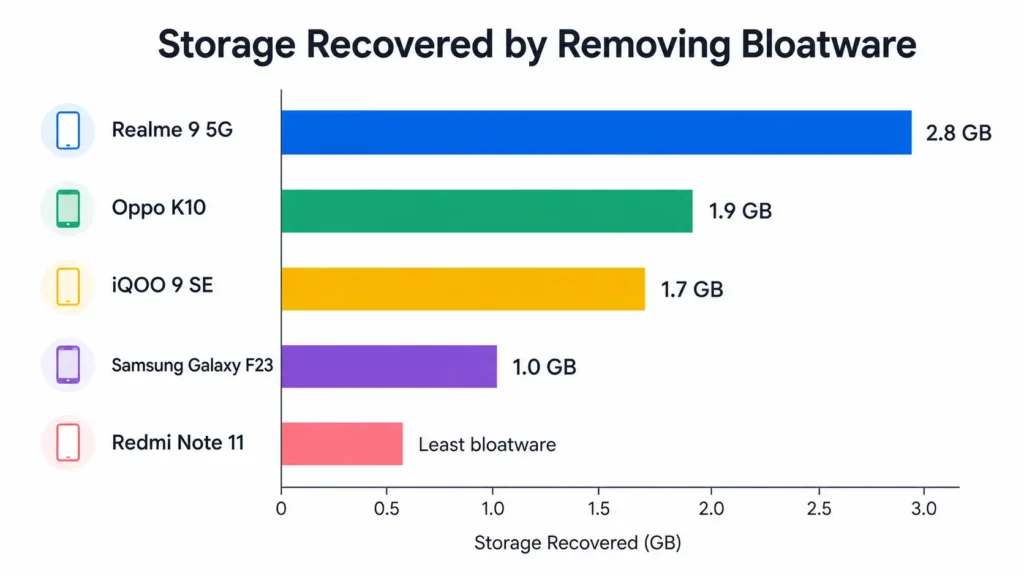
Your own results will vary depending on your phone brand, but recovering 1 to nearly 3 GB without deleting a single photo, video, or personal file is a realistic outcome for most Android users.
These numbers come from hands-on testing where bloatware was removed using ADB tools across each device. The Realme 9 5G recovered the most storage at close to 2.8 GB, while the Redmi Note 11 had the least amount of removable bloatware compared to all other phones tested.
Samsung Galaxy and Oppo devices tend to come with significantly more preinstalled apps than Xiaomi or Redmi phones. This means the storage gains from bloatware removal are often larger on those brands.
Remove Bloatware Without a PC: The LADB Wireless Method
Most bloatware removal guides still say you need a computer. LADB removes that requirement entirely — it brings full ADB functionality directly to your phone over a wireless connection, with no PC needed.
LADB is an app that brings full Android Debug Bridge functionality directly to your phone over a wireless connection, with no PC required.
What You Need Before Starting (Prerequisites)
Before running LADB on your Android phone, make sure you have the following in place:
- Developer Options enabled on your phone (tap Build Number seven times in About Phone to activate)
- Wireless Debugging turned on inside Developer Options
- LADB app downloaded and installed on your device
- Package Name Viewer 2.0 installed from the Google Play Store
Before starting, temporarily uninstall any banking apps — wireless debugging can trigger security lockouts. Reinstall them once you are done. Reinstall them once you are done.
Step-by-Step: How to Use LADB to Remove System Apps
Once your prerequisites are ready, follow these steps carefully:
- Open your phone’s Settings and go to Developer Options
- Tap Wireless Debugging and turn it on
- Tap Pair device with pairing code inside the Wireless Debugging menu
- A popup will show a 6-digit pairing code and an IP address with a port number
- Open the LADB app and enter the 6-digit pairing code in the pairing code field
- Look at the last five digits of the IP address shown in the popup — that is your port number
- Enter the port number into the LADB port field
- Tap OK and LADB will connect to your device
- Once connected open LADB in full screen mode
- Type the following command exactly as shown:
pm uninstall –user 0 [package name]
Replace [package name] with the actual package ID of the app you want to remove. When the command runs successfully you will see the word Success appear and the app will disappear from your phone immediately.
Do not attempt to remove apps like Security, System UI, or any core framework component using this method. Only use LADB to remove apps you are confident are unnecessary bloatware.
How to Find the Package Name of Any App
Every Android app has a unique package name that works like an ID. For example, the Google Chrome browser uses the package name com.android.chrome. You need this exact package ID to run the LADB uninstall command successfully.
There are two ways to find it:
Method A — Through Settings: Go to Settings, tap Apps, find the app, open its info page, and look for the APK name or package name listed there.
Method B — Package Name Viewer 2.0: Download Package Name Viewer 2.0 from the Google Play Store. Open the app and it will display the package name for every app installed on your device, including deep system apps that do not always show their package ID through Settings. This is the method I recommend because it works for every app without exception.
Remove Bloatware Using a PC: The Universal Android Debloater Method
Universal Android Debloater is the most thorough bloatware removal method available for Android without rooting. If you have a Windows, Mac, or Linux computer available, this is the approach I recommend for the deepest and most controlled cleanup.
This approach uses ADB, which stands for Android Debug Bridge, to communicate directly with your device and remove system apps that no other method can touch.
The setup takes about five minutes and every step below is exactly what I follow when using this method.
Step 1 — Enable Developer Options and USB Debugging
Before connecting your phone to a computer, you need to unlock a hidden menu called Developer Options.
- Open Settings on your Android phone
- Tap About Phone
- Find Build Number and tap it seven times in a row
- You will see a message saying Developer Options have been enabled
- Go back to the main Settings screen and tap Developer Options
- Find USB Debugging and toggle it on
- Tap OK to confirm when the warning prompt appears
USB Debugging is an Android app permission that allows your computer to send direct commands to your device through the ADB connection. Without enabling this permission, the connection between your computer and phone will not establish.
Step 2 — Download and Set Up the Tools
You need two things downloaded to your computer before proceeding.
First, download SDK Platform Tools from Google’s official developer website. This is the official ADB package. Extract the downloaded zip file and you will get a folder called platform-tools.
Second, download Universal Android Debloater from its GitHub page. Universal Android Debloater, often called UAD, is a free open-source tool that displays a safe list of removable apps for your specific device. Once downloaded, move the UAD application file directly into the platform-tools folder you just extracted. Keeping both tools in the same folder is important for the connection to work correctly.
Step 3 — Connect Your Phone and Run the Tool
With both tools ready, follow these steps:
- Connect your Android phone to your computer using a USB cable
- When your phone asks how to use the USB connection, select File Transfer mode
- A prompt may appear on your phone asking you to allow USB Debugging from your computer — tap Allow
- On your computer, open the platform-tools folder
- Click on the folder address bar at the top, type CMD, and press Enter to open a Command Prompt window inside that folder
- Type adb devices and press Enter
- Your phone’s serial number should appear in the list, confirming the connection is working
- Now open the Universal Android Debloater application from the same folder
- The tool will automatically detect your device and load a list of apps
To remove an app, search for its name in the UAD search bar, tick the checkbox next to it, and click Uninstall Selection. This is the most effective method available to remove preloaded apps from Android devices without needing root access.
Important Safety Rules Before You Delete Anything
This is the section I want you to read carefully before touching anything in Universal Android Debloater.
The UAD tool organises apps into categories: Recommended, Advanced, Expert, Unsafe, and Untested. Only work within the Recommended category. Apps in the Expert, Advanced, Unsafe, and Untested categories carry a real risk of breaking core phone functions if removed incorrectly.
Do not bulk-delete the entire Recommended list either. Instead, search for specific apps you know you do not need, such as a pre-installed browser you never use, a duplicate app store from your manufacturer, or a carrier app you never consented to having. Removing apps you recognise as unnecessary is safe. Removing apps you cannot identify is not.
Removing bloatware through Universal Android Debloater frees up storage space that Android normally keeps locked away from standard uninstall methods.
How to Restore an App You Accidentally Deleted
Made a mistake? Do not worry. Universal Android Debloater has a built-in restore function that makes it easy to bring back any app you removed.
Here is how to restore a removed app:
- Open Universal Android Debloater with your phone still connected
- Look for the filter or status dropdown menu in the tool
- Change the filter to show Uninstalled apps
- Find the app package you want to restore in the list
- Select it and click Restore
The app will reinstall on your Android device straight away. This restore function is one of the reasons I recommend Universal Android Debloater over manual ADB commands for beginners attempting bloatware removal. Knowing you can undo any mistake makes the whole process much less intimidating.
App Won’t Uninstall? Here Is Exactly Why and How to Fix It
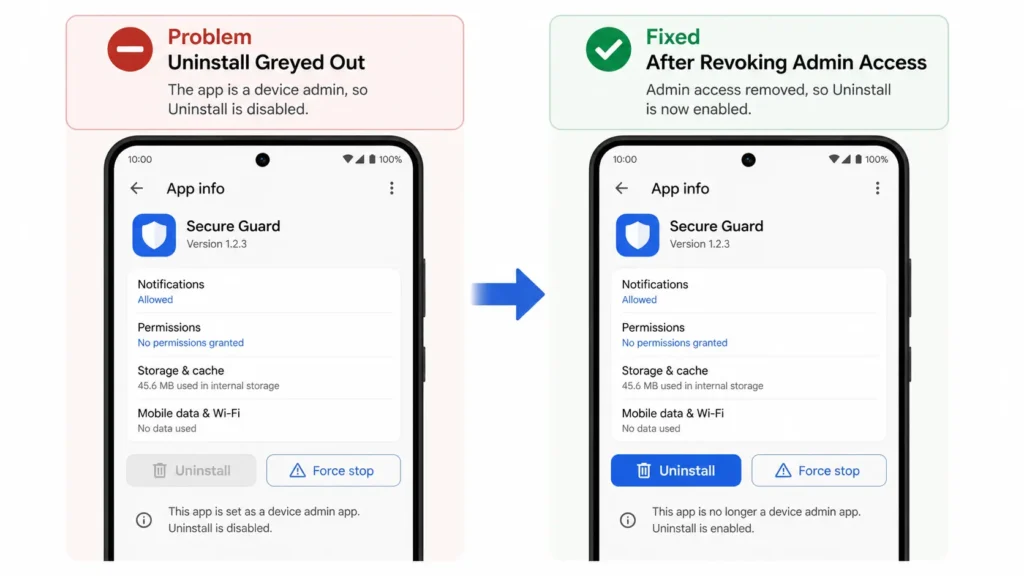
If you have tried to remove an app and the Uninstall button is greyed out or simply not there, there are two specific reasons this happens on Android. Understanding which reason applies to your situation points you directly to the fix.
The first reason is that the app is a system or preinstalled app, which Android protects by default. That situation is covered in the bloatware sections above. The second reason, and the one most people do not know about, is that the app has been granted device administrator permissions on your phone.
Device administrator permission is a security feature Android uses to let certain apps manage or protect the device. When an app holds this permission, Android automatically blocks you from uninstalling it until that permission is removed first.
Why the Uninstall Button Is Greyed Out (Two Reasons)
When the uninstall option is greyed out on Android, the cause is always one of these two things:
Reason 1: The app is a preinstalled system app that Android does not allow standard uninstallation for. In this case, use the Disable method from the earlier section or the UAD method if you want full removal.
Reason 2: The app has active device administrator access. This is why the uninstall option appears greyed out on Android even for apps you downloaded yourself — and it is the one most people never think to check.
Some apps, particularly security tools, parental control apps, or certain work-related apps, request administrator privileges during setup. Once granted, Android will not let you uninstall the app until you manually revoke that access.

How to Revoke Device Administrator Access (Then Uninstall)
This fix works every time once you know where to look.
- Open Settings on your Android phone
- Tap Security or on Samsung Galaxy phones tap Biometrics and Security
- Look for Device Admin Apps or Device Administrators and tap it
- You will see a list of apps currently holding administrator privileges
- Find the app you are trying to uninstall and tap on it
- Tap Deactivate or uncheck the toggle next to the app
- Confirm when prompted
- Now go back to Settings and tap Apps
- Find the app and tap Uninstall
- The Uninstall button will now be available and the app will be removed normally
Revoking device administrator access does not delete the app automatically. Android only removes the protection that was blocking the uninstall. You still need to complete the uninstall step manually after revoking access.
Using a Third-Party App Uninstaller as a Last Resort
If the steps above feel too technical or you want a simpler solution, a third-party app uninstaller from the Google Play Store can handle stubborn apps through a more guided interface.
Search for App Uninstaller in the Google Play Store and choose an option with a high rating and a large number of reviews. Look for one that clearly lists its permissions before installing and does not request unnecessary access to your contacts or location.
Once open, these tools display all your installed apps and let you select multiple apps to remove in one batch. Many of these uninstaller apps also help identify rarely-used apps you may have forgotten about, making them useful for a general phone cleanup as well.
For most users, revoking device administrator access and then uninstalling directly is the more permanent fix. The third-party uninstaller route is a good backup option when you want something quick and simple.
How to Remove Apps from an Android Tablet
Removing apps from an Android tablet works the same way as on a phone, and the core steps are identical. The difference is purely visual — the larger display means Settings menus and app drawer layouts are positioned differently than on a phone screen. .
If you have been following the steps in this guide on a phone, you will find the tablet process immediately familiar.
Using Settings on an Android Tablet:
- Open the Settings app on your Android tablet
- Tap Apps or Application Manager
- Browse the full list of installed apps or use the search bar to find a specific one
- Tap the app you want to remove
- Tap Uninstall and confirm
On Samsung tablets running One UI, the path is Settings, then Apps, then select the app, then Uninstall. The steps are identical to the Samsung Galaxy phone process.
Using Google Play Store on an Android Tablet:
The Play Store method works exactly the same on a tablet. Open the Google Play Store, tap your profile icon, go to Manage apps and device, tap the Manage tab, find the app, and tap Uninstall.
One thing I find useful on tablets specifically is the batch deletion method through the Play Store Manage tab. Because tablets often accumulate more apps due to their larger screen making everything feel more spacious, the ability to check multiple apps and delete them all at once saves a lot of time during a cleanup session.
The long press method also works on Android tablets. Long press any app icon on your home screen or in the app drawer and tap Uninstall when the option appears.
Clean Up What the Uninstall Left Behind: Clearing Leftover App Data
Here is something most guides skip entirely: uninstalling an app on Android does not always remove everything the app stored on your device. This leftover app data on Android — cached files, saved settings, downloaded content — quietly takes up space even after the app itself is long gone.
If you uninstalled several apps expecting a big jump in available storage and the numbers barely moved, leftover app data is likely the reason.
How to Clear App Data Before Uninstalling (Complete Removal)
The cleanest way to remove an app completely is to clear its stored data and cache before you uninstall it. This ensures nothing gets left behind.
Here is how to do it:
- Open Settings and tap Apps
- Find and tap the app you want to remove
- Tap Storage on the app info screen
- Tap Clear Cache first, then tap Clear Data
- Go back to the app info screen and tap Uninstall
- Confirm the uninstall
Clearing app data and cache before uninstalling means Android removes the app itself while the storage it was using has already been freed. This gives you the maximum possible storage recovery from a single uninstall.
How to Find and Delete Leftover App Folders
Even after uninstalling and clearing app data through Settings, some apps leave behind folders in your internal storage with saved files, downloaded content, or cached media.
Here is how to find and remove these leftover folders:
- Open the Files app on your Android phone or tablet
- Tap Internal Storage or Phone Storage
- Browse through the folder list and look for any folder names that match apps you have already uninstalled
- Tap and hold the folder to select it
- Tap Delete and confirm
Removing leftover app folders is one of the most overlooked ways to free up storage on Android after a cleanup session. The standard uninstall process leaves these folders completely untouched, and I am always surprised by how much extra space comes back once I delete them manually.
Quick Summary — Which Method Should You Use?
There are several ways to remove apps from Android and the right one depends entirely on your situation. Here is a simple guide to help you pick the correct method straight away.
| Your Situation | Method to Use |
|---|---|
| Normal app you downloaded | Long press icon or Settings uninstall |
| Removing many apps at once | Google Play Store batch deletion |
| Preinstalled app with no Uninstall button | Disable method through Settings |
| Want full bloatware removal, no PC available | LADB wireless method |
| Want full bloatware removal with a PC | Universal Android Debloater |
| Uninstall button is greyed out | Revoke device administrator access first |
| Storage still not improving after uninstall | Clear app data and delete leftover folders |
Every method covered in this guide works for a real scenario. The question is simply how deep you need to go for your specific situation.
For most users, the long press or Settings uninstall handles everything. If you are dealing with preinstalled apps, start with the Disable method — it is safe and reversible. For deeper bloatware removal, LADB or Universal Android Debloater give you full control without rooting. After uninstalling, clear leftover app data and delete orphaned folders in internal storage to recover the maximum possible space.
Does removing an app from the home screen actually delete it?
No. It only removes the shortcut. The app remains installed and uses storage until you uninstall it through Settings or Play Store.
Why is the Uninstall button greyed out on my Android?
There are two reasons this happens: either the app is a preinstalled system app that Android protects from standard removal, or the app has been granted device administrator permissions. For the second case, go to Settings, then Security, then Device Admin Apps, revoke the permission, and the Uninstall button will become available.
Will removed bloatware come back after a software update?
Bloatware removed through ADB tools like Universal Android Debloater or LADB survives software updates and stays gone. A factory reset versus a standard uninstall works very differently — a standard uninstall is permanent until you reinstall, but a factory reset wipes all user changes and restores every preinstalled app that was removed through ADB tools.
How much storage do you actually get back by removing bloatware?
The amount varies by device brand based on real-world testing across multiple phones. Realme recovered approximately 2.8 GB, Oppo approximately 1.9 GB, iQOO approximately 1.7 GB, and Samsung approximately 1 GB, with Redmi phones generally having the least removable bloatware of all brands tested.
Is it safe to remove preinstalled apps from Android?
Removing obviously unnecessary preinstalled apps like duplicate browsers, unused manufacturer stores, or carrier apps is generally safe. Never remove core system apps like Phone, Messages, Settings, System UI, or Google Play Services, as doing so can affect basic phone functions.